staticV3
Grand Contributor
- Joined
- Aug 29, 2019
- Messages
- 12,736
- Likes
- 21,265
Of course!If you've done a FW update, why not share how you did it?
1. Install Comtrue driver (https://drive.google.com/file/d/11LDzaULXWbtP1fyH6j7sp2S2SOF5ve3x/view?usp=sharing)
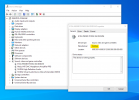
2. Open the Device Manager, go to "Sound, video and game controllers->E1DA Cosmos ADC->Properties" and check that it says "Manufacturer: Comtrue":

That shows that your Cosmos ADC is using the newly installed Comtrue driver.
3. Download the CT7601_ISP_Tool.exe (https://drive.google.com/file/d/14GC1d7RgBIBfV4EkraAlvQReGkDbAAhH/view?usp=sharing)
4. Launch the CT7601_ISP_Tool.exe
5. Turn off Detect Device
6. Make sure that the VID and PID in the CT7601_ISP_Tool match those of your Cosmos ADC. You can check them in the Device Manager.
7. Turn On Detect Device. A green box should appear with a "Device 6012 is exist" message.
8. Click on the "File" button and navigate to the .hex firmware file that you wish to flash onto your Cosmos ADC. Click "Open".
9. Back in the CT7601_ISP_Tool, click on "Auto" to start the update.
Please, before you start the update by clicking on "Auto", make sure that you have a stable USB connection and don't move or touch the Cosmos ADC or the USB cable while the firmware is being written to the Cosmos ADC.
If for some reason the USB connection were interrupted while the firmware is being written to the Cosmos ADC, then that may brick the USB bridge, requiring being sent back to @IVX for recovery.
10. After a moment, the tool will say "Verifying Success". That means that the update is complete. You can now safely close the CT7601_ISP_Tool and plug out the Cosmos ADC.
Last edited: