• WANTED: Happy members who like to discuss audio and other topics related to our interest. Desire to learn and share knowledge of science required. There are many reviews of audio hardware and expert members to help answer your questions. Click here to have your audio equipment measured for free!

AIYIMA D03 class D amplifier "Subjective review"

Toku

Major Contributor
Joined
Apr 4, 2018
Messages
2,433
Likes
2,834
Location
Japan
Yeah, this is a good little amp. I have had this for nearly 2 weeks now and I am pretty stoked to say the least. I am running from my Hama streamer at either 16 or 24/48kHz. I can only tell the sample rate at this point but to be honest it sound good enough and with ease. I am using an Amazon Basics 5m digital coaxial cable so its a pure digital connection and in short, wow! It serves up a crystal clear and punchy sound much better than my Topping E30 running into my Cambridge Audio AM10. The dropout issues have disappeared so I can only put that down internet and windows driver issues, its definitely not this little amp from Aiyima that was causing the problem..
I'm impressed that AIYIMA D03 has surprisingly high sound quality when actually used.
It's very similar to what I felt on D03 and what you felt.
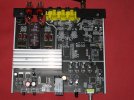
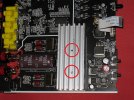
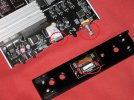
The D03 is still unfinished as a product and I feel it is a little rough, but I think it is an amp that I look forward to future growth.
 

Schlippwhip68

Addicted to Fun and Learning
Joined
Nov 28, 2020
Messages
519
Likes
204
Location
Essex, UK.
Has anyone removed the heatsink on one of these to see if there is adequate thermal compound applied, or tried wreplacing it with some of a known high grade? Is it easy to do?
I was thinking the same thing myself....
 

Toku

Major Contributor
Joined
Apr 4, 2018
Messages
2,433
Likes
2,834
Location
Japan
Has anyone removed the heatsink on one of these to see if there is adequate thermal compound applied, or tried wreplacing it with some of a known high grade? Is it easy to do?
The heat sink of D03 is only fixed with two screws. You can easily remove it by loosening the screw from the back side of the board.
Please refer to the picture of the PC board when I disassembled it.

To pull out the PC board, peel off the four rubber feet on the back of the case and remove the four screws hidden under it.
The rubber feet can be easily peeled off by heating them with a hair dryer.
 

Attachments

  • IMG_3434.jpg
    IMG_3434.jpg
    349.8 KB · Views: 429
  • IMG_3450.jpg
    IMG_3450.jpg
    369.1 KB · Views: 714

Schlippwhip68

Addicted to Fun and Learning
Joined
Nov 28, 2020
Messages
519
Likes
204
Location
Essex, UK.
Did you feel like the D03 sounded better than the Cambridge with both of those?

Edit: While I have not found any actual tests, I just looked up the manufacturers' specifications and IF they are honest, these are both efficient, easy to drive speakers. So the AM10's lack of current would not explain why the D03 sounds better. We're still in the entirely subjective realm, but it is still encouraging news to read, in my opinion. I hope the D03 gets sent o Amir for testing, although since it is a slightly older model and not hyped very much, I rather doubt it will be. Still, for the price, it seems like a "can't lose" situation to purchase one.
If I am honest I haven't spent much time in A/B testing and at present I am still a little excited with the D03 so I don't want to rush any decision at the moment as the visceral influence of my heart might affect my better judgement. I have already said that it sounded much better than my AM10 but I don't believe the Topping E30 is the better choice of DAC for this amp as the AM10 tends to be quite analytical and certainly not on the warmer side of sound. I think maybe the SMSL Sanskrit 10th may have been a better choice as its a warmer dac than the E30. The E30 does however work very well with later Denon amps and possible older Rotels and Arcam amps as they rend to have a warmer sound and the E30 a more analytical approach so matching those amps does produce a very nice detailed balanced sound.
The Mission and Tannoys are as they are describe and easy to drive. I do specifically look for speakers which are above 85db at least so amp matching is an easier task.
The D03 has a very good pure digital path which even with a Amazon Basics coaxial connection from my streamer really surprised me in regards to actual final stage sound quality. I am tempted to pay a little extra and 'upgrade' to a Van Damme Plasma Coaxial cable 75ohm impedance but I am not sure if I will improve anything or whether it really will be noticeable above the Amazon Basics which actually is not listed as 75ohm cable.
I think to take into the equation circumstances and affordability this is a very convenient piece of equipment. That convenience can be a very big deciding factor. I have a lot of power at the end of my fingertips on the desk and a sound that really does not disappoint. The remote control is very good and has no fake buttons either. I think its a waste of time moaning about the oled screen and worrying about screen burn as such. Its fine and after 6000 hours of use I believe I will know the UI enough to operate this amp blind. I chose this over the Loxjie A30 as it has a bit more power under the hood and is a whopping £70 cheaper here in the UK. I ordered via Aliexpress. The D03 is not available on Amazon UK but the D05 is. The D05 is the older model out of the and uses an NE5532 op amp for the Sub Woofer which the D03 does not, the D03 has a better digital path for the sub apparently.
 

Schlippwhip68

Addicted to Fun and Learning
Joined
Nov 28, 2020
Messages
519
Likes
204
Location
Essex, UK.
The heat sink of D03 is only fixed with two screws. You can easily remove it by loosening the screw from the back side of the board.
Please refer to the picture of the PC board when I disassembled it.

To pull out the PC board, peel off the four rubber feet on the back of the case and remove the four screws hidden under it.
The rubber feet can be easily peeled off by heating them with a hair dryer.
SO tempted to do this as I have some hot Austrian thermal past that would not be out of place on the nose cone of a space shuttle re-entering the earths atmosphere....ok slight exaggeration....but its very good stuff. I just need to switch my D03 off to do it...and I am finding it difficult to do so....lol..cant stop listening to it..
 

Schlippwhip68

Addicted to Fun and Learning
Joined
Nov 28, 2020
Messages
519
Likes
204
Location
Essex, UK.
The heat sink of D03 is only fixed with two screws. You can easily remove it by loosening the screw from the back side of the board.
Please refer to the picture of the PC board when I disassembled it.

To pull out the PC board, peel off the four rubber feet on the back of the case and remove the four screws hidden under it.
The rubber feet can be easily peeled off by heating them with a hair dryer.
Are you doing this? If so can you post more pictures?
 

Schlippwhip68

Addicted to Fun and Learning
Joined
Nov 28, 2020
Messages
519
Likes
204
Location
Essex, UK.
The heat sink of D03 is only fixed with two screws. You can easily remove it by loosening the screw from the back side of the board.
Please refer to the picture of the PC board when I disassembled it.

To pull out the PC board, peel off the four rubber feet on the back of the case and remove the four screws hidden under it.
The rubber feet can be easily peeled off by heating them with a hair dryer.
Is it a feasible task in respect of paste and chip compatibility. Would this kind of chip/processor accommodate paste?
 

Schlippwhip68

Addicted to Fun and Learning
Joined
Nov 28, 2020
Messages
519
Likes
204
Location
Essex, UK.
The heat sink of D03 is only fixed with two screws. You can easily remove it by loosening the screw from the back side of the board.
Please refer to the picture of the PC board when I disassembled it.

To pull out the PC board, peel off the four rubber feet on the back of the case and remove the four screws hidden under it.
The rubber feet can be easily peeled off by heating them with a hair dryer.
44-TSSOP-Exposed-Pad-DDV.jpg
 

Schlippwhip68

Addicted to Fun and Learning
Joined
Nov 28, 2020
Messages
519
Likes
204
Location
Essex, UK.
The heat sink of D03 is only fixed with two screws. You can easily remove it by loosening the screw from the back side of the board.
Please refer to the picture of the PC board when I disassembled it.

To pull out the PC board, peel off the four rubber feet on the back of the case and remove the four screws hidden under it.
The rubber feet can be easily peeled off by heating them with a hair dryer.
I'm presuming it looks like something like this...which looks pastable..?
 

Schlippwhip68

Addicted to Fun and Learning
Joined
Nov 28, 2020
Messages
519
Likes
204
Location
Essex, UK.
The heat sink of D03 is only fixed with two screws. You can easily remove it by loosening the screw from the back side of the board.
Please refer to the picture of the PC board when I disassembled it.

To pull out the PC board, peel off the four rubber feet on the back of the case and remove the four screws hidden under it.
The rubber feet can be easily peeled off by heating them with a hair dryer.
Ok, tried to dismantle the D03 but I didn't win. 7 screws, 4 on the bottom and 3 on the rear but the board will not pull out from the front. I don't want to force anything.
 

Doodski

Grand Contributor
Forum Donor
Joined
Dec 9, 2019
Messages
21,604
Likes
21,882
Location
Canada
Ok, tried to dismantle the D03 but I didn't win. 7 screws, 4 on the bottom and 3 on the rear but the board will not pull out from the front. I don't want to force anything.
IIs there a nut on the volume pot at the front panel behind the volume knob? Did you disconnect the FPC from the front panel?
 

Schlippwhip68

Addicted to Fun and Learning
Joined
Nov 28, 2020
Messages
519
Likes
204
Location
Essex, UK.
IIs there a nut on the volume pot at the front panel behind the volume knob? Did you disconnect the FPC from the front panel?
Must have been passing the wind through my mind at the time...i looked at that as well...lol...will check it out later, thanks.
 

Toku

Major Contributor
Joined
Apr 4, 2018
Messages
2,433
Likes
2,834
Location
Japan
Ok, tried to dismantle the D03 but I didn't win. 7 screws, 4 on the bottom and 3 on the rear but the board will not pull out from the front. I don't want to force anything.
I explained it to people who had experience of disassembly last time. It seems that I needed to explain in more detail.

Of course, it is necessary to remove the locknut of the volume shaft to actually pull out the D03 board.
Pull the volume knob toward you to remove it, and the hexagonal locknut on the volume shaft will appear. Remove this with a box wrench.

The three black screws on the back panel have nothing to do with disassembly.

The front panel can be loosened and pulled out by removing the four screws hidden in the rubber legs on the bottom of the main unit. Since the flat cable is connected, carefully pull it out toward you. At this time, two aluminum push buttons will come off, so be careful not to drop them.
Pull out the flat cable connected to the display board on the front panel.

The PC board is integrated with the back panel, pinch the speaker terminal, and pull it out to the rear.

The square part of the amplifier chip is a metal heat spreader that transfers heat to the heat sink. It is set on the PC board so that this metal surface is on top.
Apply thermal grease to this metal surface and bring it into contact with the heat sink.
 

Attachments

  • IMG_3452.jpg
    IMG_3452.jpg
    548.8 KB · Views: 306
  • IMG_3453.jpg
    IMG_3453.jpg
    638.8 KB · Views: 315
  • IMG_3455.jpg
    IMG_3455.jpg
    571.7 KB · Views: 304
  • 44-TSSOP-Exposed-Pad-DDV.jpg
    44-TSSOP-Exposed-Pad-DDV.jpg
    53.1 KB · Views: 273
Last edited:

Schlippwhip68

Addicted to Fun and Learning
Joined
Nov 28, 2020
Messages
519
Likes
204
Location
Essex, UK.
I explained it to people who had experience of disassembly last time. It seems that I needed to explain in more detail.

Of course, it is necessary to remove the locknut of the volume shaft to actually pull out the D03 board.
Pull the volume knob toward you to remove it, and the hexagonal locknut on the volume shaft will appear. Remove this with a box wrench.

The three black screws on the back panel have nothing to do with disassembly.

The front panel can be loosened and pulled out by removing the four screws hidden in the rubber legs on the bottom of the main unit. Since the flat cable is connected, carefully pull it out toward you. At this time, two aluminum push buttons will come off, so be careful not to drop them.
Pull out the flat cable connected to the display board on the front panel.

The PC board is integrated with the back panel, pinch the speaker terminal, and pull it out to the rear.

The square part of the amplifier chip is a metal heat spreader that transfers heat to the heat sink. It is set on the PC board so that this metal surface is on top.
Apply thermal grease to this metal surface and bring it into contact with the heat sink.
Great stuff! Thanks. Still i am not convinced at this point that this may be a legit move. Did the chip already have thermal paste applied?
 

Toku

Major Contributor
Joined
Apr 4, 2018
Messages
2,433
Likes
2,834
Location
Japan
Great stuff! Thanks. Still i am not convinced at this point that this may be a legit move. Did the chip already have thermal paste applied?
Of course, the heat sink is attached by applying thermal paste.
However, like A07 and A04, the case of D03 gets quite hot in the summer season. Are you worried about the fever of D03?
The heat generation of D03 is at a level that is not a problem. I have been using it for 3 months in a row with the power on, but there is no problem. It doesn't get that hot anymore in the current season.
 

Schlippwhip68

Addicted to Fun and Learning
Joined
Nov 28, 2020
Messages
519
Likes
204
Location
Essex, UK.
Of course, the heat sink is attached by applying thermal paste.
However, like A07 and A04, the case of D03 gets quite hot in the summer season. Are you worried about the fever of D03?
The heat generation of D03 is at a level that is not a problem. I have been using it for 3 months in a row with the power on, but there is no problem. It doesn't get that hot anymore in the current season.
Ok, what paste did you use and how big is the chip surface?
 

Toku

Major Contributor
Joined
Apr 4, 2018
Messages
2,433
Likes
2,834
Location
Japan
Ok, what paste did you use and how big is the chip surface?
I just removed the heat sink and checked the condition, and attached the heat sink as it was without repainting the grease.
It was a brand new product just arrived from China and I didn't feel any deterioration of the grease.
If you want to repaint the grease, you can use the thermal grease used in the CPU cooler of your computer.
 

Schlippwhip68

Addicted to Fun and Learning
Joined
Nov 28, 2020
Messages
519
Likes
204
Location
Essex, UK.
I just removed the heat sink and checked the condition, and attached the heat sink as it was without repainting the grease.
It was a brand new product just arrived from China and I didn't feel any deterioration of the grease.
If you want to repaint the grease, you can use the thermal grease used in the CPU cooler of your computer.
Ok, I decided to repaste the chip after all. Is a new unit but i reckon its worth doing if you use better than average paste. Its a little piniky as there are two small plastic spacers to consider so be careful not to lose them. I used Noctua NT-H2 paste ( https://www.amazon.co.uk/s?k=Noctua+NT-H2&ref=nb_sb_noss). Its a good quality paste with an 5 year operational lifespan. There is a separate small aluminium plate in addition to the heatsink that had paste on both sides, one for the chip and one to hold it into plate on the heatsink. I think overall the results will be positive and better paste will help to maintain a cooler temp.

Update: The amp is noticeably cooler when running or at least takes longer to get warm. The housing is not even warm in half of the time like it was prior to the paste upgrade.


Attachments

  • IMG_1077.JPG
    IMG_1077.JPG
    166.9 KB · Views: 316
  • IMG_1078.JPG
    IMG_1078.JPG
    233.2 KB · Views: 331
  • IMG_1082.JPG
    IMG_1082.JPG
    114.7 KB · Views: 320
  • IMG_1083.JPG
    IMG_1083.JPG
    140.2 KB · Views: 290
Last edited:

Schlippwhip68

Addicted to Fun and Learning
Joined
Nov 28, 2020
Messages
519
Likes
204
Location
Essex, UK.
What I have noticed is that the aux will only reach 96khz sample rate. I could not achieve a higher sample rate with my Topping E30.
 
Top Bottom