• WANTED: Happy members who like to discuss audio and other topics related to our interest. Desire to learn and share knowledge of science required. There are many reviews of audio hardware and expert members to help answer your questions. Click here to have your audio equipment measured for free!

Topping PA5 Review (Amplifier)

Grooved

Addicted to Fun and Learning
Joined
Feb 26, 2021
Messages
682
Likes
441
Thanks @gamerpaddy

i should have used jumper wires instead, so i can take a thermal photo of the underside.
View attachment 237622
I was thinking the same as soon as I saw two sides in this module.
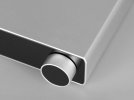
Now, if it get hot on the underside too, it will be hard to cool it, unless you have enough space bellow, and place a copper plate in U shape, making a sandwich of this module, and then adding a heat sink on the top.
I already did it on a module like this, with chips on both sides but only the ones on the top had good contact with the heat sink. The other were too hot, and after making and placing this U form, it was perfect.
 

Maciekw

Member
Joined
Nov 26, 2021
Messages
25
Likes
29
So, after this https://www.audiosciencereview.com/...owners-only-please.33293/page-48#post-1350183
i took apart my pa5 and depotted that mystery module (it got pretty hot). didnt took as long as i expected. some heat gunning and careful prying and cleaning afterwards.

View attachment 237611
View attachment 237612

So lets depot it, i got some experience in this from my last project
View attachment 237613View attachment 237615


Its a 4 layer PCB...
even ripped off a ressitor as a bonus (which is weird since i didnt put a lot of force and my temp was below 260C. i think it had bad soldering from the factory. one of the possible failure points.)

it consist of
2 NE5532 (outputs are going (via resistors) to the output pins.)
View attachment 237617
and
2 OPA1612A (at the input)
View attachment 237616

The RC network on each side (top) has the PFFB lines going in and goes to the output pins directly
its literally this.. i didnt found a place where the legs of R3 went other than the reisistors nearby. no connection to the rest of the circuit.
View attachment 237618


those golden pogo pins are not connected to ground! neither the case has been its anodizing scraped off, its just a snap in retainer (theres small dents in the case) so the potting compoung can flow beneath.


So i put it all back together, obviously without the shielding to see if something is getting hot.
it works again... both channels at the same volume level. weird.
maybe micro degradation of one of those opamps, ne5532 is very reliable, not sure of that opa1612 tho.
or cracked solder joints due to the potting compound contracting/expanding over time.

View attachment 237620

i should have used jumper wires instead, so i can take a thermal photo of the underside.
View attachment 237622


its running great again, sounds like before even without the metal can. lets see how long.
Excellent job. And makes it probable that the failure of any PA5 is a matter of time. For one PA5 this time will be longer, and in another the problem may appear much earlier.
Well, unless Topping decides to give a module with appropriate heat sinks in place of the covered box.
 

gamerpaddy

Member
Joined
Mar 6, 2022
Messages
71
Likes
320
Location
Germany
i found that the circuit has different values than the Ti reference document recommends.

Ti Recommends R_fb=33k for a TPA3255, topping uses 9.9k (3x3.3k)
for R_fb_gnd they recommend 10k, but 750 ohms is being used.
the input stage is a very low noise and distortion gain stage with a gain (inverting) of about 1.77x
the output stage have a gain of roughly 1.21x
the output resistors are about 6.99k (tpa3255 has 20k input impedance, thats a gain of 0.67x)
if im not mistaken.

both in and outputs are capacitively coupled.

pretty low gain stages, very high feedback. this explains why its overall gain is so low but also why it measures so well.

i dont think heat sinking the module would help, but a softer potting compound would. im still on that thermal expansion idea with solder joints cracking.
the opa and ne5532 is rated to run at 125 and even 150°C, it wont get that hot at any time.
 

jasonhanjk

Active Member
Joined
Mar 24, 2019
Messages
253
Likes
181
So which IC gets hot? The 5532 or the Opa?
Heat up due to load draws too much current or higher supply voltage.
 

trungdtmc

Active Member
Joined
Mar 9, 2022
Messages
129
Likes
83
On my DAC, op amps operation at +-12vdc but NE5532s or LM4562s alway hotter than opa1612s, muse02s
 
Last edited:

Toku

Major Contributor
Joined
Apr 4, 2018
Messages
2,435
Likes
2,839
Location
Japan
i dont think heat sinking the module would help, but a softer potting compound would. im still on that thermal expansion idea with solder joints cracking.
the opa and ne5532 is rated to run at 125 and even 150°C, it wont get that hot at any time.
Their temperature is the junction temperature (Tj) of the silicon chip. This is the limit temperature below which the device will not be destroyed.
When designing equipment, we normally use the recommended operating conditions in the data sheet.
According to it, the operating temperature of OPA1612 and NE5532 is +85℃ (device surface temperature).
 

Attachments

  • OPA1612_2.png
    OPA1612_2.png
    222 KB · Views: 81
  • NE5532_2.png
    NE5532_2.png
    143.9 KB · Views: 83

gamerpaddy

Member
Joined
Mar 6, 2022
Messages
71
Likes
320
Location
Germany
i was looking at the absolute max. ratings, not the recommended ones.
but if they would have overheated, they would be dead or permanently damaged by now.
it works just fine since i replaced that resistor and put it back together.
 

norcalscott

Active Member
Forum Donor
Joined
Oct 30, 2020
Messages
199
Likes
330
Location
Sierra Foothills
i was looking at the absolute max. ratings, not the recommended ones.
but if they would have overheated, they would be dead or permanently damaged by now.
it works just fine since i replaced that resistor and put it back together.
You mentioned in your earlier post that a resistor had come off the board when you disassembled the potting. I wonder if this was an issue with that part in which the solder was not quite right and at operating temperature it was losing its connection? I assume you re-soldered that resistor?

Also interesting that Topping seem to be driving this circuit to its absolute max. Would be worthwhile to re-test one of the "fixed" units to see if the "fix" is to change out some components to make it more reliable, but also not test as well.
 

gamerpaddy

Member
Joined
Mar 6, 2022
Messages
71
Likes
320
Location
Germany
probably, bad choice of solder, too little solder or thermal stress.

i would be interessted to figure out whats causing this leaves crackling and the other issues but 99% of the people sending their units back. gotta wait a year or two for them to show up on ebay as broken / for parts.
 

xrk971

Member
Audio Company
Joined
Nov 19, 2021
Messages
68
Likes
269
Location
Metro Wash. DC
Nice work Gamerpaddy. Is the main amp chip a 3255 or 3251? It makes a difference because TI recommended PFFB Rfb for 3251 is 18kohms. I wonder what Rin is set at if you happened to trace that when you were looking at the values. That would tell us the gain it is set at. I speculated earlier that opamp gain would be set at 9dB or 2.81x.

Anyhow, good to see that it is not a composite amp but just tweaked values on the PFFB circuit optimized for low distortion and reduced gain.

6B11C310-E567-4ADD-A0B2-B285EFBB31E2.jpeg
 

Lräk

Member
Joined
Jul 7, 2022
Messages
73
Likes
87
Location
Santa Clara, CA
i was looking at the absolute max. ratings, not the recommended ones.
but if they would have overheated, they would be dead or permanently damaged by now.
it works just fine since i replaced that resistor and put it back together.
Do you remember which resistor? That might be a clue to why the module fails.
 

gamerpaddy

Member
Joined
Mar 6, 2022
Messages
71
Likes
320
Location
Germany
doesnt have to be the same part in all failure cases. i dont think it was this resistor in particular since its on the left side, my right side failed.
maybe i reattached a part on the right while heating the potting compound.

Unbenannt.PNG
 

Lräk

Member
Joined
Jul 7, 2022
Messages
73
Likes
87
Location
Santa Clara, CA
look up smd resistor EIA 3 and 4 digit markings, its just a higher precision part. both are 680ohms
Is that 680 ohm part of the input R_ob_fb listed in Fig 2?

If so, then if it was not connected, the input would probably rail to one of the supplies and not function correctly.
 

Toku

Major Contributor
Joined
Apr 4, 2018
Messages
2,435
Likes
2,839
Location
Japan
A teaser photo reminiscent of the L50 ll and PA5s has been posted on Twitter.
I'm concerned about messages that say "What's the new upcoming set?"
But it is strange that there is no slit for heat dissipation!
 

Attachments

  • FfgQbLGXkAAD_Uc.jpg
    FfgQbLGXkAAD_Uc.jpg
    31 KB · Views: 213
  • FfgQbLHXkAYSWaJ.jpg
    FfgQbLHXkAYSWaJ.jpg
    24.6 KB · Views: 210

nsfgp

Active Member
Joined
Dec 27, 2020
Messages
200
Likes
185
Cool news/pic @Toku Yeah without the slit (and the min/max/knob-position markings) it may also be a new E50 II with a volume knob?! Just another guess.
Anyway ... typically Topping marketing ... which IMHO works pretty well for them ... SMSL should do more of these teaser things for upcoming products.
 

Roland68

Major Contributor
Joined
Jan 31, 2020
Messages
1,462
Likes
1,280
Location
Cologne, Germany
i dont think heat sinking the module would help, but a softer potting compound would. im still on that thermal expansion idea with solder joints cracking.
the opa and ne5532 is rated to run at 125 and even 150°C, it wont get that hot at any time.
probably, bad choice of solder, too little solder or thermal stress.

i would be interessted to figure out whats causing this leaves crackling and the other issues but 99% of the people sending their units back. gotta wait a year or two for them to show up on ebay as broken / for parts.
I think it's great that you had the courage to open it and it turned out so well.

The potting compound makes absolutely no sense at this point and in such a device.
They probably wanted to protect your circuit, which in this way, in this day and age, is absolute nonsense. Even encapsulation with high-quality epoxy resin can be removed again for reengineering.
There are good ways to protect such a circuit with little effort and without effects, but apparently Topping doesn't know about them.

If the problems are actually gone without the cover and potting compound, then, as you correctly suspect, the expansion of the materials could lead to contact problems (e.g. cracking/breaking of the solder joints). One should not underestimate the forces that can occur.

Since Topping probably has no experience in this area, I guess another problem.
Poor cleaning of the circuit board before encapsulation, as well as a too cheap or incorrect encapsulation compound, can result in leakage currents over time. The same happens if there is no pre-treatment and trapped moisture with subsequent gradual oxidation.
Also, I don't see any baked-on conformal coating on the board that should be applied prior to such a potting to prevent many of these problems.
 
Top Bottom