With liquid flux you may extend your rule to perhaps ~6-10 seconds in total between all operations with the iron. I won't go near a SMD PCB and IC without liquid flux.it's super easy to overheat the thin traces on the pcb so use the 3 second rule


With liquid flux you may extend your rule to perhaps ~6-10 seconds in total between all operations with the iron. I won't go near a SMD PCB and IC without liquid flux.it's super easy to overheat the thin traces on the pcb so use the 3 second rule
With liquid flux you may extend your rule to perhaps ~6-10 seconds in total between all operations with the iron. I won't go near a SMD PCB and IC without liquid flux.
just ordered some!With liquid flux you may extend your rule to perhaps ~6-10 seconds in total between all operations with the iron. I won't go near a SMD PCB and IC without liquid flux.
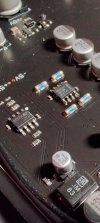
Well with the air gun it'll be pretty easy to pull off. I see that the 1656 is considerably better than the stock chip.the crooked op-amp, you'll see a tiny capacitor right above it, and the resistors nearby. do your desoldering on the other side and do each leg at a time on the side with the capacitor to be safe. it's super easy to overheat the thin traces on the pcb so use the 3 second rule with all of the legs on these tiny op-amps. the other op-amp is much easier to get to and easier to remove. I suggest you get your eye in with that op-amp. The whole job should take 30-45 minutes for both op-amps including soldering the new replacements into place. Look for the specs of the opa1678 and use that as a guide so you are actually upgrading and not downgrading! There are many suitable op-amps that you can replace them with.
I finished the job on my DA9, will do the SA200 when the new flux I ordered arrives. Went in fine though and it sounds good. The SA200 swap will be the telltale for SQ though as it powers LS50s at my desk and the DA9 takes care of some old Event 20/20s in my garage streaming Bluetooth. Cheap air gun worked really well then I just used a fine tip on my Weller to tack then flow the new chip.@Pillars there's a reason why I bought them in bulk. I still have 6 that are new for later projects.
No problem, went real easy! I rather like the sound coming from the AO200 now.
It's not a small difference but a fairly significant upgrade. Considering the cost per piece at retail pricing, I can't see why they didn't just use the opa1656's to begin with.
The DAC in the AO200 is infinitely better than the one in the DA-9, mathematically speaking--he DA-9 has no DAC, other than the DAC built into the Bluetooth receiver. I'm not sure about the quality of the DAC in the AO200. I believe one poster, maybe Toku, said it was serviceable but not great.What's the story on the DACso in these 2 SMSL amps? Is one better than the other?
The DAC in the AO200 is infinitely better than the one in the DA-9, mathematically speaking--he DA-9 has no DAC, other than the DAC built into the Bluetooth receiver. I'm not sure about the quality of the DAC in the AO200. I believe one poster, maybe Toku, said it was serviceable but not great.
I've wondered about that myself, but since I don't use Bluetooth, I never bothered to ask. What makes me curious is that the Amazon listing for the A0200 actually says, "Don't support APTX." Neither mentions LDAC support.Thanks for replying. Actually, it's the Bluetooth DAC that I'm interested in. Wondering if one is better than the other. I think they are both limited to aptx?
I've wondered about that myself, but since I don't use Bluetooth, I never bothered to ask. What makes me curious is that the Amazon listing for the A0200 actually says, "Don't support APTX." Neither mentions LDAC support.
The DA9 and AO200 have the same module I believe so, no.I have a DA9. Definitely does not do LDAC. IF the ao200 did aptx-hd I'd buy 1
Hello. I ordered the ao200 amp. I read your post and I want to replace the default op amp. Can I prepare 2 OPA1656IDs, a heating gun, an electric iron, etc.? And I am planning to purchase a heating gun and an electric iron that can control the temperature. Can I set the temperature to around 300 degrees?It's not a small difference but a fairly significant upgrade. Considering the cost per piece at retail pricing, I can't see why they didn't just use the opa1656's to begin with.
I air gunned it with my gun at 400. Took a bit to heat, gently lift and do not pull. Do not let it drift into the components next to the chip either during the lift. I then placed the 1656 down and tacked one corner with a fine solder tip (Weller at level 7-8) and a tiny bit of solder. Then I tipped each contact point from there, no longer than a couple seconds. Lightly soldered tip for each pin. Slight downward pressure after the first pin then reflow the first pin at the end. That part is optional, I've got a steady hand.Hello. I ordered the ao200 amp. I read your post and I want to replace the default op amp. Can I prepare 2 OPA1656IDs, a heating gun, an electric iron, etc.? And I am planning to purchase a heating gun and an electric iron that can control the temperature. Can I set the temperature to around 300 degrees?
600°- 650°F (316°- 343°C) is a good place to start for lead-based solder and 650°- 700°F (343°- 371°C) for lead-free solder.Hello. I ordered the ao200 amp. I read your post and I want to replace the default op amp. Can I prepare 2 OPA1656IDs, a heating gun, an electric iron, etc.? And I am planning to purchase a heating gun and an electric iron that can control the temperature. Can I set the temperature to around 300 degrees?
Hello. I ordered the ao200 amp. I read your post and I want to replace the default op amp. Can I prepare 2 OPA1656IDs, a heating gun, an electric iron, etc.? And I am planning to purchase a heating gun and an electric iron that can control the temperature. Can I set the temperature to around 300 degrees?
I air gunned it with my gun at 400. Took a bit to heat, gently lift and do not pull. Do not let it drift into the components next to the chip either during the lift. I then placed the 1656 down and tacked one corner with a fine solder tip (Weller at level 7-8) and a tiny bit of solder. Then I tipped each contact point from there, no longer than a couple seconds. Lightly soldered tip for each pin. Slight downward pressure after the first pin then reflow the first pin at the end. That part is optional, I've got a steady hand.
600°- 650°F (316°- 343°C) is a good place to start for lead-based solder and 650°- 700°F (343°- 371°C) for lead-free solder.
It is much better if you use liquid flux when working on surface mount PCBs. It will give you more time to do the work before damaging/overheating stuff and the end result looks much better. You only need a small drop on each side of the IC and it will clean up nicely with some isopropyl alcohol and a cue tip.
Thank you very much for your reply. As your comment, I will try to use AO200 for at least 2 weeks first and consider replacing the op amp. I bought 2 pieces of OPA1656ID, heat clip, a pen type flux and solderwick. In addition to these I also bought a DO200 dac for the AO200. I'm really excited@Pillars uses a method is tried and true. It takes less time using his method. His warning about not heating up surrounding components is critically important.
First listen to your amplifier for a while, as in 2 weeks or so minimum. Get really used to how it sounds so you can truly hear the difference when you do roll the op-amps. Plus if your amplifier is going to have an issue, it will come out within the first 2 weeks *usually first 2 hours*.
I hope you have a good DAC of reasonable quality or better. One that has adjustable volume so you can use the AO200 at max volume and use the DAC as a pre-amplifier.
It's not a difficult job, it just takes a steady hand, the right soldering iron, hopefully you have a heat clip so you can work and lift the op-amp off if it is being stubborn and a heat clip keeps you from losing the op-amp should you heat up the board excessively and it flies off. The clip will keep you from losing the factory op-amp. You do not need high speed here, you only need temperature.
Take your time, don't rush anything, protect the other surrounding components. Have new thermal grease, hopefully paste to replace the factory white thermal grease ready, you're going to want to remove all of the original thermal white grease *warning it gets everywhere and is very difficult to get out of clothing. Use Isopropyl alcohol or rubbing alcohol to remove and wipe off the original stuff. Just take your time.
Above all else, I would wait 2 weeks or so to be sure that your amplifier is problem free before you start modifying anything. You may be satisfied with the sound from the original amp before mods.