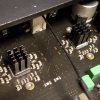
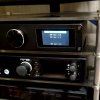
FYI for all those who have read and are contemplating swapping the two opa1678's for something different:
Make sure you unplug the amplifier and preferably let it sit for a while, maybe 30 minutes to deplete the capacitors of any stored electricity as a precaution.
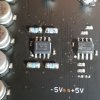
Make sure you are very comfortable with a soldering iron. It's better to have temp control. You need to wick the solder across the pins and do it gently so you do one leg at a time. You need a "Heat-Clip", do a row of 4 legs 1 leg at a time, only let your soldering iron have contact for 3-5 seconds at a time. You run the risk of overheating the trace itself that has what I assume is a Discrete Surface Mount (DSM) capacitor on two sides of the op-amp. So do one leg at a time of the eight legs, one row at a time, all the while lightly tugging on the heat clip. Once you get a row of 4 done, do the other side, the other side of 4 legs will be much easier and do the same, one leg at a time. use good soldering wick. I use Hako wick with wax, the thinnest one and then the next step thicker ones for this sized op-amp. Once you have the first row of 4 legs unsoldered, you can apply just a tiny bit more upward force, it's ok to bend the legs a little since you can easily bend them back into place. All the while make sure you don't stay in one spot for more than those 3-5 seconds. It's tedious work. Once you get probably 6 of the legs unsoldered, you can use your wick and soldering iron and go across the legs and it should just lift straight off with next to zero effort. The trick is to get the wick to do the work for you. Don't try and unsolder the op-amp with a vacuum pump style de-soldering tool, it'll take too much space, and it'll obscure your view.
When soldering on your new op-amps do the reverse, but make sure you remove all the flux from the board and excess solder from the circuit board using the wick. I just use my soldering iron at a slightly higher temp when soaking up excess solder. Then use flux remover, or Isopropyl alcohol with a q-tip to clean off the resin and flux. Readjust the temperature on your soldering iron that you just had raised a short while ago, lower the temp to the appropriate melting temp of your solder of choice. Apply a tiny dab of new solder on each of the 8 spots on the PCB where the op-amps will be placed. This is done so that when you locate and centre the new op-amp all you have to do is heat up a leg at a time. All this time you should have the new op-amp held with a pair of "Heat-Clips" for maneuvering and locating the chip. You can press down hard with the op-amp and heat clip when soldering the eight legs, do one at a time. And remember that 3-5 second rule still applies. Use your mobile and zoom in to make sure you're centred and have indeed applied solder completely on each leg, without having solder touch the next pin over! It'll just set the op-amp into protection if you do, and it won't blow up your amp, but it will make noise if you mess up with soldering. A tiny amount of excessive solder can easily cause a short. Once you get both chips done, it's finished.
Make sure that you are clearly identify that you are only attending to the two opa1678's! The reason why (part of the reason why DC offset is different on the two channels is the obvious length of the circuit board.
I prefer Texas Instruments Burr-Brown op-amps and have done for years, something about their tone has always seemed a little bit wetter and a bit more authoritative while maintaining crystal clear highs. The newer the op-amp the better in general. Look at slew rates, compare the data sheet that I posted with PDF files included earlier in the thread. You want to look at the date of publication to confirm how new or old the op-amp is. Just because an op-amp is old doesn't mean it's bad btw. Some are excellent performers on paper and also have the sound to back it up. With TI/Burr Brown, they have a line called "Sound-Plus" that is designed for higher fidelity use. Some have higher temperature ratings as well.
I do have some LME49680's, also a TI part that is excellent sounding.
https://www.ti.com/lit/ds/symlink/l...https%3A%2F%2Fwww.ti.com%2Fproduct%2FLME49860
A completely different character to the sound. I tried them both on the A0200. Sure one is much older in design, but that definitely doesn't make it a poor performer. However the op-amp is more designed for headphone amps as they are totally capable of driving a 600ohm load with no difficulty.
I'm still trying to figure out where the ST72C op-amps go to. I'm assuming still that it's for sub-out, though it could just as easily be used for RCA/Single ended input though I doubt it highly. Actually, I can test it very easily with a continuity test but I don't want to tear the amplifier back down again!
Please understand that when you are modifying anything that you are doing so of your own free will. I am not responsible for any equipment failures or damage or burns caused by your modification.
You WILL hear a significant difference with different op-amps. I had mentioned in other posts that op-amp rolling is almost useless, but that is completely dependent on how it is implemented. The circuit is far more important than the actual op-amp itself to be able to hear significant improvements. The implementation of the op-amp into a circuit is critical to the performance benefits or lack thereof. The A0200 definitely will benefit from a better op-amp. Just be careful of how much additional gain you might put through the amplifier. But then there's always the soft-clipping feature. You will not always hear clipping, if you hear clipping, usually some damage is done to a speaker or other components within an amplifier as you've sent a DC signal through an analogue portion of the amplifier. They're not supposed to see any form of DC voltage or squared off sinewaves.
I have not managed to drive the A0200 with the OPA1656's op-amps with my RME ADI DAC-2 fs into clipping. In fact the amplifier and speaker combination in my room is excessively loud if I try and get close to clipping levels of Decibels. I have to leave the room! And zero evidence of clipping.
It is in my personal opinion a modification that is well worth the effort. Even the several generations older OPA1612 which is a solid performer on which the 1656 is based is still a solid performer though the bass is less forceful.
With the new op-amps, I can say that the bass has much more force than with the standard op-amps. The rest of the sound is just on a different level. It's a huge improvement. Now I can truly say that the A0200 is as close to my tiny tube amplifier and probably beats it. Not hands down, but I would be comfortable in saying that it definitely can play music extremely well. It will not only shock you at how much better it sounds, but will outshine so many amplifiers in the sub $1500 price point that is a power amplifier that has XLR inputs and single ended inputs.
You do need to know which op-amps work in what type of circuit, but the information is floating out there and so is actual TI customer support.
Newer op-amps seem to have the edge over the older generation in very broad terms. The MUSES01 is extremely expensive, that is all. It's about 10 years old. And back then it was indeed a revelation, today most op-amps comprehensively outperform them at a mere fraction of a fraction of the price. In Japan, the MUSES01 is about $35 each even today. You can buy op-amps that out class, out perform it for $3 each! Every measurement, every sound test and graph will show you that the 01 op-amp is living on legacy rather than performance. Also, maybe there's a little bit of a status symbol type of reverence given to it due to the price?
Happy listening, and if you do decide to mod your amp and it's your first time doing so, find something else that is basically scrap so you can practice removing parts. And also have the necessary heat-clips. Glorified crocadilly alligator clips made of aluminium. They have both straight and angled types. I prefer the angled type so as to give me a clearer view of the op-amp. But you can certainly use either. Have your supplied on hand and ready. Practice with something that you don't care about before embarking on the modification if you're not sure about your skill/comfort level. I've made a tutorial of sorts to help with those with less experience with removing the original op-amps. You should certainly save the originals. You can re-use them and would want to re-fit them in the event you need to send your amp in for repair/service. The cleaner your soldering job, the less likely you are to be flagged for modification resulting in failure.
Cheers guys and gals!

")