• WANTED: Happy members who like to discuss audio and other topics related to our interest. Desire to learn and share knowledge of science required. There are many reviews of audio hardware and expert members to help answer your questions. Click here to have your audio equipment measured for free!

Looking for insight into box/bracing design for 2.5-3 ft3 sealed subwoofer

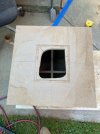
Subs rarely needs bracing. Frequencies are too low to be a potential problem.

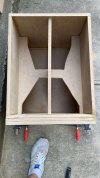
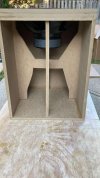
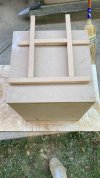
It's not about what frequencies the sub is producing, but the fact that the internal pressure, the energy can excite panel resonances, so bracing is about breaking them up by shifting them up higher in frequency and damping their overall output.

Someone mentioned the Thor subwoofer. It's net internal volume is around 1.75 cubic ft. and is corner braced. As the enclosure gets larger and displacement goes up, bracing is just good practice to have your bases covered.

Even commercial manufacturers use bracing. It increases cost and shipping weight, so they wouldn't do it if it wasn't necessary.
 
What do you mean
It seems very likely that a 1/2" offset will not be very "linear". You can test this in the real world. Both distortion and amplitude.
How do I take into account room transfer function>? Is that the same thing as room gain?
You can compare the anechoic response (calculated or measured in the near field) with the measured response at the listening position and the subwoofer at the subwoofer position. The difference between them is the function we are looking for. You can use any subwoofer or speaker for this. Sealed is more convenient.
Room gain is usually an essential component.
I am new and not familiar with everything.
Don't worry, everyone was a beginner once)
 
Update

The box is starting to take shape. I made the box out of 5/8 mdf instead of .75 inches. I thought it would be nice to be a bit lighter. BIG MISTAKE. Historically, most of my driver's mounting depth was about 10mm. This one was 20mm! I had to triple baffle the front because the depth is 20mm / .78 inches. This also provided a huge challenge for my router as I didn't have any router bits that went 1.89 inches deep—had to cut as deep as I could safely and then use a jigsaw.

From there, the driver didn't want to sit flush, most likely due to the precision of a novice using a jigsaw is not great. OD was perfect, but inner was not great. Spent two days sanding.

I should have just gone with a window brace, but I wanted to get a bit fancy and secure all panels with a cross brace. I was going to cut out the braces to be hollow but was so frustrated with the front baffle that I just called it a day.

I got the plate amp today, it is tiny! Will start working on the back to cut it out. Most likely using the jigsaw. Any tips for using a router instead to carve out the back to fit the plate amp?
 

Attachments

  • wPUXVUTM.jpg
    wPUXVUTM.jpg
    273.4 KB · Views: 61
  • DE4Fv-O7.jpg
    DE4Fv-O7.jpg
    219.4 KB · Views: 56
It isn't pretty, but I'm just learning. Here are a few more updated photos. I had to make a jig out of MDF to flush mount the rear amp.

Box is basically done, sanding is all thats left. Filling in a few holes etc. Going to veneer the whole sub. Either walnut or something fun like zebra wood.
 

Attachments

  • cy07fv29.jpg
    cy07fv29.jpg
    279.8 KB · Views: 60
  • 8LnGdaB-.jpg
    8LnGdaB-.jpg
    260.4 KB · Views: 63
  • 6LXSZPw9.jpg
    6LXSZPw9.jpg
    365 KB · Views: 64
  • lL9Wic4s.jpg
    lL9Wic4s.jpg
    299.7 KB · Views: 57
Here's the sub that I recently built... I agree with Sigberg on the overengineering comment. I don't want any part of my box moving around, even theoretically, and since it falls into the hobby realm, the extra time and effort required to do it is part of the fun. :)

View attachment 398063

Doing it with braces that run from front-to-back, all the way from the lip of the sub, means that in the end, the sub is pushing on the whole box, rather than just the front baffle. For this front baffle to flex, the sub is going to have to be pushing hard enough to physically compress solid wood.

View attachment 398064

Here's what the bracing looked like once it was glued. This is just before I slathered the entire interior in automotive anti-resonance rubberish paint.

View attachment 398065

No bearing on the bracing, but since I'm posting pics, here's what it looked like from the outside after glue up. Took 10x longer to make than if I had gone the square box route, but what I lost in time I gained in multiples when it came to WAF. I have not heard a single grumbling comment from the powers-that-be on these (or the speakers that go on top, which are generally similar), even though they objectively take up more space than my old monkey coffins. ;)
Seriously interested to see a build/project thread on that one!
 
Back
Top Bottom