
daniboun
Major Contributor
Hi amigos,
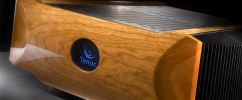
Following the ASR review of the 3E Audio 480-1-29A Module, I decided to roll up my sleeves and show you that with a little elbow grease, you can create a very beautiful amplifier based on these nice 3E Audio modules. I called this project, "Bamboo"> the pictures will speak for themselves)
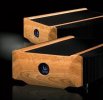
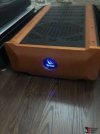
I've shared the list of materials you'll need, below. I decided to shape the front panel of the case with a bamboo board that I chamfered and cut. (thickness 10mm). This is what will give all the charm to the case.)) I don't use the stock aluminum front panel because I don't need that volume knob and generally speaking, I don't really like it.
To make some improvements and move towards a qualitative project, I replaced the 2.54mm XH cables supplied with the modules with shielded XH cables. For the other cables, I opted for copper cables with a section of 1mm2 up to 2mm2 which I took care to twist and sheath +added isolated faston connectors. I opted for some good quality gold plated acrylic isolated binding post; (they are almost similar to those of the AHB2 Benchmark.) For the balanced inputs, I am using some Neutrik plugs.
To optimize heat dissipation, I increased the contact between the heatsink of the module and that of the case via thermal adhesive / paste (the ones used for CPUs works well) I had to orient the PSUs laterally, for obvious internal layout reasons. (space is limited) Fortunately, These PSUs have holes to be screwed sideways and they are also placed face to face. For the more observant, you will have understood that I was inspired by the Soncoz SGP1 in a global way, whose power supply was placed with the heatspread upwards.
3E Audio 480-1-29A Mono module Review
A few tips :
- Bring a good little soldering iron and a tool kit, but that's obvious)
-Transfer the measurements of the fixing holes to an A4 sheet before carrying out any drilling. Think carefully about the arrangement of elements coherently
-Do not attach any electronic element to the case without testing first, golden rule)
-The case is almost ready to use, you will need to readjust the upper holes for the XLR connectors (diameter of 2.2cm) and think about the fixing holes.
-Do not neglect any soldering if you make your cables yourself) carry out continuity tests using a multi meter. This step is important.
- For beginners, you can find ready-to-use Faston isolated cables on Amazon or other...
-Always twist your cables, it doesn't take much time.
-For the indicator light, take a 220V LED, easier to implement).
-The EMI filter is optional but practical if you have a somewhat outdated electrical installation.
-Ground your PSU/case for safety
-Remember to check the VDC voltage at the PSU outputs, ensure that the two PSUs have the same voltage level to avoid level differences between the two channels (The ones I use can be set from 42V to 48V)
It's a design that will take a little time and know-how, but it's worth it!
Count approximately between 350€ / 400€ for this project.
At this price, this amp will have no competition)
NB : It took me a short weekend to put everything into action.)
What you need :
Pre-drilled Enclosure in a solid brushed aluminum / side heat dissipation
PSU MP-H250S48 with active PFC
IEC Power block with mini switch
XH 2.54MM shielded cables
XLR Neutrik plugs NC3FAH-0
Gold plated acrylic isolated binding post
220V LED
Bamboo board (Any with thickness of 10mm from Amazon (about 10€)


Following the ASR review of the 3E Audio 480-1-29A Module, I decided to roll up my sleeves and show you that with a little elbow grease, you can create a very beautiful amplifier based on these nice 3E Audio modules. I called this project, "Bamboo"> the pictures will speak for themselves)
I've shared the list of materials you'll need, below. I decided to shape the front panel of the case with a bamboo board that I chamfered and cut. (thickness 10mm). This is what will give all the charm to the case.)) I don't use the stock aluminum front panel because I don't need that volume knob and generally speaking, I don't really like it.
To make some improvements and move towards a qualitative project, I replaced the 2.54mm XH cables supplied with the modules with shielded XH cables. For the other cables, I opted for copper cables with a section of 1mm2 up to 2mm2 which I took care to twist and sheath +added isolated faston connectors. I opted for some good quality gold plated acrylic isolated binding post; (they are almost similar to those of the AHB2 Benchmark.) For the balanced inputs, I am using some Neutrik plugs.
To optimize heat dissipation, I increased the contact between the heatsink of the module and that of the case via thermal adhesive / paste (the ones used for CPUs works well) I had to orient the PSUs laterally, for obvious internal layout reasons. (space is limited) Fortunately, These PSUs have holes to be screwed sideways and they are also placed face to face. For the more observant, you will have understood that I was inspired by the Soncoz SGP1 in a global way, whose power supply was placed with the heatspread upwards.
3E Audio 480-1-29A Mono module Review
A few tips :
- Bring a good little soldering iron and a tool kit, but that's obvious)
-Transfer the measurements of the fixing holes to an A4 sheet before carrying out any drilling. Think carefully about the arrangement of elements coherently
-Do not attach any electronic element to the case without testing first, golden rule)
-The case is almost ready to use, you will need to readjust the upper holes for the XLR connectors (diameter of 2.2cm) and think about the fixing holes.
-Do not neglect any soldering if you make your cables yourself) carry out continuity tests using a multi meter. This step is important.
- For beginners, you can find ready-to-use Faston isolated cables on Amazon or other...
-Always twist your cables, it doesn't take much time.
-For the indicator light, take a 220V LED, easier to implement).
-The EMI filter is optional but practical if you have a somewhat outdated electrical installation.
-Ground your PSU/case for safety
-Remember to check the VDC voltage at the PSU outputs, ensure that the two PSUs have the same voltage level to avoid level differences between the two channels (The ones I use can be set from 42V to 48V)
It's a design that will take a little time and know-how, but it's worth it!
Count approximately between 350€ / 400€ for this project.
At this price, this amp will have no competition)
NB : It took me a short weekend to put everything into action.)
What you need :
Pre-drilled Enclosure in a solid brushed aluminum / side heat dissipation
PSU MP-H250S48 with active PFC
IEC Power block with mini switch
XH 2.54MM shielded cables
XLR Neutrik plugs NC3FAH-0
Gold plated acrylic isolated binding post
220V LED
Bamboo board (Any with thickness of 10mm from Amazon (about 10€)
Last edited:

")