-
Welcome to ASR. There are many reviews of audio hardware and expert members to help answer your questions. Click here to have your audio equipment measured for free!
You are using an out of date browser. It may not display this or other websites correctly.
You should upgrade or use an alternative browser.
You should upgrade or use an alternative browser.
B&W M-1 - After market table stand and wall mount suggests
- Thread starter Guddu
- Start date
Guddu
Major Contributor
- Joined
- Feb 10, 2020
- Messages
- 1,562
- Likes
- 1,545
- Thread Starter
- #3
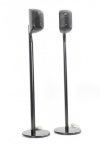
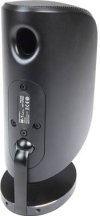
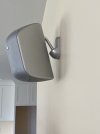
Looks like these were designed firmly around the original, interchangeable floor/desk/wall mounts:
View attachment 379174 View attachment 379176 View attachment 379175
Do these not work for you, can you just not find them on the used market?
The new ones from B&W cost as much as the speakers themselves, haven’t seen any on used market as well.
Trying to find some cheaper options.
Thanks
There was a change in the mounting architecture several years ago so if you do find some on ebay make sure they fit whichever version of the speakers you have. I sourced a pair of the floor-standing mounts a few years ago but they were for the old format and ended up in the garbage. Painful lesson.

High-Quality Speaker Mounts & Stands | Mount-It!
Enhance your audio experience with Mount-It's versatile speaker mounts & stands. Ideal for any setup, they blend style & room function seamlessly.

StandsandMounts.com | TV Stands and TV Mounts | Free Shipping
A sleek and stylish alternative to floor-standing speaker stands, these wall and ceiling speaker mounts are designed to save valuable floor space and raise your speakers to ear-level, allowing higher quality surround sound. If you have any questions about installation, weight capacity or product...
www.standsandmounts.com
You pretty much have to use the official mounts because they make up part of the wiring. The end of the short ball socket post (part of the speaker) has a mini coaxial connector in the end. The various stand options provide a way of connecting to that coax and hooking up normal speaker wires.
The original M1's had rubber on the top and bottom.
The newer M-1's have perforated metal over the top and bottoms.
The stands are not compatible between the two generations.
Older M1 (rubber top):

Newer M-1 (perforated metal top):

Coax connector PCB In the base (older M1 - I think):

The original M1's had rubber on the top and bottom.
The newer M-1's have perforated metal over the top and bottoms.
The stands are not compatible between the two generations.
Older M1 (rubber top):
Newer M-1 (perforated metal top):
Coax connector PCB In the base (older M1 - I think):
Last edited:
I'm pretty sure that picture of the connector is the old format, as you surmised.
Yep.I'm pretty sure that picture of the connector is the old format, as you surmised.
This is what the wall mount for the newer M-1 looks like:
Guddu
Major Contributor
- Joined
- Feb 10, 2020
- Messages
- 1,562
- Likes
- 1,545
- Thread Starter
- #9
Thanks guys, appreciate all your responses.
This is what I ended up doing:
- unscrewed the attached hook/leg
- cut the cable that goes through the hook/leg
- put any QD connector for easy connection
- then you can use any wall mount available in market, like wali etc.
* it still looks neat and clean, no need to pay insane amount to get original assembly or something.
Hi are you able to provide more detailed photos (or video) of your process and result?Thanks guys, appreciate all your responses.
This is what I ended up doing:
- unscrewed the attached hook/leg
- cut the cable that goes through the hook/leg
- put any QD connector for easy connection
- then you can use any wall mount available in market, like wali etc.
* it still looks neat and clean, no need to pay insane amount to get original assembly or something.
View attachment 383457
View attachment 383458
Guddu
Major Contributor
- Joined
- Feb 10, 2020
- Messages
- 1,562
- Likes
- 1,545
- Thread Starter
- #11
Hi,Hi are you able to provide more detailed photos (or video) of your process and result?
Somehow this one escaped me, but it’s really what I explained in earlier post.
Unscrewing the 5 screws on back plate exposes the wire connected to the handle/arm.
You can then cut it for your use, it will then look like what you see in the pic in above post.
I installed that quick connect plug to connect other end of speaker cable but you can do any connector or bare wires.
When those screws are removed, then you can use any after market wall mount, like I did WALI brand, put it on any of those screws as you like.
Here is end result:
Guddu
Major Contributor
- Joined
- Feb 10, 2020
- Messages
- 1,562
- Likes
- 1,545
- Thread Starter
- #13
I used cheap WALI mounts from Amazon and it’s been solid.hello,
i am trying to solve similar problem with old bw m1 mk1/
is it also possible to do a ceiling install? thanks!
@Guddu what stand did u use? where did u buy it?
thanks!
Speakers are on heavier side for ceiling, I would say. But it might just be okay if you install mounts securely on studs, however I would avoid such a speaker on ceiling.
Guddu
Major Contributor
- Joined
- Feb 10, 2020
- Messages
- 1,562
- Likes
- 1,545
- Thread Starter
- #15
I used these: https://a.co/d/bmVdykw@Guddu
do u have a link to that WALI mounts?
These are heavy for mounting on ceiling a mounts like WALI or even the original mounts that come with it.what do you mean by - heavier side for ceiling?
Probably any ceiling or in-wall speakers, not an on-wall speaker.Why avoid such a speaker on ceiling? Any tip for some other model which suits better?
but does it matter how heavy if u use proper screws?These are heavy for mounting on ceiling a mounts like WALI or even the original mounts that come with it.
i am so confused... basically i wanted to expand to atmos 4 ceiling speakers, and i was told that in case the sofa is close the wall in my case 50cm, its better to use these speakers so u can angle them, and for a front ceiling to use in-ceiling with adjustable tweeter.
thanks
Last edited:
Guddu
Major Contributor
- Joined
- Feb 10, 2020
- Messages
- 1,562
- Likes
- 1,545
- Thread Starter
- #17
I believe it should be fine as long as proper anchor-screws are used onto studs.but does it matter how heavy if u use proper screws?
My comments were un relation with wali mounts I used.
The base metal plate is placed on surface secured with 2 screws. Then the fiber/plastic mount (whose other half is mounted on speaker) slides in with metal base. The assembly is connected with a nut. This whole combination seems okay for on-wall installation to me, but I still have doubts about on-ceiling setup.
Please have a look at some youtube video to see how this WALI mount comes together and then decide.
RolloTomassi
New Member
- Joined
- May 11, 2025
- Messages
- 1
- Likes
- 1
Hihello,
i am trying to solve similar problem with old bw m1 mk1/
is it also possible to do a ceiling install? thanks!
@Guddu what stand did u use? where did u buy it?
thanks!
The M1 manual explicitly warns against ceilng installs. And that's with the original stock wall mounts. For liability purposes I am sure, but just something to be informed about.
In any case, IMHO attaching 2,3-kg speakers to these 3,5-rated Wali mounts with just one screw and mounting this whole thing to a ceiling = helmet use mandatory.
Similar threads
- Replies
- 13
- Views
- 2K
- Replies
- 45
- Views
- 7K
- Replies
- 179
- Views
- 19K


