BadAudioAdvice
Active Member
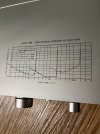
Based on the measurements printed on the case, seems like this offers SOTA performance ")
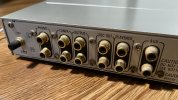
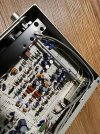
The only problem is that the input select isn't behaving nicely. I need to position it in-between inputs, otherwise the Left channel is very distorted (sometimes it works OK in the actual position, but usually not).
I was thinking that it would be a quick fix with some Deoxit, but I'm not at all familiar with how they implemented the selector switch.
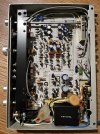
Also, when taking off the bottom, I was struck by how beautiful IMO the circuit board is, the tidy wiring, layout, and the labelling on the circuit board.
Any advice appreciated, and enjoy the pics!
The only problem is that the input select isn't behaving nicely. I need to position it in-between inputs, otherwise the Left channel is very distorted (sometimes it works OK in the actual position, but usually not).
I was thinking that it would be a quick fix with some Deoxit, but I'm not at all familiar with how they implemented the selector switch.
Also, when taking off the bottom, I was struck by how beautiful IMO the circuit board is, the tidy wiring, layout, and the labelling on the circuit board.
Any advice appreciated, and enjoy the pics!