• WANTED: Happy members who like to discuss audio and other topics related to our interest. Desire to learn and share knowledge of science required. There are many reviews of audio hardware and expert members to help answer your questions. Click here to have your audio equipment measured for free!

Small 2-way speakers with linear on-axis and power response characteristics (Scan Speak and SB Acoustics drivers). H&V off-axis measurements included

@XMechanik, I'm about to assemble the crossovers so I'm looking carefully at the information you provided in your first post. Unfortunately, When I don't completely understand what's going on I was trained to compare all sources of information. From doing so it appears that C2, C3, and C4 are different in location and value in the two circuit diagrams (the one labeled "Filter Design" and the one contained in the VituixCad information). The VituixCad information matches the Parts List and the diagram with red and blue lines so I've assumed that it is the correct circuit.
The numbering in the component list is based on the VituixCad schematic. The XMachina schematic is provided only as an illustration for the initial phase of the crossover design process. At the circuits assembly stage refer to the VC schematic and numbering.
 
Last edited:
I'm about to start a build and have some questions please :

1. What is the position and orientation of the brace?
2. It is stated that the port should be adjusted to 140mm. I guess this includes the flange?
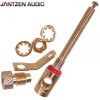
3. What terminals have people been using?

I've made a 3d model of the port adjusted to 140mm. Please see attached. I printed the prototype in ABS but PLA would probably do as well.

Print Settings
  • Layer height: 0.2mm.
    1724843437233.jpg
  • Extrusion width: 0.4mm, forced.
  • Infill percentage: 40%
  • Infill type: grid, gyroid, honeycomb, triangle, or cubic.
  • Wall count: 4.
  • Solid top/bottom layers: 5.
  • Supports: NONE.
I'll probably print the final ports in Nylon Carbon fibre as its probably the closest I have to PVC (which the commercial port is made of).
 
Last edited:
I've made a 3d model of the port adjusted to 140mm. Please see attached. I printed the prototype in ABS but PLA would probably do as well.

I'll probably print the final ports in Nylon Carbon fibre as its probably the closest I have to PVC (which the commercial port is made of).
FWIW, I've seen commercial ports made w/ PVC, ABS and polypropylene. I certainly wouldn't hesitate to use an ABS port.
 
I'm about to start a build and have some questions please :

1. What is the position and orientation of the brace?
It was installed between the side panels right in the middle. But I've found in some research that this type of bracing is not very effective so in my second pair it wasn't installed at all.

2. It is stated that the port should be adjusted to 140mm. I guess this includes the flange?
Yes but since the flange is 2..3mm thick it has not a big impact on BR tuning (and btw note a minor difference that there is 145mm in the description).

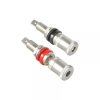
3. What terminals have people been using?
jantzen_term1591131909.0763.jpg
Used them in the original design.
jantzen_term1591215780.4959.jpg
Used in the second pair.
 
Congratulations on your amazing result @XMechanik.

This thread and @amirm's review have inspired me to build some.

If I used solid wood panels instead of plywood, would that have a dramatic effect on the results?
 
Congratulations on your amazing result @XMechanik.

This thread and @amirm's review have inspired me to build some.

If I used solid wood panels instead of plywood, would that have a dramatic effect on the results?
Building loudspeaker cabinets with solid wood panels, or even glued wood, is the ultimate challenge even for very experienced carpenters.
The wood, like tonewood, has to be properly stored and dried for years. That is very expensive.
Otherwise the cabinet can crack and warp everywhere.
I would definitely recommend multiplex wood panels, but at least well-seasoned 3-layer plywood
 
Thank you for replying. How do you make the plywood more aesthetically pleasing then?
 
Thank you for replying. How do you make the plywood more aesthetically pleasing then?
Miter joints rather than butt joints, as XMechanik did with his second build, would be a start.
Baltic birch is the most common plywood choice because its accessible, has consistent build quality w/ low or no voids, and is easy to work with. However, birch can be challenging to stain (inconsistent/blotchy) when finishing, so you'll want to consider gel stains and/or pre-conditioning or light sealing before staining if you want to emulate walnut or other colors.
Building with MDF and then veneering is very common and can produce great results, but comes with its own set of challenges and vulnerabilities.
 
Last edited:
Thank you so much for taking the time to post such a helpful reply @Jim Taylor.

Laminate appeals to me. I'll try to work out how to do that on an assembled box. Maybe that self-adhesive stuff mentioned at the end is the way to go.
 
Miter joints rather than butt joints, as XMechanik did with his second build, would be a start.
Baltic birch is the most common plywood choice because its accessible, has consistent build quality w/ low or no voids, and is easy to work with. However, birch can be challenging to stain (inconsistent/blotchy) when finishing, so you'll want to consider gel stains and/or pre-conditioning or light sealing before staining if you want to emulate walnut or other colors.
Building with MDF and then veneering is very common and can produce great results, but comes with its own set of challenges and vulnerabilities.
Thank you @Inertiaman. I wasn't aware of the second build. I'll take a look.
 
Thank you @Inertiaman. I wasn't aware of the second build. I'll take a look.
Post #219 here Only a couple photos. The benefit is you eliminate the visible laminations at the 4 primary corners. It may also avoid the need for clamps by using the "folding" method with painters tape on joint edges when assembling the box.

His front baffle is still butted to the cabinet, so you've still got visible laminations on the perimeter of the baffle. Painting only the baffle (whether MDF or plywood), including the edges, would cover those laminations and give a nice contrast to the woodgrain on the main panels, and isn't hard to do. Matte black only on the baffle is MUCH easier to execute than a nice painted finish on the entire cabinet.
 
I'm about to start a build and have some questions please :

1. What is the position and orientation of the brace?
2. It is stated that the port should be adjusted to 140mm. I guess this includes the flange?
3. What terminals have people been using?

I've made a 3d model of the port adjusted to 140mm. Please see attached. I printed the prototype in ABS but PLA would probably do as well.

Print Settings
  • Layer height: 0.2mm.
  • Extrusion width: 0.4mm, forced.
  • Infill percentage: 40%
  • Infill type: grid, gyroid, honeycomb, triangle, or cubic.
  • Wall count: 4.
  • Solid top/bottom layers: 5.
  • Supports: NONE.
I'll probably print the final ports in Nylon Carbon fibre as its probably the closest I have to PVC (which the commercial port is made of).

3d Model updated to 145mm port length.
 

Attachments

  • Mechano23_port_rev3.zip
    283 KB · Views: 34

Find it somewhat difficult to search the DIY market for complete kits. Complete in the way that everything like chassis’ and wood panels are included so that the customers would just have to start assembling it.

Where for instance can I find a complete kit for Scan Speak chassis’ equipped DIY bookshelf loudspeakers, like the one in the pic?
There are very few complete kits for DIY Speakers available. Meniscus was the main source in the US but they closed down over a year ago. Most DIY designs are just the work of people willing to share their work with no interest in selling (selling kits is not profitable without having some scale). The few places with some kits in the US are Parts Express, Madisound, CSS and probably a few others that don't come to mind.
 
Well, guess I'm also someone who finally registered after a long time of lurking around. (Thanks to XMechanik's designs.) I'm from the Netherlands and I've build several DIY speaker designs in the past. I've also casually designed them myself. (Not worth sharing technical details as for example crossovers aren't really phase or time adjusted properly.)

For my next pair I'd like to use another well executed design and at this moment I'm really leaning towards your designs, XMechanik. The quest for a linear frequency response within a reasonable budget brought me here. I would like to build either the design from this thread, or the Semi classic 3-way with AMT. Can someone steer me into making the right choice? ~325 square feet room, Low-mid volume listening. Music/Movies 65-35. I'll be using a pre-amp with integrated dsp so further tuning is possible to counter any annoying room nodes. (for example.)
 
Last edited:
Well, guess I'm also someone who finally registered after a long time of lurking around. (Thanks to XMechanik's designs.) I'm from the Netherlands and I've build several DIY speaker designs in the past. I've also casually designed them myself. (Not worth sharing technical details as for example crossovers aren't really phase or time adjusted properly.)

For my next pair I'd like to use another well executed design and at this moment I'm really leaning towards your designs, XMechanik. The quest for a linear frequency response within a reaonable budget brought me here. I would like to build either the design from this thread, or the Semi classic 3-way with AMT. Can someone steer me into making the right choice? ~325 square feet room, Low-mid volume listening. Movies/Music 40-60. I'll be using a pre-amp with integrated dsp so further tuning is possible to counter any annoying room nodes. (for example.)

I habitually forget to say this, so I'd like to get my two cents in before my afternoon nap : Welcome to ASR! :)

Jim
 
I would like to build either the design from this thread, or the Semi classic 3-way with AMT. Can someone steer me into making the right choice? ~325 square feet room, Low-mid volume listening. Music/Movies 65-35. I'll be using a pre-amp with integrated dsp so further tuning is possible to counter any annoying room nodes. (for example.)
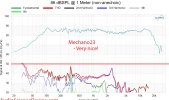
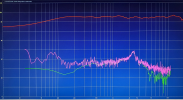
One objective and evident advantage of Mechano323 over Mechano23 is the THD level for mid frequencies. But when listening at low and medium levels this difference may be unnoticeable.

86dB_Mechano23 Open Source DIY 2-way bookshelf speaker THD distortion Measurement.jpg
THD Mechano23 from the review by Amir,

m23_THD_cl3.png
THD Mechano23 (my measurement)

thd_m323.jpg
and THD for Mechano323.

All measurements for 86dB/1m.
 
Back
Top Bottom