KamuDesigns
Member
- Joined
- Dec 18, 2022
- Messages
- 33
- Likes
- 53
I was playing around with some Tectonic Audio Labs TEBM36S12-4/A that I ordered for a tws bt speaker pair and I noticed that these little drivers sound incredibly good when crossed over from 300-400hz. They have a unique characteristics that you forget you are listening to speakers and the music just is. They have definition, but they are not fatiguing even with poor masters. Even the reflected sound around my house is more pleasing and clean than with conventional speakers and I think that's because of the bmr's excellent polar response.
SInce I have another pair why not build a proper speaker with these right?
I also had 2 Reckhorn d165i subwoofers still unused so I took a quick look at the sensitivities and they were a match at 83db/w and both 4 ohm speakers.
Then I just had to open up vituixcad and see if they can be passively crossed over.
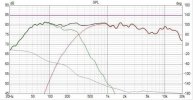
First I simulated them (1st picture)at 300hz 12db/o xover and it seemed nice so I ordered the parts from h3llsound since they had quite a lot of clearance items. 6.8mH and 120uF for woofer and 68uF and 3.3mH for bmr.
I am building these for fun and they'll be given away as a xmas present to a person who deffo needs some good speakers
 so I also needed an amp for them.
The most important was convenience so I ended up with Arylic Up2Stream Plate amp.
It has streaming support, bt, aux, wifi, ethernet etc and A DSP!
With dsp I can only design the basic xo and leave bsc and other necessary corrections to the dsp.
Power was a bit on the low side for this particular build with 2x40w@4ohm, but that's good for some 93db and that's more than that person will ever use!
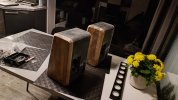
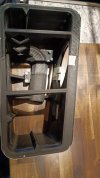
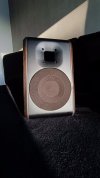
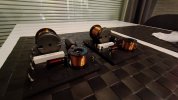
Since I was unpatient to hear these out, I took apart old chorus aw-10hqi kit speaker that was in my warehouse collecting dust.
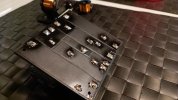
I printed an adapter for the sub and a modified the cad model baffle to be wg for the bmr and also carry the bmr enclosure (Image4).
While in simulation all was fine and tandy I forgot to take into account that the bmr enclosure is quite small and it raises the fs. That alongside having a bmr driver that was not broken in caused a big hump at 250hz which was a bummer. Most of it went away with some excersice, but there definately still was a hump in the bmr at 250hz.
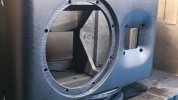
Fortunately and unfortunately the hump wasn't an issue in the repurposed enclosure. These Chrorus Speakers used a multi chamber enclosure in which the driver magnet actually plugs one of the divider walls. Changing the driver meant that the first segment now worked as a 270hz resonator attenuating all the frequencies around the upper limit of the woofer. Or at least that's my reasoning why the upper bass is attenuated...
So back to the drawing board:
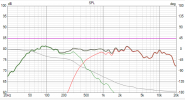
Another version with 450hz 12db/o xo (image2).
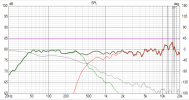
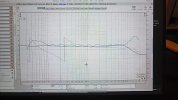
The response is without bsc. Bsc is simulated with measured response in cabinet and with the wavequide. (image 3)
At first the waveguide was mostly cosmetic choise. I tried to simulate it in hornresp, but the results differed. There was a lot more amplitude gain. Fortunately the fundamental peak stayed in the target frequency so I just needed to change 1 resistor value.
The waveguide also got rid of the 5-7k dip and raised the +10k response by at least 15db. But hey that's good since it's easier to work with more than less.
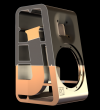
I ordered new xo parts right away, finished the cad model (image 5). It's a 7L br tuned to 45hz since that worked quite well as a sub for small satellite speakers.
Currently printing the 1st enclosure from pla. The parts will be then sanded and the painted or vinyl wrapped.
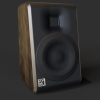
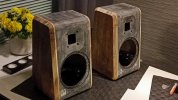
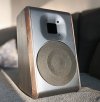
Wooden side panels are to be made with a handheld router using flush trim bit and then 45 angle bit. End result should look something like image 6.
SInce I have another pair why not build a proper speaker with these right?
I also had 2 Reckhorn d165i subwoofers still unused so I took a quick look at the sensitivities and they were a match at 83db/w and both 4 ohm speakers.
Then I just had to open up vituixcad and see if they can be passively crossed over.
First I simulated them (1st picture)at 300hz 12db/o xover and it seemed nice so I ordered the parts from h3llsound since they had quite a lot of clearance items. 6.8mH and 120uF for woofer and 68uF and 3.3mH for bmr.
I am building these for fun and they'll be given away as a xmas present to a person who deffo needs some good speakers
The most important was convenience so I ended up with Arylic Up2Stream Plate amp.
It has streaming support, bt, aux, wifi, ethernet etc and A DSP!
With dsp I can only design the basic xo and leave bsc and other necessary corrections to the dsp.
Power was a bit on the low side for this particular build with 2x40w@4ohm, but that's good for some 93db and that's more than that person will ever use!
Since I was unpatient to hear these out, I took apart old chorus aw-10hqi kit speaker that was in my warehouse collecting dust.
I printed an adapter for the sub and a modified the cad model baffle to be wg for the bmr and also carry the bmr enclosure (Image4).
While in simulation all was fine and tandy I forgot to take into account that the bmr enclosure is quite small and it raises the fs. That alongside having a bmr driver that was not broken in caused a big hump at 250hz which was a bummer. Most of it went away with some excersice, but there definately still was a hump in the bmr at 250hz.
Fortunately and unfortunately the hump wasn't an issue in the repurposed enclosure. These Chrorus Speakers used a multi chamber enclosure in which the driver magnet actually plugs one of the divider walls. Changing the driver meant that the first segment now worked as a 270hz resonator attenuating all the frequencies around the upper limit of the woofer. Or at least that's my reasoning why the upper bass is attenuated...
So back to the drawing board:
Another version with 450hz 12db/o xo (image2).
The response is without bsc. Bsc is simulated with measured response in cabinet and with the wavequide. (image 3)
At first the waveguide was mostly cosmetic choise. I tried to simulate it in hornresp, but the results differed. There was a lot more amplitude gain. Fortunately the fundamental peak stayed in the target frequency so I just needed to change 1 resistor value.
The waveguide also got rid of the 5-7k dip and raised the +10k response by at least 15db. But hey that's good since it's easier to work with more than less.
I ordered new xo parts right away, finished the cad model (image 5). It's a 7L br tuned to 45hz since that worked quite well as a sub for small satellite speakers.
Currently printing the 1st enclosure from pla. The parts will be then sanded and the painted or vinyl wrapped.
Wooden side panels are to be made with a handheld router using flush trim bit and then 45 angle bit. End result should look something like image 6.