I really enjoyed the two pairs of branded speakers I have right now when I brought them home. The first pair for a while longer than the second, though they both ended up disappointing me eventually (and for the same reason!)
I won't waste too much time building up to what you obviously already know this thread is about from the title - cabinet resonance. Resonances in the upper bass and lower midrange in particular were Pair 1's problem.
Pair 1 would get excited with the right snare at medium to medium-high levels (upper bass/lower midrange range),
Pair 2 was "better" in that its problems didn't show up until higher frequencies. Not better because it took significantly less than the snare energy of Pair 1 to start muddying up vocals just 250-400Hz higher. The resonance was remarkably low Q (excitable from more than just 383Hz and 534Hz, 370 and 562 were almost as problematic, and all the frequencies in between, plus many surrounding, though they were slightly less so....
I thought to myself "what to do, what to do?!", sans quotes.
First I'll tell you what I didn't do - what I didn't do, was change cabinet volume - I didn't want to throw off the tuning of either pair, but especially Pair 1 was important to not muck with. They're 2.5 ways with midbass drivers in separate compartments, each compartment sized and tuned to create a larger, more sophisticated sound than one typically expects from compact floorstanders, even in their price range. They extend effortlessly to below 40Hz, and, if a room they're in interacts with their sound in unfortunate ways, they are uniquely adaptable - the chamber tuned lower is ported to the front to allow for good dispersion in tighter places (compact, remember?). And if you're getting punched too hard in the chest with every kick, all you have to do is shove your bung in a hole (or 2!). I think I've said enough to explain why I don't want to change the volume of Pair 1 now.
Pair 2 is kind of funny in that its structure is made of constrained-layer-damped boards specifically designed to damp resonances. Multi-layer construction with some layers made of rubber or something... I can't remember anymore. Anyway, it is remarkably effective... right up to the point it starts being remarkably ineffective. What a problem for a sealed design! They definitely aren't short on bass or extension... and I really enjoy its quality and control. But with Q just a bit below 1, I can't imagine I can take too much of the (already limited) space away from the woofer and keep everything I like the way I like it
The enclosures! Pair 1 and Pair 2...
Pair 1 made from (what I can tell) really dense, knot free hardwood boards 0.75" to 1.5" thick, randomized and glued in parallel.
Pair 2 made from that exotic stuff...
What I did was
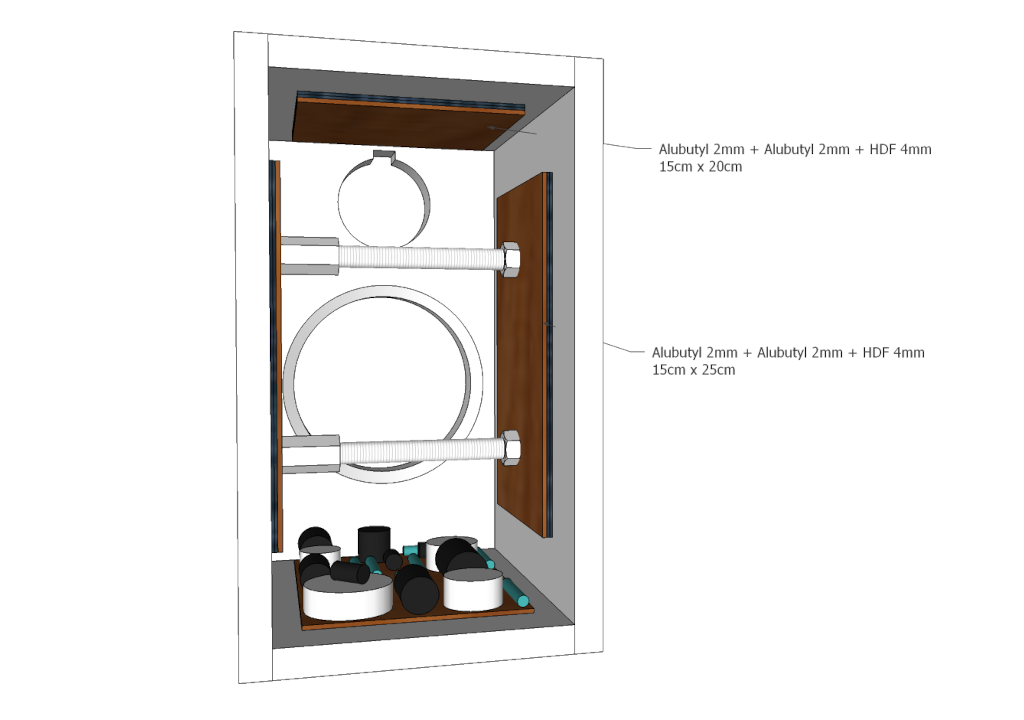
1.) Got some long bolts and some really long nuts...
2.) Screwed one bolt (with lock-tight applied) into a long nut about 1"
3.) Screwed bolt 2 onto the other side of the long nut so that I had an adjustable-length metal rod.
4.) I screwed bolt 2 in enough to get the expandable metal rod inside the cabinet, placed the rod width wise in a good "lower cabinet resonance" spot, grabbed my two pairs of vice grips, and used one to hold the long nut in place, while I twisted the [free] bolt on the right, to expand my rod.
5.) When the rod was wide enough to reach each side of the cabinet, I made sure it was in the right place (there's a ratio or something stupid), and then
6.) I held the long nut in place with my vice grips to prevent it from moving, while I further expanded the rod by spinning the bolt on the right in the counter-clockwise direction. You really have to yank on it so that the compressive force placed on the rod by the enclosure is enough to keep the bolt from tightening itself over time from the vibrations of music.
7.) If you fail, your rod will shrink and fall down.
8.) Technically, you could use lock-tight on both bolts, but what if you want to remove it some day in the future without cutting up your hands again, but 4x worseq?
Note: You must understand torsion, and your muscles, and exactly where your hands are in that really cramped 7.75" wide box, because if you screw anything up, you're punching hard wood and sharp metal really hard, while awkwardly holding tools. It'll hurt!)
So that's what I did to my speakers. with 12mm bolts. It's been years since, and the resonances are still gone and nothing rattles around when I move my speakers. I haven't noticed any bulging, either.
This is with maybe MDF+rubber of 0.75 to 1.5" thick, and wood of 0.75" to 1.5" thick.
I usually keep my speakers between 30 and 40% humidity. For a couple weeks a year thing deteriorate to the point that they see 52-54% (relevant? Irrelevant? I'm sure if you live in 90% humidity and try this with 1/2" LDF junkers, they might just blow apart lol)
I recommend everyone do what I described above to their speakers if they have resonance problems and their speakers are made of thick, medium to medium high-quality boards.
Unless there are compelling reasons not to. I hope from this thread we'll find out if there are!
I haven't noticed any bulging!
I won't waste too much time building up to what you obviously already know this thread is about from the title - cabinet resonance. Resonances in the upper bass and lower midrange in particular were Pair 1's problem.
Pair 1 would get excited with the right snare at medium to medium-high levels (upper bass/lower midrange range),
Pair 2 was "better" in that its problems didn't show up until higher frequencies. Not better because it took significantly less than the snare energy of Pair 1 to start muddying up vocals just 250-400Hz higher. The resonance was remarkably low Q (excitable from more than just 383Hz and 534Hz, 370 and 562 were almost as problematic, and all the frequencies in between, plus many surrounding, though they were slightly less so....
I thought to myself "what to do, what to do?!", sans quotes.
First I'll tell you what I didn't do - what I didn't do, was change cabinet volume - I didn't want to throw off the tuning of either pair, but especially Pair 1 was important to not muck with. They're 2.5 ways with midbass drivers in separate compartments, each compartment sized and tuned to create a larger, more sophisticated sound than one typically expects from compact floorstanders, even in their price range. They extend effortlessly to below 40Hz, and, if a room they're in interacts with their sound in unfortunate ways, they are uniquely adaptable - the chamber tuned lower is ported to the front to allow for good dispersion in tighter places (compact, remember?). And if you're getting punched too hard in the chest with every kick, all you have to do is shove your bung in a hole (or 2!). I think I've said enough to explain why I don't want to change the volume of Pair 1 now.
Pair 2 is kind of funny in that its structure is made of constrained-layer-damped boards specifically designed to damp resonances. Multi-layer construction with some layers made of rubber or something... I can't remember anymore. Anyway, it is remarkably effective... right up to the point it starts being remarkably ineffective. What a problem for a sealed design! They definitely aren't short on bass or extension... and I really enjoy its quality and control. But with Q just a bit below 1, I can't imagine I can take too much of the (already limited) space away from the woofer and keep everything I like the way I like it
The enclosures! Pair 1 and Pair 2...
Pair 1 made from (what I can tell) really dense, knot free hardwood boards 0.75" to 1.5" thick, randomized and glued in parallel.
Pair 2 made from that exotic stuff...
What I did was
1.) Got some long bolts and some really long nuts...
2.) Screwed one bolt (with lock-tight applied) into a long nut about 1"
3.) Screwed bolt 2 onto the other side of the long nut so that I had an adjustable-length metal rod.
4.) I screwed bolt 2 in enough to get the expandable metal rod inside the cabinet, placed the rod width wise in a good "lower cabinet resonance" spot, grabbed my two pairs of vice grips, and used one to hold the long nut in place, while I twisted the [free] bolt on the right, to expand my rod.
5.) When the rod was wide enough to reach each side of the cabinet, I made sure it was in the right place (there's a ratio or something stupid), and then
6.) I held the long nut in place with my vice grips to prevent it from moving, while I further expanded the rod by spinning the bolt on the right in the counter-clockwise direction. You really have to yank on it so that the compressive force placed on the rod by the enclosure is enough to keep the bolt from tightening itself over time from the vibrations of music.
7.) If you fail, your rod will shrink and fall down.
8.) Technically, you could use lock-tight on both bolts, but what if you want to remove it some day in the future without cutting up your hands again, but 4x worseq?
Note: You must understand torsion, and your muscles, and exactly where your hands are in that really cramped 7.75" wide box, because if you screw anything up, you're punching hard wood and sharp metal really hard, while awkwardly holding tools. It'll hurt!)
So that's what I did to my speakers. with 12mm bolts. It's been years since, and the resonances are still gone and nothing rattles around when I move my speakers. I haven't noticed any bulging, either.
This is with maybe MDF+rubber of 0.75 to 1.5" thick, and wood of 0.75" to 1.5" thick.
I usually keep my speakers between 30 and 40% humidity. For a couple weeks a year thing deteriorate to the point that they see 52-54% (relevant? Irrelevant? I'm sure if you live in 90% humidity and try this with 1/2" LDF junkers, they might just blow apart lol)
I recommend everyone do what I described above to their speakers if they have resonance problems and their speakers are made of thick, medium to medium high-quality boards.
Unless there are compelling reasons not to. I hope from this thread we'll find out if there are!
I haven't noticed any bulging!
Last edited: