• WANTED: Happy members who like to discuss audio and other topics related to our interest. Desire to learn and share knowledge of science required. There are many reviews of audio hardware and expert members to help answer your questions. Click here to have your audio equipment measured for free!

The beginners guide to setting up CAVA on a Raspberry Pi

Madjalapeno

Senior Member
Forum Donor
Joined
Aug 13, 2021
Messages
463
Likes
1,122
Location
NH, USA
What is CAVA

cava.gif


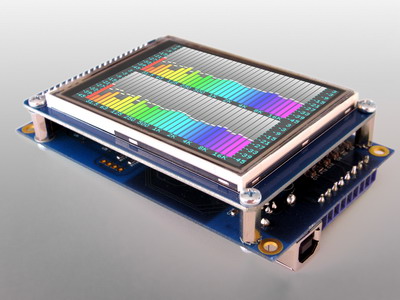
CAVA is a software spectrum analyzer for Linux devices. It will happily run on a Raspberry Pi, and here I will show you how to install it as a Roon Endpoint, with CamillaDSP. This post will be split into chunks as I write it.

After doing this I tried a different screen and it nuked my system, so this guide is incomplete.

I used this OTS part instead of CAVA. See post #8

EVOR04_1_small.jpg


Requirements

You will need:

  • Raspberry Pi (I'm using v4 here)
  • MicroSD card for operating system (16GB should be fine)
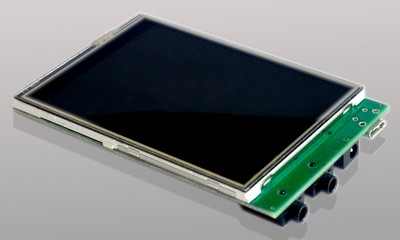
  • A screen of some sort
  • Another computer for installing the operating system
  • A terminal program. Putty is good for Windows, and Mac OS has one built in.
  • An internet connection
I'm doing this to work with Roon, but it should also work with other sources.

Please note - this is what worked for me. I'm writing this as I do it. There are probably better ways of doing it, and I would be happy to edit if people share those methods. If you try this, it's your responsibility to make sure nothing bad happens. If it doesn't work I will try and help, but Google is probably better.

Installation

If you've never worked with a Raspberry Pi before, they're very easy to use.

First we need to install an operation system onto a MicroSD card. The easiest way is to download the official imager from Raspberry Pi - https://www.raspberrypi.com/news/raspberry-pi-imager-imaging-utility/

Follow the instructions, and create an image on your MicroSD card. I used Ubuntu Server 21.10

When it has finished, insert the card into your Raspberry Pi, with a network cable and screen attached. Apply power and it should boot up. Using your main computer connect to the device via SSH (https://www.raspberrypi.com/documentation/computers/remote-access.html). The command should present a log in screen with a login prompt.

Default log in is 'ubuntu', and the password is also 'ubuntu'. When you type your password nothing will show on the screen, but that is normal. You will be prompted to change the password, and then the device will reboot. Repeat the SSH log in.

Bash:
login as: ubuntu
[email protected]'s password:
Welcome to Ubuntu 21.10 (GNU/Linux 5.13.0-1008-raspi aarch64)

 * Documentation:  https://help.ubuntu.com
 * Management:     https://landscape.canonical.com
 * Support:        https://ubuntu.com/advantage

  System information as of Fri Nov  5 18:17:42 UTC 2021

  System load:  0.22               Temperature:           55.0 C
  Usage of /:   17.0% of 14.30GB   Processes:             186
  Memory usage: 15%                Users logged in:       0
  Swap usage:   0%                 IPv4 address for eth0: 192.168.1.160


0 updates can be applied immediately.


The list of available updates is more than a week old.
To check for new updates run: sudo apt update

Last login: Fri Nov  5 18:17:11 2021 from 192.168.1.175
To run a command as administrator (user "root"), use "sudo <command>".
See "man sudo_root" for details.

ubuntu@ubuntu:~$

The first thing we want to do is update the software to the latest version. To do that we need to be a 'super user'. You can do that by using the following command:

Bash:
sudo su

the username will change from 'ubuntu@ubuntu' to 'root@ubuntu'. Use the following to install any updates:

Bash:
apt update && apt upgrade

You will probably need to reboot at the end of the upgrade.

Bash:
reboot

Log in again, and now we can start installing software.
 
Last edited:
OP
Madjalapeno

Madjalapeno

Senior Member
Forum Donor
Joined
Aug 13, 2021
Messages
463
Likes
1,122
Location
NH, USA
RoonBridge

Let's start with an easy one - Roon.

Reconnect to your Raspberry Pi using your Terminal Program, and log in. To download the automatic installer we will use a program called 'wget'. It's installed by default, so this is easy.

Bash:
wget http://download.roonlabs.com/builds/roonbridge-installer-linuxarmv8.sh

The installer will download in a few seconds. We want to be the super user to install it.

Bash:
sudo su
bash roonbridge-installer-linuxarmv8.sh

(rather than typing in the full roonbridge installer filename you can type the first few letters and then hit TAB to let it autocomplete)

You will be asked if you want to install the program with a [Y/n] prompt. Hit ENTER to select the capitalized prompt (Yes).

Bash:
ubuntu@ubuntu:~$ sudo su
root@ubuntu:/home/ubuntu# bash roonbridge-installer-linuxarmv8.sh

--------------------------------------------------------------------------------------

Welcome to the RoonBridge installer

This installer sets up RoonBridge to run on linux with the following settings:

 - RoonBridge will be installed in /opt/RoonBridge
 - RoonBridge's data will be stored in /var/roon/RoonBridge
 - RoonBridge will be configured to run as a system service
 - RoonBridge will run as root

These settings are suitable for turning a dedicated or semi-dedicated device
into an appliance that runs RoonBridge

If you want customize how RoonBridge is installed, see:

   http://kb.roonlabs.com/LinuxInstall

--------------------------------------------------------------------------------------

Do you want to install RoonBridge on this machine? [Y/n]

and it will probably fail. Don't worry though, it will tell you why it failed.

Code:
Do you want to install RoonBridge on this machine? [Y/n]

Downloading RoonBridge_linuxarmv8.tar.bz2 to /tmp/tmp.GzSBJ651pO/RoonBridge_linuxarmv8.tar.bz2

######################################################################### 100.0%

Unpacking RoonBridge_linuxarmv8.tar.bz2...tar (child): lbzip2: Cannot exec: No such file or directory
tar (child): Error is not recoverable: exiting now
tar: Child returned status 2
tar: Error is not recoverable: exiting now

--------------------------------------------------------------------------------------

The RoonBridge installer did not complete successfully.

If you are not sure how to proceed, please check out:

 - Roon Labs Community            https://community.roonlabs.com/c/support
 - Roon Labs Knowledge Base       https://kb.roonlabs.com/LinuxInstall

--------------------------------------------------------------------------------------

root@ubuntu:/home/ubuntu#

The error is that it could not find a program it needs
Code:
lbzip2
. To install it is easy enough:

Code:
apt install lbzip2

The software will find the program and install it

Bash:
root@ubuntu:/home/ubuntu# apt install lbzip2
Reading package lists... Done
Building dependency tree... Done
Reading state information... Done
The following NEW packages will be installed:
  lbzip2
0 upgraded, 1 newly installed, 0 to remove and 0 not upgraded.
Need to get 57.4 kB of archives.
After this operation, 155 kB of additional disk space will be used.
Get:1 http://ports.ubuntu.com/ubuntu-ports impish/universe arm64 lbzip2 arm64 2.5-2.1build1 [57.4 kB]
Fetched 57.4 kB in 1s (110 kB/s)
Selecting previously unselected package lbzip2.
(Reading database ... 112716 files and directories currently installed.)
Preparing to unpack .../lbzip2_2.5-2.1build1_arm64.deb ...
Unpacking lbzip2 (2.5-2.1build1) ...
Setting up lbzip2 (2.5-2.1build1) ...
Processing triggers for man-db (2.9.4-2) ...
Scanning processes...
Scanning processor microcode...
Scanning linux images...

Running kernel seems to be up-to-date.

Failed to check for processor microcode upgrades.

No services need to be restarted.

No containers need to be restarted.

No user sessions are running outdated binaries.
root@ubuntu:/home/ubuntu#

Let's try again. To use a command you've already run you can just use the UP key on your keyboard until it shows at the prompt, and then hit enter.

Bash:
root@ubuntu:/home/ubuntu# bash roonbridge-installer-linuxarmv8.sh

--------------------------------------------------------------------------------------

Welcome to the RoonBridge installer

This installer sets up RoonBridge to run on linux with the following settings:

 - RoonBridge will be installed in /opt/RoonBridge
 - RoonBridge's data will be stored in /var/roon/RoonBridge
 - RoonBridge will be configured to run as a system service
 - RoonBridge will run as root

These settings are suitable for turning a dedicated or semi-dedicated device
into an appliance that runs RoonBridge

If you want customize how RoonBridge is installed, see:

   http://kb.roonlabs.com/LinuxInstall

--------------------------------------------------------------------------------------

Do you want to install RoonBridge on this machine? [Y/n]

Downloading RoonBridge_linuxarmv8.tar.bz2 to /tmp/tmp.hLA2Ihgk9y/RoonBridge_linuxarmv8.tar.bz2

######################################################################### 100.0%

Unpacking RoonBridge_linuxarmv8.tar.bz2...Done

Checking to see if RoonBridge can run on this machine

    Checking for Binary Compatibility                            [   OK   ]
    Checking for ALSA Libraries                                  [   OK   ]

STATUS: SUCCESS


Copying Files...Done
Failed to stop roonbridge.service: Unit roonbridge.service not loaded.

Installing /etc/systemd/system/roonbridge.service

Enabling service roonbridge...
Created symlink /etc/systemd/system/multi-user.target.wants/roonbridge.service → /etc/systemd/system/roonbridge.service.
Service Enabled

Starting service roonbridge...
Service Started

--------------------------------------------------------------------------------------

All Done! RoonBridge should be running on your machine now.

--------------------------------------------------------------------------------------

root@ubuntu:/home/ubuntu#

We have now got RoonBridge installed and running. It should show up in Settings - Audio on Roon.

1636139634681.png


There are now a bunch of options. You could just go the CAVA route, and have a display to use when you're in that sort of mood, you could just go the CamillaDSP route (but then Roon has a good EQ built in) or do both.
 
Last edited:
OP
Madjalapeno

Madjalapeno

Senior Member
Forum Donor
Joined
Aug 13, 2021
Messages
463
Likes
1,122
Location
NH, USA
Roon is connected and will let you play sound to the default audio device, in this case the headphone connector. If you have a USB DAC you can connect it and it should show that. I will be using a Topping E30 for the rest of this, but any DAC should work.

If you have a HAT (Hardware Attached on Top) make sure you have the Raspberry Pi powered off before attaching it.

1636143179433.png

You can now stream to your Pi from Roon and enjoy a cheap, but clean streamer, but we can do more ...
 
Last edited:
OP
Madjalapeno

Madjalapeno

Senior Member
Forum Donor
Joined
Aug 13, 2021
Messages
463
Likes
1,122
Location
NH, USA
Before we go too far, should point out I could not have done any of this without these two posts:

Thanks @armigo and @mdsimon2

---

For either CAVA or CamillaDSP to work with our Roon stream we need to install a Loopback audio source.

A loopback is a dummy source that will let us intercept the audio stream and do other things with it. There may be a way to do it directly, but this worked for me.

First we need to install some more software to allow us to set up a loopback

Code:
apt-get install linux-image-generic alsa-utils
Code:
apt install linux-modules-extra-$(uname -r)

let it finish installing, and then set it up

Code:
modprobe snd-aloop

if no error shows it probably worked.

To get it to automagically install next time
Code:
echo 'snd-aloop' >> /etc/modules

Roon should now be showing another two output devices, Loopback PCM.

Screen Shot 2021-11-05 at 5.04.20 PM.png


As a sanity check, reboot and make sure they still show up before we continue.
 
OP
Madjalapeno

Madjalapeno

Senior Member
Forum Donor
Joined
Aug 13, 2021
Messages
463
Likes
1,122
Location
NH, USA
All good? Let's continue and install CAVA. Details of CAVA are on github here - https://github.com/karlstav/cava#configuration

Code:
sudo su
to be a super user again

Code:
apt install cava
then
Code:
Y
to accept the install.

If you try running
Code:
cava
now, you will get an error
Code:
Could not open pulseaudio mainloop to find default device name: 0

We need to edit the config to tell the program what to listen to. Pulseaudio and ALSA are two different technologies for audio on Linux. We want ALSA.

To edit the config we are going to use a program called
Code:
nano
. It's a simple but powerful text editor. You open a file when you type the command. To save is CTRL-O, to exit is CTRL-X. To move around the file you can use the cursor keys.

Code:
nano /root/.config/cava/config

For me the initial file was blank, but there is a demo file with explanations here https://github.com/karlstav/cava/blob/master/example_files/config

The config I used is:

Code:
[general]

[input]
method = alsa
source = hw:Loopback,1

[output]
channels = mono
mono_option = average

[color]
foreground = green

copy the above and paste it into the config in nano, then CTRL-X to close, and Y to save it.

then
Code:
cava
should blank the screen and show some small squares at the bottom of it. We're not sure which source Roon thinks Loopback,1 is, so the best thing to do is enabling each one, streaming music to it, and see what happens. What should happen is the bars start moving with the music.

1636148625818.png


Next we need to redirect that to our screen. Depending on the screen you're using this could be very frustrating (I'm trying to set this up with a 1920x480 screen right now, which prompted me to write this guide so I don't forget the process!)

Code:
CTRL-C
to quit the moving bars.

To get the output to play to the attached screen enter
Code:
cava <> /dev/console >&0 2>&1

1636149295746.png


Code:
CTRL-C
to quit. Try different settings in the config to see what works best.

My current config is
Code:
[general]
framerate = 60
sleep_timer = 5

[input]
method = alsa
source = hw:Loopback,1

[output]
method = noncurses
channels = mono
mono_option = average

[color]
foreground = green

When you're happy with how it is running, exit with
Code:
CTRL-Z
, it will stop, then
Code:
bg
to keep it running.

Next we will get it to run on boot without any user intervention.
 
Last edited:
OP
Madjalapeno

Madjalapeno

Senior Member
Forum Donor
Joined
Aug 13, 2021
Messages
463
Likes
1,122
Location
NH, USA
So that took a while to figure out, but now have it.

(References: https://linuxconfig.org/how-to-run-script-on-startup-on-ubuntu-20-04-focal-fossa-server-desktop)

First let's remove the extra text that the 'cloud-init' software tries to run on boot.

Log in as super user.

Code:
touch /etc/cloud/cloud-init.disabled
- this will create an empty file that disables it from running.

Then we need to create a service (a program that runs automatically at boot), and a script for it to run. We need to find where the CAVA program is
Code:
whereis cava

I get the following response cava: /usr/bin/cava /usr/share/cava /usr/share/man/man1/cava.1.gz

Which tells me that the program is at /usr/bin/cava

First we will create a script to clear the screen and run CAVA.

Code:
nano /usr/local/bin/cava.sh

and paste the following (if your CAVA program is somewhere different change the path below). I've added comments to show what each line does. You can paste them too, as the # will stop that section running.

Code:
#!/bin/bash

sleep 20                  ### wait until everything has booted before contining
reset                     ### this should clear the screen
clear && printf '\e[3J'   ### as should this
stty sane                 ### and this

cava  <> /dev/console >&0 2>&1

CTRL-X then Y to save.

We then need to tell the operating system that this program is a script to run.

Code:
chmod 744 /usr/local/bin/cava.sh

You can then test the program
Code:
/usr/local/bin/cava.sh
and you should see the attached screen blank and a series of green lines. To make them dance don't forget to send a stream from Roon.

Code:
CTRL-C
to cancel.

Next we need to create a service to run that program. (This section may be different for older operating systems).

Code:
nano /etc/systemd/system/cava.service

Code:
[Unit]
Description=Load CAVA on boot
After=network.service

[Service]
Type=simple
User=root
ExecStart=/usr/local/bin/cava.sh

[Install]
WantedBy=default.target

CTRL-X then Y to save.


Code:
chmod 664 /etc/systemd/system/cava.service

Then reload the control system, and enable the service.

Code:
systemctl daemon-reload
systemctl enable cava.service

We can now reboot, and when everything has finished loading on the attached monitor you should get the line of green dots, ready to go when you send something from Roon.
 
OP
Madjalapeno

Madjalapeno

Senior Member
Forum Donor
Joined
Aug 13, 2021
Messages
463
Likes
1,122
Location
NH, USA
I'm sorry, but after trying to add an 'Amazon Special' mini HDMI screen I seemed to have lost all my ALSA settings and no longer see any audio devices apart from the HDMI screen.

o_O

Do not run the files at https://github.com/goodtft/LCD-show - they will nuke your system.
 
Last edited:
OP
Madjalapeno

Madjalapeno

Senior Member
Forum Donor
Joined
Aug 13, 2021
Messages
463
Likes
1,122
Location
NH, USA
So after all that, I've decided an OTS display is better. Purchased one of these, and am very happy with it. I tested it with a signal generator, and it shows the correct outputs. Can be configured to change colors, etc.


EVOR04_1_small.jpg
 
Top Bottom