• WANTED: Happy members who like to discuss audio and other topics related to our interest. Desire to learn and share knowledge of science required. There are many reviews of audio hardware and expert members to help answer your questions. Click here to have your audio equipment measured for free!

RPi4 + CamillaDSP Tutorial

OP
M

mdsimon2

Major Contributor
Forum Donor
Joined
Oct 20, 2020
Messages
2,526
Likes
3,401
Location
Detroit, MI
Which samplerate are you using in squeezelite? 48 kHz or 44.1khz like @mdsimon2 suggested?

I've just tried to measure my 2.1 System with REW, playing the 24-bit/48khz sweeps via squeezlite and i'm getting very strange echos at the end of the sweeps, if the m4_streamer_44c_96p_10212022.yml config file from @mdsimon2 is actived. Only if i'm using the m4_streamer_44c_44p_10212022.yml config file from @mdsimon2 there are no echos in the playback.

Is it necessary to change the squeezelite config from

Code:
SL_SOUNDCARD="hw:Loopback,1"
SB_EXTRA_ARGS="-W -C 5 -r 44100-44100 -R hLE:::28"


to

Code:
SL_SOUNDCARD="hw:Loopback,1"
SB_EXTRA_ARGS="-W -C 5 -r 48000-48000 -R hLE:::28"

and create a camilladsp config which only works with 48khz samplerate to match the 24-bit/48khz REW sweeps and playback them without echos?

Are you running REW on the Pi or a separate computer? In either case you will want to run REW at 48 kHz to match the UMIK.

I don’t think the sample rate of your sweep should matter. For reference using the setup in the tutorial if you start with a 48 kHz file squeezelite will resample to 44.1 kHz and CamillaDSP will then resample that to 96 kHz. I am not familiar with playing sweep files in squeezelite when making REW measurements so I can’t be much help. My advice is to eliminate as many variables as possible, remove all resampling in squeezelite and CamillaDSP, start from a 48 kHz file and run REW and CamillaDSP at 48 kHz.

Michael
 
Joined
Jan 9, 2023
Messages
87
Likes
30
The Ultralite is a bit unusual. It presents itself as two usb devices. One audio device, and one network interface. The network interface is used for configuration by the Motu windows & macOS software

. This new network interface likely confuses the network config on some systems. Ubuntu seems to handle this fine, while RPiOS has trouble.

Well, do you need a multi channel DAC at all with bi amping that's the question.
You can do (analogue) filters before the preamp with simple R-C, then split it into LF+HF with opamps.

I figured if you are going to use Raspberry pi then I absolutely couldn't see the point in using USB audio devices at all. (apart from the MOTU must be a multichannel USB DAC?)
This may sound a bit OT, but it's relevant.

There exists far better DAC using a HAT on GPIO, bearing in mind that they can only be 2 channel devices (ie. stereo on Rpi.).
The Ian Canada implementation of the dual mono sabre DAC using output transformers strikes me as one of the best you can get and sort of looks like this....
cm4_2015.JPG IMG_2642 2.jpeg 48189439547_0f9252f5df_h.jpg output_pins.jpg s6893414.jpg

This involves going down a totally hybrid route....

In this case I opted not to go for tri-amping, but tri-wiring using a unique and rarely imagined idea that appeared in Broskie's tubecad webzine, for resolving some smart crossover issues. So much for theory it's HERE

Output%20Transformer%20and%20Two-Way%20Speaker%202.png

And also helpfully pointed out the following:-
"the old Quad model 57 held two low-frequency ESL panels bracketing a high-frequency ESL panel (as did several other speakers").
Above in fact is a combination of active and passive filtering.

This doesn't cause the "holes/character/phase changes" in the audio spectrum caused by active filtering and bi or triamping, for the simple reason "there are giant differences in power requirements for bass vs hf", so that gets a 1st order low pass filter, the rest of the roll off provided by the driver itself.

It wasn't needed in the much admired Quad 57, but they had other disadvantages, which meant compensating a lack of bass, unless stacking yet more quad panels, which of course then presents the amp with a near short circuit at 10-15khz and an impedance curve looking like a roller coaster...
(A solid state amp would compensate for a near dead short by just producing loads more power, which would be the complete reverse of what is needed)

Throwing a stone in the pond again, DSP, bi/triamping v classic crossover etc are not the great magic solution that everyone makes them out to be, esp on ASR.
If you want to use ESL, with non ESL, LF drivers, then it starts becoming real fun**.

ie.some more reading.
There is also a lot of debate about current feedback amplifiers, showing that solid state amps don't compensate for phase lag, as they have no V-I feedback mechanism.

I solved some this by increasing the sensitivity of the bass drivers system with enormous speaker drivers and giant cabinets....as above (There's many ways to skin a chicken).

Using a single (Admittedly impossibly rare) amp per channel, originally designed for PA, means using simple low and high pass filtering with capacitors and chokes, ie. one secondary of multiple ones on the output transformer for each band of frequencies.
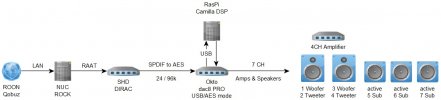
This means the output transformer+different windings end up being part of an active/passive filter system, - fed by the Raspberry pi HAT stereo only on a CM4 with CamillaDSP.

Using the old tried and tested impedance matching (used to be used for 70v and 140V systems in the USA, and 100V line systems in the EU), we can accurately match the power requirements of each section of the audio spectrum to the impedance required to get it, without changing the overall colour/behaviour of the system and the way it reacts to inductance changes).
+
Being as I understood fairly early on the implementation of DHCP, and a number of other things in the Linux 64 IP stack had problems, the smart thing emerged as using the CM4 as an IOT and internet router as well as an audio file server and audio playback system. (you upload files locally on ftp using the vsftpd server).

FYI, I just tested and booted NVME on the CM4 Tofu board.
To my mind, nothing can get close.
e-MMC, already a quantum leap faster than SD cards, which struggle 20-30Mb/s on a vanilla Rpi4 does around 85Mb on benchmark on CM4.
NVME via m.2 (pci-e) is doing 400+ !
It makes a 2ghz overclocked CM4 go like lightning, so I would never ever dream of going back to Rpi4.
 
Last edited:
Joined
Jan 9, 2023
Messages
87
Likes
30
Why I prefer Linux 64+camillaDSP on ARM - CM4.
You want to upload multiple large uncompressed 24bit files to an IOT device?
Pci-e is the answer. (I didn't benchmark SD cards).

wd_nvme.jpg e-mmc.jpg
 

Spezialtrick

Member
Joined
Jan 8, 2022
Messages
21
Likes
2
Are you running REW on the Pi or a separate computer?
I'm running REW on a separate computer.

My advice is to eliminate as many variables as possible, remove all resampling in squeezelite and CamillaDSP, start from a 48 kHz file and run REW and CamillaDSP at 48 kHz.

Allright. I've change

Code:
sudo nano /etc/default/squeezelite

to

Code:
SL_SOUNDCARD="hw:Loopback,1"
SB_EXTRA_ARGS="-W -C 5"

to disable the resampling in squeezelite. Is there a way check wat samplerate squeezelite is putting out and what CamillaDSP is receiving?

In CamillaDSP i'm using the attached Config, which should receive 48khz, process an output in 48khz. But i'm still getting the echos at the end of the sweeps.

Could somebody, maybe @HenrikEnquist :), explain me the different samplerates in Camilla DSP? The samplerate on the top is for processing and output. Is the capture_samplerate in the resampling box the same as the Capture samplerate in the status box on the left side? And is the capture_samplerate the samplerate CamillaDSP expects on the input?
 

Attachments

  • m4_streamer_48c_48p_10212022.txt
    1.5 KB · Views: 34

HenrikEnquist

Member
Joined
Jul 1, 2021
Messages
82
Likes
110
Could somebody, maybe @HenrikEnquist :), explain me the different samplerates in Camilla DSP?
There are two samplerate settings:
- samplerate: this is the main one, the rate that the processing and output device runs at.
- capture_samplerate: this is the rate that the capture device runs at. If it's set to the same as "samplerate" or 0, then everything runs at the same rate. But if it's set to another value, then a resampler is needed to convert the data before sending it down the processing pipeline.

There is also a measured samplerate that is shown in the gui. It's a simple and not super accurate measurement of the capture samplerate. It's used to catch sample rate changes from some quirky devices. For example some Spdif inputs when the input signal changes, or when capturing raw data from stdin. If you are capturing from any "normal" device or a loopback you can ignore this.
 
Joined
Jan 9, 2023
Messages
87
Likes
30
There are two samplerate settings:
- samplerate: this is the main one, the rate that the processing and output device runs at.
In Linux at least you go aplay -l
Then dump the specs on the device...because you set to what you have.

On this notebook:-
aplay -v -D hw:ICH6 /dev/zero --dump-hw-params

What you get is something similar you are looking for values in BOLD here.

Playing raw data '/dev/zero' : Unsigned 8 bit, Rate 8000 Hz, Mono
HW Params of device "hw:ICH6":
--------------------
ACCESS: MMAP_INTERLEAVED RW_INTERLEAVED
FORMAT: S16_LE S32_LE
SUBFORMAT: STD
SAMPLE_BITS: [16 32]
FRAME_BITS: [32 64]
CHANNELS: 2
RATE: [8000 48000]

you then set it to the max possible, in this case S32_LE & 48000.

I checked arecord -l and it can do only 16bit...

arecord -v -D hw:ICH6 /dev/zero --dump-hw-params
Recording WAVE '/dev/zero' : Unsigned 8 bit, Rate 8000 Hz, Mono
HW Params of device "hw:ICH6":
--------------------
ACCESS: MMAP_INTERLEAVED RW_INTERLEAVED
FORMAT: S16_LE
SUBFORMAT: STD
SAMPLE_BITS: 16
FRAME_BITS: 32
CHANNELS: 2
RATE: [8000 48000]


By way of example I have a 2nd Pro sound card in the same notebook:-

this gives:-
aplay -v -D hw:VXPocket440 /dev/zero --dump-hw-params
Playing raw data '/dev/zero' : Unsigned 8 bit, Rate 8000 Hz, Mono
HW Params of device "hw:VXPocket440":
--------------------
ACCESS: MMAP_INTERLEAVED RW_INTERLEAVED
FORMAT: S16_LE S24_3LE
SUBFORMAT: STD
SAMPLE_BITS: [16 24]
FRAME_BITS: [16 48]
CHANNELS: [1 2]
RATE: [5000 48000]
--------------------
aplay: set_params:1343: Sample format non available
Available formats:
- S16_LE
- S24_3LE
So this has to be set to 24LE3 and 48000 and has 4 channels (2 x stereo).

No suprise the VX440 can record in 24/48.
arecord -v -D hw:VXPocket440 /dev/zero --dump-hw-params
Recording WAVE '/dev/zero' : Unsigned 8 bit, Rate 8000 Hz, Mono
HW Params of device "hw:VXPocket440":
--------------------
ACCESS: MMAP_INTERLEAVED RW_INTERLEAVED
FORMAT: S16_LE S24_3LE
SUBFORMAT: STD
SAMPLE_BITS: [16 24]
FRAME_BITS: [16 48]
CHANNELS: [1 2]
RATE: [5000 48000]
--------------------
arecord: set_params:1343: Sample format non available
Available formats:
- S16_LE
- S24_3LE
 
Last edited:

MCH

Major Contributor
Joined
Apr 10, 2021
Messages
2,673
Likes
2,298
Hi all,
Is there a way to have the squeezelite streamer as built following this tutorial, to output unprocessed audio to an USB card while camilladsp is doing its thing with different input/output cards?
The final objective is to have the audio out of squeezelite out via Toslink to the input of a minisdp 2x4hd.
Until now i was using a different streamer without giving it much thought, but i was wondering if I can simplify things doing it all in the same RPI.
Thanks!
 
OP
M

mdsimon2

Major Contributor
Forum Donor
Joined
Oct 20, 2020
Messages
2,526
Likes
3,401
Location
Detroit, MI
to

Code:
SL_SOUNDCARD="hw:Loopback,1"
SB_EXTRA_ARGS="-W -C 5"
to disable the resampling in squeezelite. Is there a way check wat samplerate squeezelite is putting out and what CamillaDSP is receiving?

This will disable squeezelite resampling BUT if the squeezelite file does not match the capture sample rate of the Loopback (which is defined by your CamillaDSP configuration) then squeezelite will use ALSA resampling to match it. This is lower quality than the squeezelite SOX based resampling which is why I have squeezelite resample.

In CamillaDSP i'm using the attached Config, which should receive 48khz, process an output in 48khz. But i'm still getting the echos at the end of the sweeps.

Can you upload the audio file you are using? It is very odd to me that it seems OK at 44.1 kHz but not at 48 kHz, makes me think there is some OS based resampling occurring on the device running REW. If you upload the file I'll replicate your setup with my M4 and see what I get.

One more thing are you running REW on a PC or Mac?

Michael
 
OP
M

mdsimon2

Major Contributor
Forum Donor
Joined
Oct 20, 2020
Messages
2,526
Likes
3,401
Location
Detroit, MI
Hi all,
Is there a way to have the squeezelite streamer as built following this tutorial, to output unprocessed audio to an USB card while camilladsp is doing its thing with different input/output cards?
The final objective is to have the audio out of squeezelite out via Toslink to the input of a minisdp 2x4hd.
Until now i was using a different streamer without giving it much thought, but i was wondering if I can simplify things doing it all in the same RPI.
Thanks!

I don't see why what you are proposing would not work. Just change SL_SOUNDCARD to your USB to TOSLINK card (which I assume is what you have on your separate streamer currently?).

Michael
 
  • Like
Reactions: MCH
OP
M

mdsimon2

Major Contributor
Forum Donor
Joined
Oct 20, 2020
Messages
2,526
Likes
3,401
Location
Detroit, MI
That's a good point, it does look like RPi.GPIO is on borrowed time. The thing is that using a direct library seems WAY faster than using the lgpio method of accessing the pins. In my benchmark testing the old way is 11+ times faster than the new way. Maybe I'm doing something wrong but here's the result of five test runs using Python, one using lgpio and the other using RPi.GPIO:

john@camilla:~/source/pybench$ python3 t2.py ;python3 t3.py lgpio 84111 toggles per second RPi.GPIO 962372 toggles per second john@camilla:~/source/pybench$ python3 t2.py ;python3 t3.py lgpio 83317 toggles per second RPi.GPIO 979529 toggles per second john@camilla:~/source/pybench$ python3 t2.py ;python3 t3.py lgpio 83688 toggles per second RPi.GPIO 974429 toggles per second john@camilla:~/source/pybench$ python3 t2.py ;python3 t3.py lgpio 84055 toggles per second RPi.GPIO 998126 toggles per second john@camilla:~/source/pybench$ python3 t2.py ;python3 t3.py lgpio 84964 toggles per second RPi.GPIO 1027179 toggles per second

Doing a similar test with C comparing pigpio to lgpio shows an even greater improvement with pigpio being 27+ times faster than lgpio:

john@camilla:~/source/bench$ ./lgpio ;sudo ./pigpio C lgpio: 141463 toggles per second C pigpio: 3900408 toggles per second john@camilla:~/source/bench$ ./lgpio ;sudo ./pigpio C lgpio: 141355 toggles per second C pigpio: 4009276 toggles per second john@camilla:~/source/bench$ ./lgpio ;sudo ./pigpio C lgpio: 139096 toggles per second C pigpio: 3930747 toggles per second john@camilla:~/source/bench$ ./lgpio ;sudo ./pigpio C lgpio: 142311 toggles per second C pigpio: 3885954 toggles per second john@camilla:~/source/bench$ ./lgpio ;sudo ./pigpio C lgpio: 141962 toggles per second C pigpio: 3735742 toggles per second john@camilla:~/source/bench$

For what it's worth I'm using Ubuntu 22.04.1 LTS with kernel 5.15.0-1023-raspi.


Here's my modified version of the OLED Python script.

Just got home and tried this out, it is so unbelievable fast (almost too fast lol!).

Going through your code I noticed that in addition to switching to RPi.GPIO you also made some changes to the data/command functions which simplified them. Making these same changes in lgpio results in a decent performance increase so I've made that change to lgpio based version.

Are you OK with me adding a copy of your python routine to the tutorial? Even if RPi.GPIO is on the way out it seems like a great option for 22.04 LTS which will be around for some time.

I also like the way you pull the configuration names for the display. Will require some modifications to my naming conventions to use this but I like it a lot as it avoids people needing to edit oled.py.

Thank you so much for improving this!

Michael
 
Last edited:

Spezialtrick

Member
Joined
Jan 8, 2022
Messages
21
Likes
2
This will disable squeezelite resampling BUT if the squeezelite file does not match the capture sample rate of the Loopback (which is defined by your CamillaDSP configuration) then squeezelite will use ALSA resampling to match it. This is lower quality than the squeezelite SOX based resampling which is why I have squeezelite resample.

Ok i unterstand. So i have to change all samplerates in CamillaDSP to 48khz. I thought that i did it in the attached config file. Did you check it out?

Can you upload the audio file you are using? It is very odd to me that it seems OK at 44.1 kHz but not at 48 kHz, makes me think there is some OS based resampling occurring on the device running REW.

I've attached the sweeps. Just for clarification: I playing the sweep with squeezelite and i can hear the echos on my speakers without measuring anything with REW.
If you upload the file I'll replicate your setup with my M4 and see what I get.

That's very nice! :) Thank you for your help!

One more thing are you running REW on a PC or Mac?

What ever you like. I can run REW on mac or pc.
 

Attachments

  • 1MMeasSweep_0_to_24000_-12_dBFS_48k_PCM24_L_refR.wav.zip
    3.5 MB · Views: 41
  • 1MMeasSweep_0_to_24000_-12_dBFS_48k_PCM24_R_refR.wav.zip
    3.5 MB · Views: 35
OP
M

mdsimon2

Major Contributor
Forum Donor
Joined
Oct 20, 2020
Messages
2,526
Likes
3,401
Location
Detroit, MI
Ok i unterstand. So i have to change all samplerates in CamillaDSP to 48khz. I thought that i did it in the attached config file. Did you check it out?


I've attached the sweeps. Just for clarification: I playing the sweep with squeezelite and i can hear the echos on my speakers without measuring anything with REW.


That's very nice! :) Thank you for your help!


What ever you like. I can run REW on mac or pc.

First your config looks fine.

This was my first time playing with using a saved sweep as the source of the measurement so it was a bit of a learning experience.

Your timing reference is on the right channel, not the left channel as originally suggested by @Daverz . Not an issue but this threw me for a loop in the beginning as I was using an ADC instead of a mic to record.

Both files sound normal to me. When you say echo are you referring to the chirp at the end of the sweep? If so that chirp (and the one in the beginning) are the acoustic timing references and should be there.

Do your measurements look OK? At first my measurement was way off because I was using a 512K sweep length in REW but your sweeps look like they are 1M in length. The sweep length you specify in Measure should match your file. Here is the output of channel 1 (right) as measured by an ADC, looks like the expected high pass behavior.

1676928772892.png


The only other thing that might sound like an echo is that when you start the sweep in REW if you have the volume up on your computer that sweep will be audible. You should mute your computer output so that it is not picked up by the mic and the mic only hears the sweep being streamed via squeezelite.

Michael
 
OP
M

mdsimon2

Major Contributor
Forum Donor
Joined
Oct 20, 2020
Messages
2,526
Likes
3,401
Location
Detroit, MI
Updated tutorial with new versions of oled.py, one based on lgpio and one based on rpi-gpio. Thanks again to @LandscapeJohn for the feedback to switch to rpi-gpio and for making improvements to the data / command functions which improve performance of both routines.

If you are running a display I highly recommend switching to the rpi-gpio based routine, it is significantly faster and much more enjoyable to use. All you need to use it is install rpi-gpio by running:

Rich (BB code):
sudo pip3 install rpi-gpio

And overwrite your existing oled.py with the rpi-gpio based one.

Michael
 

LandscapeJohn

Member
Joined
Dec 7, 2022
Messages
9
Likes
14
Just got home and tried this out, it is so unbelievable fast (almost too fast lol!).

Going through your code I noticed that in addition to switching to RPi.GPIO you also made some changes to the data/command functions which simplified them. Making these same changes in lgpio results in a decent performance increase so I've made that change to lgpio based version.

Are you OK with me adding a copy of your python routine to the tutorial? Even if RPi.GPIO is on the way out it seems like a great option for 22.04 LTS which will be around for some time.

I also like the way you pull the configuration names for the display. Will require some modifications to my naming conventions to use this but I like it a lot as it avoids people needing to edit oled.py.

Thank you so much for improving this!

Michael

Sure, feel free to include whatever you want and make any changes as you see fit. Glad it was able to speed things up for you.
 

Yems

Member
Joined
Aug 31, 2022
Messages
17
Likes
4
I finally got my Okto dac 8 Pro to replace my Motu UL-mk5. The attached image shows my plan to insert it in my audio chain.
I use the SHD for final Dirac room correction, everything else (xo / filters etc.) is done with camilla dsp. What's your opinion, is there a smarter way to connect
in purpose of maximum audio quality? Where should i control volume - i guess the best would be the Okto dac?
 

Attachments

  • Yems_Connection_Chain.jpg
    Yems_Connection_Chain.jpg
    58.5 KB · Views: 55
OP
M

mdsimon2

Major Contributor
Forum Donor
Joined
Oct 20, 2020
Messages
2,526
Likes
3,401
Location
Detroit, MI
I finally got my Okto dac 8 Pro to replace my Motu UL-mk5. The attached image shows my plan to insert it in my audio chain.
I use the SHD for final Dirac room correction, everything else (xo / filters etc.) is done with camilla dsp. What's your opinion, is there a smarter way to connect
in purpose of maximum audio quality? Where should i control volume - i guess the best would be the Okto dac?

I think you can use either the SHD or the Okto for volume control. Which one will work best depends on the specifics of your system.

If you use the Okto as volume control you will want to apply attenuation in the SHD such that you avoid digital clipping in the SHD. A good way to do this is to electrically measure the SHD frequency response after Dirac using the bi-directional USB of the SHD. This will give you a feel for how much net boost you are applying in the SHD and you can offset the level by this amount. The disadvantage of this approach is that it limits the volume level you can achieve if you are starting from a lower level recording, however if the Okto output voltage exceeds the input sensitivity of your amplifiers you will still have some ability to compensate for this. I would not use this approach if your amplifier input sensitivity is less than or equal to the Okto output voltage.

If you do volume control in the SHD you do not need to apply any permanent attenuation to avoid digital clipping. If you have a low level recording you can safely turn up the volume and will not digitally clip, similarly if you have a higher level recording you can turn the volume down to avoid digital clipping. There is an argument that attenuating in the SHD prior to applying DSP via CamillaDSP will result in fidelity loss but as long as you aren't doing something dumb like adding a bunch of digital gain/boost in CamillaDSP I think that there will not be a measurable difference at the output as CamillaDSP uses 64 bit floating point.

Michael
 

MCH

Major Contributor
Joined
Apr 10, 2021
Messages
2,673
Likes
2,298
Updated tutorial with new versions of oled.py, one based on lgpio and one based on rpi-gpio. Thanks again to @LandscapeJohn for the feedback to switch to rpi-gpio and for making improvements to the data / command functions which improve performance of both routines.

If you are running a display I highly recommend switching to the rpi-gpio based routine, it is significantly faster and much more enjoyable to use. All you need to use it is install rpi-gpio by running:

Rich (BB code):
sudo pip3 install rpi-gpio

And overwrite your existing oled.py with the rpi-gpio based one.

Michael
working fine, and very noticeable improvement, thanks @LandscapeJohn and @mdsimon2 !!
 

Spezialtrick

Member
Joined
Jan 8, 2022
Messages
21
Likes
2
When you say echo are you referring to the chirp at the end of the sweep?

Hello Michael, just a short answer.

No, i'm not reffering to the timing chrip. It's an echo, sounds like a second delay playback of a part of the signal. I was able to record the sweep with the UMIK-1. The echo starts at 17 seconds.
 

Attachments

  • echo.zip
    3.7 MB · Views: 38
Last edited:

Triliza

Senior Member
Forum Donor
Joined
Jun 23, 2021
Messages
481
Likes
578
Location
Europe
Sorry (again) for the 101 questions, is HPQ filter on APO equivalent to Biquad->Highpass on camilladsp? I got a little confused by this filter:

Code:
Filter 1: ON HPQ Fc 31.6 Hz Gain 0 dB Q 0.85

I don't see any option to add gain on a highpass filters in camilladsp, which got me thinking maybe I should implement it as some other filter (peaking has gain), most likely not, but just wanted to be sure about it. Thanks.
 

Wirrunna

Member
Joined
May 27, 2021
Messages
94
Likes
45
Location
South Coast, NSW, Australia
Triliza, I don't quite know what a "HPQ filter on an APO" is, but I suspect it is a HighPass with Q to define slope from the Fc. The gain in a simple High pass filter is always 0. You could make a Gain filter where only the gain in db is entered.

At the risk of offending (here in Oztraya, real men don't read manuals) have a look at the manual
https://github.com/HEnquist/camilladsp , scroll down to the table of contents and click on the Usage example: Crossover for 2-way speaker, or for more on IIR filters , click on IIR in the filters section.

Keep the questions coming, perhaps explain a little more what you are trying to achieve.
 
Top Bottom