melomane13
Member
First of all, I would especially like to thank @HenrikEnquist for developing CamillaDSP and @mdsimon2 for his tutorial, the starting point of this work and without which I could not have done anything!
Thanks also to @MCH for the interest he showed in another thread that I explain.
Second, I assume that you have a properly functioning camilladsp system, ubuntu or raspberrypi OS. If not, go to mdsimon2 tutorial.
Third, the python script that I am going to show you is used for the remote control, display and the power trigger at the same time. you can not use the power trigger, but the remote and the display are inseparable, because the command sent to camilladsp is also sent to the display. Note that only commands sent via the remote control are reflected, very quickly, on the display.
Material used:
TM1637 LED Display 0.56 inch 6 Digits , 4€ send from aliexpress

2 usb cable male female with dupont connector. I have make mines, by cutting a 2 meter USB extension cable and putting in the Dupont connectors that I already had.
They already exist manifactured.
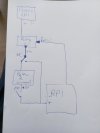
Connect red wire to VCC, black to GND, green to DIO , white to CLK on the display.
Connect red wire to 3,3 or 5V ( brightness - + ) black wire to ground, green gpio 24 , white to gpio 23 on the RPI.


I have used two layer of plexiglass to make the display box, was the most simple solution for me, but plenty of solutions are possible : only important thing is to block the wires.

Remote bluetooth 4 € send
You can use the remote you want, bluetooth, 2.4GHz receptor or Ir with flirc. Remember than it is possible that keys names on script need to be modified if you use another remote than this.

2 Relay 5v boards, 5 € send
one plastic box, power strip, jack socket and jack cable for trigger.
One relay put in a small plastic box for subwoofer main power , the seconds is for my aiyama A07 modified.
If your trigger require 12v, 5v to 12v converter is mandatory.

in the script you can read:
PowerGpio = 4 #### GPIO power trigger
connect RPI gpio 4 to "in" pin of relay, dc + to 5v , dc - to ground.
now connect the output of relay to main or use it for 12v trigger
Thanks also to @MCH for the interest he showed in another thread that I explain.
Second, I assume that you have a properly functioning camilladsp system, ubuntu or raspberrypi OS. If not, go to mdsimon2 tutorial.
Third, the python script that I am going to show you is used for the remote control, display and the power trigger at the same time. you can not use the power trigger, but the remote and the display are inseparable, because the command sent to camilladsp is also sent to the display. Note that only commands sent via the remote control are reflected, very quickly, on the display.
Material used:
TM1637 LED Display 0.56 inch 6 Digits , 4€ send from aliexpress
2 usb cable male female with dupont connector. I have make mines, by cutting a 2 meter USB extension cable and putting in the Dupont connectors that I already had.
They already exist manifactured.
Connect red wire to VCC, black to GND, green to DIO , white to CLK on the display.
Connect red wire to 3,3 or 5V ( brightness - + ) black wire to ground, green gpio 24 , white to gpio 23 on the RPI.
I have used two layer of plexiglass to make the display box, was the most simple solution for me, but plenty of solutions are possible : only important thing is to block the wires.
Remote bluetooth 4 € send
You can use the remote you want, bluetooth, 2.4GHz receptor or Ir with flirc. Remember than it is possible that keys names on script need to be modified if you use another remote than this.
2 Relay 5v boards, 5 € send
one plastic box, power strip, jack socket and jack cable for trigger.
One relay put in a small plastic box for subwoofer main power , the seconds is for my aiyama A07 modified.
If your trigger require 12v, 5v to 12v converter is mandatory.
in the script you can read:
PowerGpio = 4 #### GPIO power trigger
connect RPI gpio 4 to "in" pin of relay, dc + to 5v , dc - to ground.
now connect the output of relay to main or use it for 12v trigger
Last edited: