• WANTED: Happy members who like to discuss audio and other topics related to our interest. Desire to learn and share knowledge of science required. There are many reviews of audio hardware and expert members to help answer your questions. Click here to have your audio equipment measured for free!

Amir's Music Server Build Thread

amirm

Founder/Admin
Staff Member
CFO (Chief Fun Officer)
Joined
Feb 13, 2016
Messages
45,751
Likes
254,504
Location
Seattle Area
Over the last few months I have had a number of requests to document my music server build. I finally got around to collecting and organizing my pictures and references.

There are a number of such efforts such as CA's "CAP" series of music server specs. I have read through them and much of what they do there doesn't make any sense to me and bring a ton of complexity. As an example is using a server-class motherboard, Windows Server OS which is expensive and very difficult to manage for ordinary users, expensive linear power supplies, etc.

The approach of then minimizing the tasks on the OS true third-party tools also doesn't make sense to me. From noise and jitter point of view, you want a chaotic/random activity. Removing all but a few system processes means both of these components can be become more correlated, predictable and hence potentially audible.

My goal in building my own server was much more down to earth:

1. 100% quiet. No fans. No spinning parts. Acoustic noise is obviously audible (at least at close distances) so I wanted to avoid that. Having had other servers run 24/7 I also find fans both in the power supply and chassis collect a ton of dust, push said dust into the machine, and are prime source of failures.

2. Low heat generation/power consumption. The enemy of reliability is heat. And fanless cooling of a beast of a machine is much harder than a low-power system. I also like to put my server in the cabinet and not have any worry of it overheating itself, or cooking other components around it. Again, this is a lesson learned from running a home theater PC 24/7 for many years.

3. While #2 calls for a very low (CPU) power machine, I like to have ample peak horsepower to handle Equalization and sample rate conversion.

4. Attractive. A large, tower PC is ugly and hard to put in a cabinet/rack. So I opted to go by home theater PC enclosures which give the look of a stereo component.

5. Guarding against early obsolescence by using the latest components.

My target scenario is running Roon music server and library manager. Access to it would be through Android tablets and my laptop computer. Roon allows automatic update of its software on all platforms so I don't need a keyboard and mouse to mess with it on my server (though I do have wireless keyboard/touchpad).

All music would be located on a Networked Attached Storage (NAS) connected to the music server via Gigabit Ethernet. This allows me to buy music on my laptop while in the living room, store them on the NAS and for it to be available to play on my system through Roon. The NAS also provides reliability and by remote placement, free of any noise by the main audio system.

Since everyone names their servers, let's call this ASR Music Server or (AMS) for short.

fc10-alpha-featured.jpg
 
Last edited:
Selecting the enclosure was the first and most critical step in the build. For that, I went with the same recommendation as CAP and used the German Streacom, FC10 Alpha-OPT.

fc10-alpha-featured.jpg


This was pretty difficult to source at the time. It was not available through Amazon. But did manage to order it as a third-party product through Newegg: http://www.newegg.com/Product/Product.aspx?Item=9SIA5FY2MW2475.

It has a price of $340 as of this writing.

Note that I opted for the one with a slot for the DVD drive. But since Roon does not rip music, nor do I want to saddle this system with video, this was a wasted effort. And also pointed out the only substandard feature of this enclosure which is the manual eject button. It is poorly constructed lever and hardly ever works to hit the eject button on the internal, laptop-class, slot loading Blu-ray drive. I suggest doing without it.

FYI, I do all of my ripping on my main workstation and put the files on the NAS. The workstation is much nicer because I can manipulate the metadata with ease as compared to trying to navigate the same on this machine. I use dbPoweramp for that and highly recommend it even though its user interface and features can be obscure at times. Regardless, this eliminates the need for any optical drive on my AMS server.

Here is what the box looks like inside:
fc10b_alpha_opt_090000.jpg


Certainly doesn't look like any ordinary PC and as such, the build is somewhat more complicated than putting together an ordinary one.

On the plus side, the case oozes great German engineering. No sheet metal screws here. Every screw is threaded with most having the great socket cap. The manual is also very good and aids you mostly in the build of the system although leaves out critical information as to which motherboards fit, hence this guide.

The idea of a fanless PC is to eliminate the fan from the CPU and power supply and instead guide the heat to the side heatsinks. With neither being built to interface this way, you need to resort to using "heat pipes" that pull the heat to the side. And this represents the most complex part of the build.
 
Next came the difficult task of selecting a motherboard to go into this chassis. An email communication to the Streacom did not result in a helpful response. They did not want to be liable for wrong suggestions so have decided to give no recommendations (the ones on their web site are old).

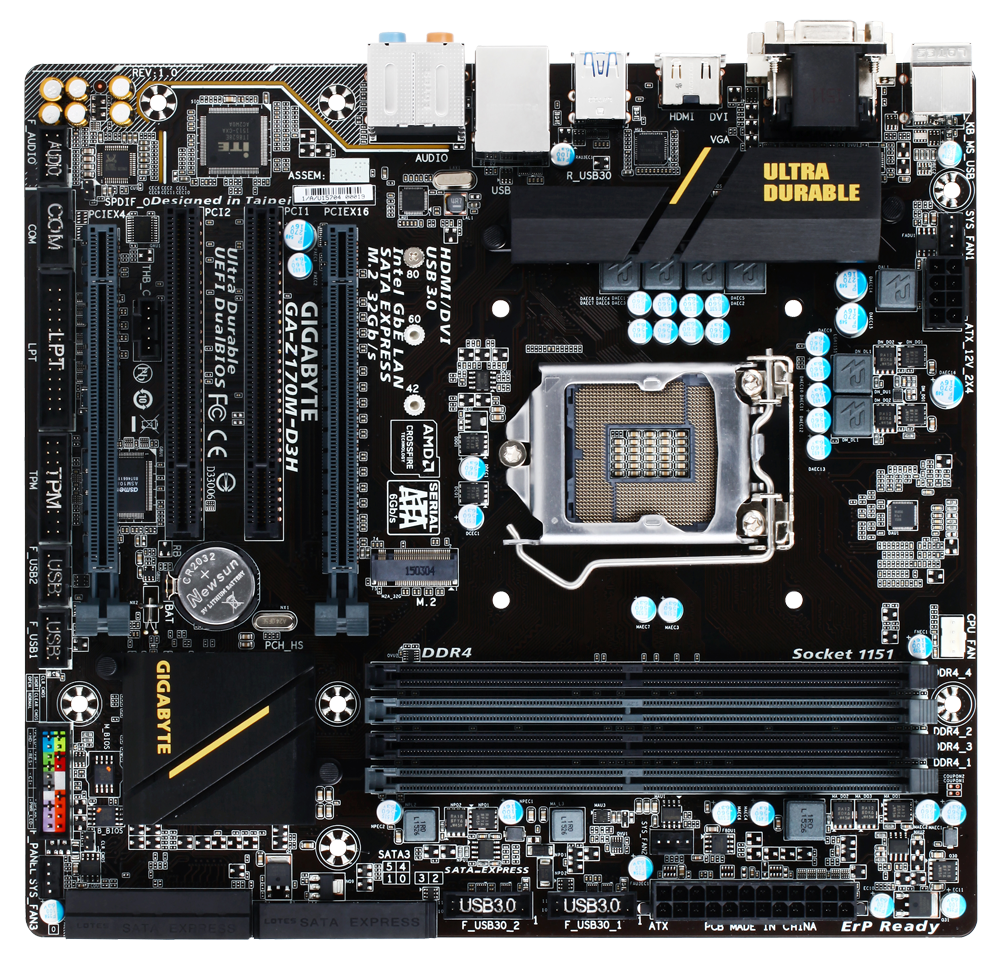
I had selected the Skylake CPU from Intel which at that time was brand new. Most of the motherboards were targeted toward gamers with overclocking, heat producing components. Finding a plain one was not easy. Today that is probably different so you may want to do a search of your own. But this is what I purchased from Amazon: http://www.amazon.com/Gigabyte-LGA1...psc=1&redirect=true&ref_=od_aui_detailpages03

It is the Gigabyte LGA1151 Intel Z170 Micro ATX DDR4 Motherboards GA-Z170M-D3H. Yes, someone needs to shoot these guys in the head together with Intel for these obscure names and models.

The cost is $105 as of this writing which is pretty decent.

This is what it looks like:

20150721163739_big.png


If you look in the back, under the label "Ultra Durable" there is metal piece that is heat sink for the (ASIC) component under it. On many motherboards this is on the side where it could interfere with the heatpipes that would pull the heat from the CPU to the side.


.
 
Here is the Gigabyte motherboard mounted in the case:

20150916_155324.jpg


As with ordinary builds, you need to align the back connectors to the case and let the board land where it would.

20150916_155336.jpg


I like that this board has both HDMI and DVI. Related, note that I use the integrated graphics in the CPU, saving power and space.

Note that this case accepts full sized PCIe expansion boards so gives you flexibility in that regard. It also has plenty of room on the side which I utilized for a fanless power supply.
 
Next in line is the CPU. For this, I selected Intel Skylake Core i5 CPU. The i7 that was available at the time was more expensive and ran hotter. With the core i5, I have only had an occasional glitch where the CPU fell behind upsampling. This was infrequent enough that makes me feel that it is still the right choice. Without resampling, CPU usage even with Dirac EQ running, is less than 5%. So most of the time the CPU is idling resulting in a very cool system. So cool that even without heatsink the CPU was not hot to touch! Of course the heatsink is needed for resampling and such.

I purchased this through Amazon for about $240: http://www.amazon.com/Intel-Boxed-I...psc=1&redirect=true&ref_=od_aui_detailpages00

If you read the specs for the Skylake i5 you see very high wattage ratings. But those are at maximum utilization. In this application with very low CPU usage, the advanced manufacturing and optimized design of the Skylake is a big advantage in pulling power consumption way down.

Anyway, insertion of the CPU is no big deal as long as you know how to align it. Here it is in the motherboard:

20150916_155634.jpg


And a close-up:

20150916_155642.jpg
 
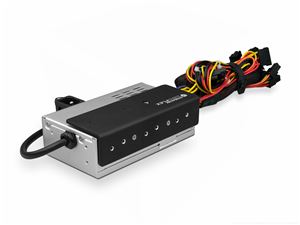
Next I put in the power supply. For this, I chose the Streacom switchmode, fanless, high-efficiency power supply. Boy that was a mouthful! I went this route because a) I knew it would fit the case and b) I have an isolated USB interface to my DAC so not afraid of the noise in the power supply. It would also be silly to opt for a linear power supply when the rest of the computer is whaling at all kinds of frequencies. The part description is: Streacom ST-ZF240 ZeroFlex 240W Passive PSU.

Finding this unit in US was again hard. I finally found it at QuietPC web site which seemed trustworthy: http://www.quietpcusa.com/Streacom-ST-ZF240-ZeroFlex-240W-Passive-PSU-P1093.aspx
GetImage.ashx


As you see there, the price is $175.

Here is my sample:

20150916_161803.jpg


The unit bolts to the side of the case and utilizes that heat sink for cooling:

20150916_162608.jpg


The power supply is cantilevered on the side so it takes some dexterity to put it there. It is complicated by having to push the screws through the heatsink.
 
Next was the challenging part. The case comes with a set of heat pipes to connect the CPU to the heat sink. Alas, despite my careful shopping of the motherboard, the included ones were not long enough or tall enough (I forget which) for that. So I quickly get online and order the longer and bent ones to accommodate every situation from QuietPC. Sadly QuietPC saddled me with another large shipping charge. Boy did I miss Amazon Prime free shipping.

Here are the two parts:

STHT4 Streacom ST-HT4 CPU Cooler Riser for FC9/10

STLH4 Streacom ST-LH4 Extended Length Heatpipes

There were $35 each plus $20 shipping :(.

This is one of heatpipe:

20150917_111027.jpg


This is how they attach to the CPU coupling piece:

20150917_111212.jpg


This is by far the trickiest part of the insall. You need to put heatsink compound between all the components and get them to align without making a huge mess as you screw everything down:

20150917_114754.jpg


Once there, you screw the upper cap on the CPU heatsink:

20150917_120347.jpg


Everything will be much simpler from here on.
 

Attachments

  • 20150917_111113.jpg
    20150917_111113.jpg
    176.7 KB · Views: 595
Next was attaching the Blu-ray drive. I opted for Panasonic UJ-265 Slim 6X Blu-ray Writer SATA Slot Load: http://www.amazon.com/Panasonic-UJ-...psc=1&redirect=true&ref_=od_aui_detailpages02

It now says it is not available. But any drive would do that goes into laptops with slot loading.

20150917_121309.jpg


You will need one of these adapters to convert its connectors to larger SATA: http://www.amazon.com/Slimline-Sata...psc=1&redirect=true&ref_=od_aui_detailpages03

20150917_121810.jpg


Here she is mounted:

20150917_122600_001.jpg


Can't say I like the dangling adapter with all the force it puts on the connector.

Anyway, as I said, I would do without the drive if I built another.
 
For permanent storage, of course I went with SSD. Here, I am a big fan of 3-D NAND Flash from Samsung due to higher durability. Instead of getting a laptop one, I utilized the new "M.2" slot on the motherboard.

I bought the 500 Gigabyte version even though I don't need nearly that much storage. But having a larger drive helps with reliability and I thought I could put some of my music on it in the odd chance that my NAS server ever goes down.

http://www.amazon.com/Samsung-850-E...psc=1&redirect=true&ref_=od_aui_detailpages03. Price is about $150 as of this writing.

20150917_125521.jpg


And here she is mounted next to the CPU:

20150917_125742.jpg


You can see the progress this far with the cabling attached to Blu-ray drive and such:

20150917_130055.jpg
 
The machine would not do anything without memory. I went for the newer DD4 interface and 16 Gigabytes. No, you don't need this much for the server to work. But extra memory reduces traffic to and from the SSD, increasing its life, and makes the machine pretty future proof.

Again, I wanted low-power, non-gaming memory and opted for this Crucial brand:http://www.amazon.com/dp/B00MMLUYQK

Here is the stupid part number for that: Crucial 16GB Kit (8GBx2) DDR4 2133 MT/s (PC4-17000) CL15 DR x8 Non-ECC UDIMM 288-Pin Memory CT2K8G4DFD8213/CT2C8G4DFD8213

20150917_131059.jpg


BTW, you do need to buy a pair regardless of size to take full advantage of the dual memory channels on the CPU. Here they are seated in their new home:

20150917_131422.jpg
 
For the OS, I opted for Windows 10. As an ex-employee I can get it at highly discounted price. This was my first install of Windows 10 and I was shocked how much of the primitive look and feel of the old OS is still maintained during the install:

20150917_132223.jpg


I mean give me a break. This is not the Windows over DOS world anymore.

In general, I find Windows 10 aggravating to use for this Windows 7 user. But once everything is setup, it is no different.
 
The finished server runs surprisingly well. The CPU heatsink is cool/cold to touch even under load! The Power supply side gets a tad warm but again, not remotely hot.

In the few months I have had it, it has run very reliably with maybe a couple of hangs/crashes.

One late addition is connection of my LG OLED 4K display. Sadly the Intel built-in graphics only goes up to 30 frames/second. And Roon goes nuts, only running full screen and pretty crippled at that. The Roon 1.2 release says something about better support but I have not had time to test that version yet.

Overall, the AMS server has been a delight to use. It has exceeded my expectations in performance, quality and reliability. The combination with Roon and Tidal subscription has made it the heart of my system.
 
I remain astonished that computers work at all.

Nice build. I should do something like that (noiseless) for my desktop.

case $340
mb $105
cpu $240
ps $175
pipes $70
ssd $150
_________
$1080 + some shipping

+memory
+os
+musical softwares like Dirac and Roon and ???

Ok, I'll wait till "next time".
 
Thanks for adding them up :).

Memory is $61.
OS was employee cost so I can't say.
Dirac is about $440 for stereo version that I have.
Roon lifetime subscription is $500. https://roonlabs.com/pricing.html
 
This looks like the guts of some drone spy pirate spaceship. Can it do tele-transportation to another time and space? :)
Cool.
It can... through music :).
 
Did you try HQplayer on that old clunker yet? :)
 
Back
Top Bottom