I recently purchased the Scarlett Solo 3rd Gen and couple of mics, mostly for podcasting and audio measurements.
The new generation seems to be better than the previous one regarding on how it measures; feel free to compare http://prosound.ixbt.com/interfaces/focusrite/scarlett/solo/gen2-2444.shtml with http://prosound.ixbt.com/interfaces/focusrite/scarlett/solo/24-44.shtml and you'll see that background noise is lower on the 3rd Gen and harmonics are all below -100 dB.
Solo Gen2
Solo Gen3
Despite what @amir said in another thread, I found that Focusrite ASIO drivers seem to be working fine on my desktop and also on a Lenovo T440p. Probably the 3rd Gen of Scarlett interfaces are somehow better or the newer drivers are better (or maybe it’s because of the latest Windows 10 update from September, 2019). The ASIO control panel is locking the bitrate to one single value chosen by the user, so if the software is trying to change this automatically, then it may crash, although sometimes it does it well (depends how well is accessing the ASIO drivers). However, from the Focusrite ASIO control panel the bitrate and bitdepth can be easily adjusted, but Windows 10 control panel will always see the max values that were previously setup in the Focusrite control panel!
The software bundle is very generous, including “Ableton® Live Lite™ and Pro Tools® First Focusrite Creative Pack – Softube’s Time and Tone Bundle; Focusrite’s Red Plug-in Suite; and a choice of one of four of XLN Audio’s Addictive Keys virtual keyboard instruments”.
I find the Ableton Lite 10 DAW not so easy to use, but very good for podcasting or mixing. However, I prefer to use this interface on my iMac with GarageBand, although the Ableton application works perfectly fine on both latest Windows 10 and latest Mojave as well, but GarageBad is having an easier visual interface and more built-in plugins and controls (I actually use the compressor, stereo expander and optionally the EQ as high-pass filter).
The bundle also includes Pro Tools | First Focusrite Creative Pack that asks for an iLok license management account that can be easily created within couple of minutes.
The RED PLUG-IN SUITE seems to contain a large suite of EQ and compressor plugins.
Also Gen3 has the AIR mode, introduced 30 years ago by Focusrite, that emulates an “airy” sound that increases the clarity, emphasises the voice and makes the sound more upfront and...”airy”. Focusrite has a graph with the airy effect here:

It’s easy to see the gradually volume boost with about 4 dB from 100 Hz to 10 kHz.
Just to double check if my Solo behaves in the same mode when AIR is pressed, here are my measurements with AIR button not pressed vs. pressed:


Pretty close to what manufacturer states in their documents, like expected actually. Based on manufacturer wrote, here’s what the AIR effect is intended to do:
“There are three main elements that contribute to the classic ‘Air’ effect.
Coupling – the interaction between the microphone and the ISA’s mic pre input transformer.
Clarity – created by the low distortion and high linearity of the transformer and preamp design.
Frequency – a subtle enhancement created by the transformer resonance resulting in an emphasis in the higher frequency content of the sound.
Engaging the setting on the Clarett Mic Preamp switches the impedance of the preamp to that of the original ISA and enables the ‘transformer resonance effect’, giving your microphone recordings the air and clarity of an ISA transformer-based mic pre recording. ‘Air’ is useful with any microphone, but in particular listen to the benefits with vintage microphones for which this input impedance was originally intended”.
In my tests, without AIR mode enabled and volume setup for -1dB peaks, when I pressed the AIR button it starts clipping a lot per the increased gain from AIR. However, after recalibrating the volume, ARTA is showing an increase in harmonics from less than -100 dB to about -80 dB. So, there's something else that AIR-mode does to the output sound.
I also have an audio recording done by me today: https://drive.google.com/open?id=14HOs8jNQ0S3Rrt_XkfZ8caydzzZekRZH. The first speech is done normally, the second one is done with the AIR button pressed. You should notice the 1 dB increase in volume, but also the more “airy” and brighter sound when in AIR-mode. It’s like a proximity effect of the mics, but on the mid-trebles instead of the mid-bass, so quiet a pleasant effect.
The PCB seems well done and clean enough, with good-looking soldering, although some flux residue can be seen on the backside of the PCB, but not sure anyone should actually care about this.

Front of PCB

Bottom of PCB
The USB transport is done via a XMOS chip. The USB plug is an USB-C small format, but the USB cable is USB-C to USB-A, so it can get connected to any regular computer. The ADC/DAC processing is done by a $10 CIRRUS LOGIC CS4272-CZZ chip able to record/playback two 24/192kHz audio signals with a dynamic of 114 dB and a THD+N of -100 dB (a SINAD of about 17 dB). Datasheet can be found here: https://statics.cirrus.com/pubs/proDatasheet/CS4272_F1.pdf.

Close-up with the PCB
On the PCB bord I can spot a MC74HC595A chip which is a 8-Bit Serial-Input/Serial or Parallel-Output Shift Register with Latched 3-State Outputs, a HEF4053B - Triple single-pole double-throw analog switch, couple of NJM2122 - ultra low noise dual operational amplifier and several NJM8065 - dual operational amplifier.
I see that NJM2122 is quite a low noise opamp and given their positioning on the PCB layout I think these opamps are used on the MIC and INST inputs, just in front of the ADC chip, while the NJM8065 looks more like a general-use opamp, probably used on DAC outputs (the two TRS plugs) and probably for the AIR-mode effect and in the gain-stage of the headphones amplifier (not sure what the output buffer is, as the chip is scratched a bit with two parallel lines/scratches). I wonder how much the use of NJM8065 will influence THD+N? Maybe swapping those with OPA1612 will improve the final specs, although I’m not sure it really worth the trouble, given the risks caused by the very close proximity of opamps to the surrounding SMD passive components.

JRC/NJM2122 and 8065 can be spotted on the board
On the backside of the PCB I identified a chip that might gather the BIOS/firmware: https://www.mct.net/download/macronix/mx25l8005.pdf. Inside there should be the built-in firmware code, most likely upgradable via the USB connectivity from a computer running Window.
Nearby the headphones stereo plug there’s a boost-converter voltage regulator chip marked as MKPC 3425 894. This might be similar with the datasheet found here: https://www.monolithicpower.com/pub/media/document/MP3425_r1.1.pdf. This is most likely used to boost-up the USB provided +5V power up to +48V to supply the “phantom power” to dedicated dynamic microphones.
Given the rather low maximum output power provided on the headphones-out and the lack of dedicated output buffers, I really think that the headphones are directly driven by the NJM8065 opamps, so sensitive headphones are required for monitoring purposes. I’ve used sensitive AKG K550 closed headphones, in a very quiet environment (quiet bedroom at night with no audio pollution sources) and the volume was very loud to my ears when I got the knob volume over 2 o’clock (couldn’t pass over 2 o’clock, because I care about my hearing). However, when using Audio Technica ATH-20X monitoring headphones the knob volume could be maxed out without feeling that my hearing will get damaged. I also tested the sound with Hifiman HE-560, but I felt like the volume is around 25% then needed, so low indeed, but it was clean and free of audible distortions.
The polarised capacitors are branded YUSCON and some of them seem to be rated at 85C, but some others to 105C (probably the ones used as bypassing the audio opamps are at 105C). Given that the audio interface is completely cold, even after hours of operation, I see no reason to pick up 105C capacitors inside, so I see a frugal choice here. Given the very low ripple that can exist in such audio interfaces that take the power from the USB’s +5V, I don’t think there will ever be issues with these caps. Well, the phantom power capacitor nearby the dedicated SMSP boost-converter is probably the most “stressed” one.

When I touch the outer shell of the XLR plugs from MIC/INST I get a tiny/little noise if no mic & no instrument are connected (max. input impedance) when maximum gain is used. That makes me thinking that the audio ground might be separated from the USB/computer’s ground. If that’s true, then this means that the probability of getting ground-loops is extremely low.
I’ve tested both Instrument and Microphone inputs and I see that the self-noise is about the same for both when set to minimum, with all the noise kept well below -140 dB, while when setting the gain to the maximum the noise increases a bit above -120 dB on the MIC input and a bit above -100 dB on the INST input. This is probably due to the gain difference between the two inputs, although the better THD+N I was able to get it on the INST input: 0.0015% on INST vs. 0.0038% on MIC.


MIC input with AIR button pressed

Note: Measurements were done in loopback mode at an output level of 1.145V RMS (best signal/noise ratio I found), so the THD+N figures represent both ADC + DAC distortions and noise! Sinewaves were taken from audiocheck.net, 16 bit/48 KHz, because these are lower in harmonics than ARTA's built-in generator. However, the actual measurement's results for this audio device will definitely be better if Audio Precision equipment will be used.
I also tested the MIC input with an AKG D5S dynamic mic (no phantom power needed) with a self-noise of 18 db(A) and also with a SUPERLUX ECM999 measurements condenser mic (needs 48V phantom power) with an estimated self-noise of 22 dB(A) (if it's using the same capsule as ECM888 mic). Recording’s noise with the AKG dynamic mic is very low, barely audible on the final mix/podcast, while the background noise of a recording with the ECM999 microphone is way much higher, although this is not related to the audio interface itself, but to the microphone’s internal self-noise.
Worth mentioning that interface’s gain needs to get setup way much higher when a dynamic mic is used, so, theoretically, the internal noise of the audio interface may only be audible when dynamic mics are used, but this really depends on the gain used which depends on mic’s sensitivity. In this particular case, Superlux ECM999 has a sensitivity of 14mV/Pa, while the AKG D5S has 2.6mV/Pa.


LINE input used, 1 KHz sinewave
Overall, I find this audio interfaces very good for use in a home/small studio, having a really low internal noise and a very good THD: below -100 dB on INST input and about -85 dB on MIC input (loopback, measured just before the input RED light to show the clipping, with output signal of 2V RMS on the TRS plugs).
L.E.: I've added INST and LINE graphs, separately.
The new generation seems to be better than the previous one regarding on how it measures; feel free to compare http://prosound.ixbt.com/interfaces/focusrite/scarlett/solo/gen2-2444.shtml with http://prosound.ixbt.com/interfaces/focusrite/scarlett/solo/24-44.shtml and you'll see that background noise is lower on the 3rd Gen and harmonics are all below -100 dB.
Solo Gen2
Solo Gen3
Despite what @amir said in another thread, I found that Focusrite ASIO drivers seem to be working fine on my desktop and also on a Lenovo T440p. Probably the 3rd Gen of Scarlett interfaces are somehow better or the newer drivers are better (or maybe it’s because of the latest Windows 10 update from September, 2019). The ASIO control panel is locking the bitrate to one single value chosen by the user, so if the software is trying to change this automatically, then it may crash, although sometimes it does it well (depends how well is accessing the ASIO drivers). However, from the Focusrite ASIO control panel the bitrate and bitdepth can be easily adjusted, but Windows 10 control panel will always see the max values that were previously setup in the Focusrite control panel!
The software bundle is very generous, including “Ableton® Live Lite™ and Pro Tools® First Focusrite Creative Pack – Softube’s Time and Tone Bundle; Focusrite’s Red Plug-in Suite; and a choice of one of four of XLN Audio’s Addictive Keys virtual keyboard instruments”.
I find the Ableton Lite 10 DAW not so easy to use, but very good for podcasting or mixing. However, I prefer to use this interface on my iMac with GarageBand, although the Ableton application works perfectly fine on both latest Windows 10 and latest Mojave as well, but GarageBad is having an easier visual interface and more built-in plugins and controls (I actually use the compressor, stereo expander and optionally the EQ as high-pass filter).
The bundle also includes Pro Tools | First Focusrite Creative Pack that asks for an iLok license management account that can be easily created within couple of minutes.
The RED PLUG-IN SUITE seems to contain a large suite of EQ and compressor plugins.
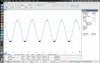
Also Gen3 has the AIR mode, introduced 30 years ago by Focusrite, that emulates an “airy” sound that increases the clarity, emphasises the voice and makes the sound more upfront and...”airy”. Focusrite has a graph with the airy effect here:
It’s easy to see the gradually volume boost with about 4 dB from 100 Hz to 10 kHz.
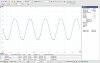
Just to double check if my Solo behaves in the same mode when AIR is pressed, here are my measurements with AIR button not pressed vs. pressed:
Original MIC-input frequency response
AIR-mode pressed MIC-input frequency response
Pretty close to what manufacturer states in their documents, like expected actually. Based on manufacturer wrote, here’s what the AIR effect is intended to do:
“There are three main elements that contribute to the classic ‘Air’ effect.
Coupling – the interaction between the microphone and the ISA’s mic pre input transformer.
Clarity – created by the low distortion and high linearity of the transformer and preamp design.
Frequency – a subtle enhancement created by the transformer resonance resulting in an emphasis in the higher frequency content of the sound.
Engaging the setting on the Clarett Mic Preamp switches the impedance of the preamp to that of the original ISA and enables the ‘transformer resonance effect’, giving your microphone recordings the air and clarity of an ISA transformer-based mic pre recording. ‘Air’ is useful with any microphone, but in particular listen to the benefits with vintage microphones for which this input impedance was originally intended”.
In my tests, without AIR mode enabled and volume setup for -1dB peaks, when I pressed the AIR button it starts clipping a lot per the increased gain from AIR. However, after recalibrating the volume, ARTA is showing an increase in harmonics from less than -100 dB to about -80 dB. So, there's something else that AIR-mode does to the output sound.
I also have an audio recording done by me today: https://drive.google.com/open?id=14HOs8jNQ0S3Rrt_XkfZ8caydzzZekRZH. The first speech is done normally, the second one is done with the AIR button pressed. You should notice the 1 dB increase in volume, but also the more “airy” and brighter sound when in AIR-mode. It’s like a proximity effect of the mics, but on the mid-trebles instead of the mid-bass, so quiet a pleasant effect.
The PCB seems well done and clean enough, with good-looking soldering, although some flux residue can be seen on the backside of the PCB, but not sure anyone should actually care about this.
Front of PCB
Bottom of PCB
The USB transport is done via a XMOS chip. The USB plug is an USB-C small format, but the USB cable is USB-C to USB-A, so it can get connected to any regular computer. The ADC/DAC processing is done by a $10 CIRRUS LOGIC CS4272-CZZ chip able to record/playback two 24/192kHz audio signals with a dynamic of 114 dB and a THD+N of -100 dB (a SINAD of about 17 dB). Datasheet can be found here: https://statics.cirrus.com/pubs/proDatasheet/CS4272_F1.pdf.
Close-up with the PCB
I see that NJM2122 is quite a low noise opamp and given their positioning on the PCB layout I think these opamps are used on the MIC and INST inputs, just in front of the ADC chip, while the NJM8065 looks more like a general-use opamp, probably used on DAC outputs (the two TRS plugs) and probably for the AIR-mode effect and in the gain-stage of the headphones amplifier (not sure what the output buffer is, as the chip is scratched a bit with two parallel lines/scratches). I wonder how much the use of NJM8065 will influence THD+N? Maybe swapping those with OPA1612 will improve the final specs, although I’m not sure it really worth the trouble, given the risks caused by the very close proximity of opamps to the surrounding SMD passive components.
JRC/NJM2122 and 8065 can be spotted on the board
On the backside of the PCB I identified a chip that might gather the BIOS/firmware: https://www.mct.net/download/macronix/mx25l8005.pdf. Inside there should be the built-in firmware code, most likely upgradable via the USB connectivity from a computer running Window.
Nearby the headphones stereo plug there’s a boost-converter voltage regulator chip marked as MKPC 3425 894. This might be similar with the datasheet found here: https://www.monolithicpower.com/pub/media/document/MP3425_r1.1.pdf. This is most likely used to boost-up the USB provided +5V power up to +48V to supply the “phantom power” to dedicated dynamic microphones.
Given the rather low maximum output power provided on the headphones-out and the lack of dedicated output buffers, I really think that the headphones are directly driven by the NJM8065 opamps, so sensitive headphones are required for monitoring purposes. I’ve used sensitive AKG K550 closed headphones, in a very quiet environment (quiet bedroom at night with no audio pollution sources) and the volume was very loud to my ears when I got the knob volume over 2 o’clock (couldn’t pass over 2 o’clock, because I care about my hearing). However, when using Audio Technica ATH-20X monitoring headphones the knob volume could be maxed out without feeling that my hearing will get damaged. I also tested the sound with Hifiman HE-560, but I felt like the volume is around 25% then needed, so low indeed, but it was clean and free of audible distortions.
The polarised capacitors are branded YUSCON and some of them seem to be rated at 85C, but some others to 105C (probably the ones used as bypassing the audio opamps are at 105C). Given that the audio interface is completely cold, even after hours of operation, I see no reason to pick up 105C capacitors inside, so I see a frugal choice here. Given the very low ripple that can exist in such audio interfaces that take the power from the USB’s +5V, I don’t think there will ever be issues with these caps. Well, the phantom power capacitor nearby the dedicated SMSP boost-converter is probably the most “stressed” one.
Caps nearby the ADC/DAC chip, probably used to bypass its voltage rails
When I touch the outer shell of the XLR plugs from MIC/INST I get a tiny/little noise if no mic & no instrument are connected (max. input impedance) when maximum gain is used. That makes me thinking that the audio ground might be separated from the USB/computer’s ground. If that’s true, then this means that the probability of getting ground-loops is extremely low.
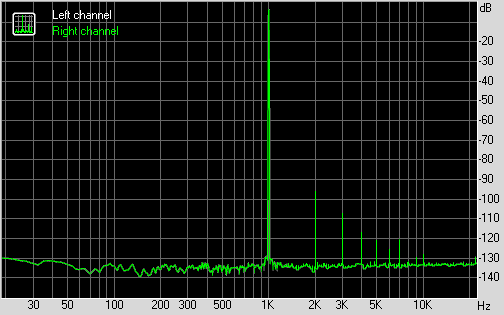
I’ve tested both Instrument and Microphone inputs and I see that the self-noise is about the same for both when set to minimum, with all the noise kept well below -140 dB, while when setting the gain to the maximum the noise increases a bit above -120 dB on the MIC input and a bit above -100 dB on the INST input. This is probably due to the gain difference between the two inputs, although the better THD+N I was able to get it on the INST input: 0.0015% on INST vs. 0.0038% on MIC.
MIC input self noise when nothing connected and gain is to the min

MIC input self noise when nothing connected and gain is to the max

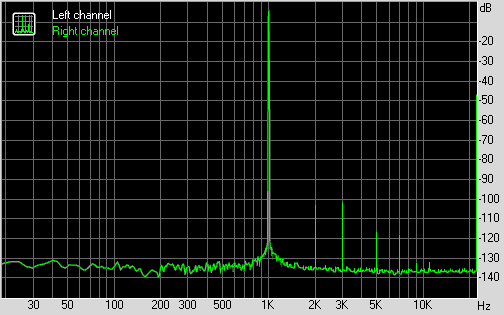
MIC input used, 1 KHz sinewave
MIC input self noise when nothing connected and gain is to the max
MIC input used, 1 KHz sinewave
MIC input with AIR button pressed
MIC input with both AIR and Direct Monitor buttons pressed
You can easily see the effect of harmonics increase when AIR button is pressed, but also the odd distortions and decrease of output volume caused by the Direct Monitor. Not sure what is causing such kind of effect when Direct Monitor is pressed, but this is usually not pressed while doing recording, so it shouldn't matter much.
Note: Measurements were done in loopback mode at an output level of 1.145V RMS (best signal/noise ratio I found), so the THD+N figures represent both ADC + DAC distortions and noise! Sinewaves were taken from audiocheck.net, 16 bit/48 KHz, because these are lower in harmonics than ARTA's built-in generator. However, the actual measurement's results for this audio device will definitely be better if Audio Precision equipment will be used.
I also tested the MIC input with an AKG D5S dynamic mic (no phantom power needed) with a self-noise of 18 db(A) and also with a SUPERLUX ECM999 measurements condenser mic (needs 48V phantom power) with an estimated self-noise of 22 dB(A) (if it's using the same capsule as ECM888 mic). Recording’s noise with the AKG dynamic mic is very low, barely audible on the final mix/podcast, while the background noise of a recording with the ECM999 microphone is way much higher, although this is not related to the audio interface itself, but to the microphone’s internal self-noise.
Worth mentioning that interface’s gain needs to get setup way much higher when a dynamic mic is used, so, theoretically, the internal noise of the audio interface may only be audible when dynamic mics are used, but this really depends on the gain used which depends on mic’s sensitivity. In this particular case, Superlux ECM999 has a sensitivity of 14mV/Pa, while the AKG D5S has 2.6mV/Pa.
INSTRUMENT input used, 1 KHz sinewave
LINE input used, 1 KHz sinewave
Overall, I find this audio interfaces very good for use in a home/small studio, having a really low internal noise and a very good THD: below -100 dB on INST input and about -85 dB on MIC input (loopback, measured just before the input RED light to show the clipping, with output signal of 2V RMS on the TRS plugs).
L.E.: I've added INST and LINE graphs, separately.
Attachments

Last edited: