• WANTED: Happy members who like to discuss audio and other topics related to our interest. Desire to learn and share knowledge of science required. There are many reviews of audio hardware and expert members to help answer your questions. Click here to have your audio equipment measured for free!

My ATC look-a-likes.

badspeakerdesigner

Active Member
Joined
Jan 12, 2023
Messages
274
Likes
446
I really, really like the look of ATC's three ways. I really, really don't like the price. I've also got a bunch of tools and an idea.

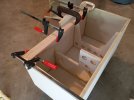
I've taken Paul Carmody's Pit Vipers and tossed them into an ATC style cabinet. Lots of work left to do but felt like sharing the wip, feels good to see them upright after all the work so far. Probably a bit more bracing. Cabinet fill and xover pcb's are in the mail. Excited to hear them, will be sharing a good measurement set when they're done.

20230517_192213.jpg
 

RayDunzl

Grand Contributor
Central Scrutinizer
Joined
Mar 9, 2016
Messages
13,250
Likes
17,186
Location
Riverview FL
Nice build...

How big is the woofer?
 
OP
B

badspeakerdesigner

Active Member
Joined
Jan 12, 2023
Messages
274
Likes
446
Painted the baffles, had a semi gloss epoxy on there at first, but really didn't like it so I tried a flat color, looks perfect. I wanted a smooth texture but some of the wood grain of the ply came through and I actually like it a lot.

20230520_093913.jpg


Driver fit is good, the peerless tweeter had a nice foam seal but I had to remove else the tweeter protruded. The woofers are on back order till next month.

20230520_094703.jpg


Not sure what this is but we had a roll of it, maybe a yoga mat at one point but we have thicker ones for that so I've procured this material for gaskets and it works great. A few strips and a circle fit the walls of the pvc midrange enclosure and stay there without any glue.

20230520_102243.jpg


Still waiting on bolts for the baffle and hunting down some materials for the lining the cabinet walls. I initially wanted to veneer these in a darker wood but I'm kind liking the lighter color so I will probably just finish them birch, which will save me money since I need to two sheets to cover these monsters.

20230520_110837.jpg
 
OP
B

badspeakerdesigner

Active Member
Joined
Jan 12, 2023
Messages
274
Likes
446
Here's some earlier build pics for anyone interested.

Baffle glue up

341936728_634794427986749_8674691466670593354_n.jpg


Glueing in oak boards to hold tee nuts. I've heard a lot of complaints about tee nuts falling out and failing, but I haven't run into that yet with my builds so I stuck with them for this.

20230428_153030.jpg


I don't really do anything, it's all this cat. This is seriously her favorite place to be in the whole house, I don't get it.

341914367_756724439325643_7309178282283811951_n.jpg


Mid range chamfer. I wanted to go deeper with it but I was worried about the inner lip coming off, not the best plywood in the world.

342358899_1463924411081205_2159305135305576945_n.jpg


Nice flat surface for baffle mounting.Not pictured but I routed out a small channel for strips of gasket tape to make sure there is a good seal.

342219670_591054576332056_8329356231078935743_n.jpg


The bolt holes were the hardest thing to do, maybe because I did it the wrong way, who knows. I have no drill press or way to keep my drill steady enough (I do have a drill block but that won't do) to make clean straight holes, so I used my router to make 1/4" holes, then 1/2" bit to make the counter sinks. In order to make sure the bolts went straight I plunged further with 1/4" bit all the way to the oak just enough to mark it. I followed that up with a 5/16" bit for the tee nuts. That ended up getting me very clean and accurate holes for the bolts. Ignore the hole being off mark, the mark is off and I used an edge guide for the router.

20230512_120210.jpg
 

Attachments

  • 20230428_100146.jpg
    20230428_100146.jpg
    201.9 KB · Views: 74
OP
B

badspeakerdesigner

Active Member
Joined
Jan 12, 2023
Messages
274
Likes
446
And here they are. First impressions are very good. Going to get the measurement stuff out to verify performance and find any issues lurking about then toss them on a dolly and get some on and off axis stuff outside.

Resized_20230525_152342_17507898302350.jpeg
 
OP
B

badspeakerdesigner

Active Member
Joined
Jan 12, 2023
Messages
274
Likes
446
I'm still waiting on pcb's but I couldn't help but solder up the passive xovers on some cardboard and get a test run. I'm kind of exhausted after doing one so I'll do the other tomorrow and get some stereo impressions and hopefully move them out into the larger room. Here's just a quick holding the mic up in front of me in a small bedroom measurement, looks pretty good. The cabinets aren't lined with anything inside yet. Def not to be taken as useful data.
 

Attachments

  • pit viper 1.png
    pit viper 1.png
    51.9 KB · Views: 166

OldHvyMec

Senior Member
Forum Donor
Joined
Oct 5, 2022
Messages
369
Likes
293
Well OP you have certainly done a nice job. My hand are hurting from looking at the work. :) It is motivating to see
you getting closer and closer. I've had to make a few "how to" videos for people, that is the part I really don't care for.
The actual work may make my hands ache but the video editing makes my brain hurt. LOL

I'm more of "here is a pile of materials. Here is the pile of materials assembled." I keep wanting to grab the camera
and then I remember getting dried glue off my A77 and A99 Sonys. That was a chore, to do no harm.

There is a lot of detail to your build. I'm a huge fan of Flex Seal and @TM Sound Coat for speaker cabinets. I like Flex seal
and silicone on all interior seams and interior panels for the return on the investment. Sound Coat is a little dated but still a great
product maybe better overall. The price, it's not inexpensive though.

You could probably use the cabinets to hold up your car if you needed some under wheel stands in a pinch. They look pretty darn sturdy.

God Bless DIY. My hand already feel better.

Regards
 
OP
B

badspeakerdesigner

Active Member
Joined
Jan 12, 2023
Messages
274
Likes
446
Brought the speakers and all my rig outside to measurement, only to find that I had the woofer wired backwards which explained the pretty awful performance I was getting around the woof/mid xover point. I only figured it out after I took them back inside so I'll have to get measurements again some other day. My back is kind of tired of lifting them, I might have pulled muscle :/

As far subjective impressions I find the speakers to be very good, probably the best thing I've heard in my home (I have Amiga, Classix II, C-note, Genelec 8030, and KH80). There is something that large woofers and wide baffles do that small speakers just cannot and I'm happy to find a sense of scale and space to music that I haven't heard before. I finally get the "musicians in the space with you" thing people describe which I'm suprised I never quite got with my nice monitors. I find the stock tuning a tad bright but a simple shelf filter fixes that. I'd have to give these things a 10/10 for now, there is way more speaker here than the cost of parts implies. If you have the skills and space this has got to be one of the best values in DIY right now (component costs were $380). Pretty proud of myself of building such a thing, was a nervous build where I wasn't sure things would work out. Next up is to save up the money for veneer and make some new stands and maybe toss on some corrective EQ.

I did notice the port has an audible resonance that can be heard on spoken word content, can't hear it on anything else. Hopefully I can track that one down, the cabinets have nothing inside or on the walls as of yet. There's also a bit of 50hz build up which makes sense, cabs are nearly the same height as the Amiga which need the bottom half filled to knock out a similar issue.

20230526_152601.jpg
 

tonapo

Active Member
Joined
Oct 14, 2019
Messages
158
Likes
80
These look excellent, I always feel slightly indequate whenever I read through threads like these! I wish I had your skills OP. Keep the pictures coming please!
 

fpitas

Master Contributor
Forum Donor
Joined
Jul 7, 2022
Messages
9,885
Likes
14,211
Location
Northern Virginia, USA
Brought the speakers and all my rig outside to measurement, only to find that I had the woofer wired backwards which explained the pretty awful performance I was getting around the woof/mid xover point. I only figured it out after I took them back inside so I'll have to get measurements again some other day. My back is kind of tired of lifting them, I might have pulled muscle :/

As far subjective impressions I find the speakers to be very good, probably the best thing I've heard in my home (I have Amiga, Classix II, C-note, Genelec 8030, and KH80). There is something that large woofers and wide baffles do that small speakers just cannot and I'm happy to find a sense of scale and space to music that I haven't heard before. I finally get the "musicians in the space with you" thing people describe which I'm suprised I never quite got with my nice monitors. I find the stock tuning a tad bright but a simple shelf filter fixes that. I'd have to give these things a 10/10 for now, there is way more speaker here than the cost of parts implies. If you have the skills and space this has got to be one of the best values in DIY right now (component costs were $380). Pretty proud of myself of building such a thing, was a nervous build where I wasn't sure things would work out. Next up is to save up the money for veneer and make some new stands and maybe toss on some corrective EQ.

I did notice the port has an audible resonance that can be heard on spoken word content, can't hear it on anything else. Hopefully I can track that one down, the cabinets have nothing inside or on the walls as of yet. There's also a bit of 50hz build up which makes sense, cabs are nearly the same height as the Amiga which need the bottom half filled to knock out a similar issue.

View attachment 288435
Well there you go. That invites midrange leakage. Nice job!
 

fpitas

Master Contributor
Forum Donor
Joined
Jul 7, 2022
Messages
9,885
Likes
14,211
Location
Northern Virginia, USA
I built mine modular, so I could move them myself. That does get away from the retro look, though.
 
OP
B

badspeakerdesigner

Active Member
Joined
Jan 12, 2023
Messages
274
Likes
446

I generally try to make sure that I jerk backwards as hard as I can when lifting for maximum lift lol.

I'm gonna have my friend come help me move them outside to measure this week. I did stuff the cabinet finally, had to cut costs so I just stapled in some folded sheets of polyeseter blankets we had. I might change it out one day but no one sees it so who cares. Gonna play with mid range stuffing as well. Been tricky to get anything done on them as I've just been listening to music. That dynamic range is seriously addicting, it's like just when you think the speaker is at it's limits is just keeps going.

I did open up a few projects to work on the other day, it was absolutely amazing to finally be able to really hear the bass. On my smaller speakers it was just a guessing game.
 

fpitas

Master Contributor
Forum Donor
Joined
Jul 7, 2022
Messages
9,885
Likes
14,211
Location
Northern Virginia, USA
I generally try to make sure that I jerk backwards as hard as I can when lifting for maximum lift lol.

I'm gonna have my friend come help me move them outside to measure this week. I did stuff the cabinet finally, had to cut costs so I just stapled in some folded sheets of polyeseter blankets we had. I might change it out one day but no one sees it so who cares. Gonna play with mid range stuffing as well. Been tricky to get anything done on them as I've just been listening to music. That dynamic range is seriously addicting, it's like just when you think the speaker is at it's limits is just keeps going.

I did open up a few projects to work on the other day, it was absolutely amazing to finally be able to really hear the bass. On my smaller speakers it was just a guessing game.
I've had good results with open cell egg crate foam, evenly glued to the surface with PL Premium. If you glue it over the entire surface it also seems to help with panel resonance.
 
OP
B

badspeakerdesigner

Active Member
Joined
Jan 12, 2023
Messages
274
Likes
446
Took them outside, data looks meh, something wrong with the mid range integration. I'll wait to get the xover on pcb to make final call but it does seem like somethings off. Huge dip in the lower end of the mid range. Driver polarity is all correct. The raw midrange is ruler flat from 150 to 3k so no idea what the dip is about. Slope looks wrong.

I'm gonna run them active out of an onboard 5.1 soundcard for now and if the passive xover of the original design doesn't work I'll just keep them active. I do prefer the ease of use of passive.

Pit Viper 0 to 60.png
 
Top Bottom