• WANTED: Happy members who like to discuss audio and other topics related to our interest. Desire to learn and share knowledge of science required. There are many reviews of audio hardware and expert members to help answer your questions. Click here to have your audio equipment measured for free!

Truncated line array project (rear speakers)

ppataki

Major Contributor
Joined
Aug 7, 2019
Messages
1,248
Likes
1,413
Location
Budapest
After being (almost) finished with my Murphy's Corner Line Array project and after discussing options for my rear speakers I am opening this thread where I will document my truncated line array rear speaker project

I will use 6 pieces of Dayton ND91-8 drivers (the same that I used for my MCLA project). This time I will try rear-mounting them and chamfer the holes from the front (as suggested previously by @fluid)
The drivers will be wired in series-parallel, resulting in 5.3 ohms of total resistance.

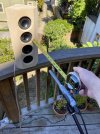
Cabinet will look like this:

1643405217024.png


The -15dB point will be 45Hz, so if I add my room gain and my DSP (Dirac Live 3 + some other plugins) I am sure I can get these down to <45Hz at 0dB which will be enough for me

I will use 2x9mm birch plywood with a layer of Green Glue in between (had extremely good results with that with my MCLA project)
The speakers will be mounted on the wall looking at my ears, totally on-axis with a listening distance of 160-170cm
I am not sure about the height though....any advice on that would be much appreciated!

Drivers are already on their way, I expect delivery early next week - so build will start probably in a few weeks' time, depending on my neighbor who is my allstar carpenter :) (KUDOS to him for all the projects he had built for me!)

I will keep on posting updates, as usual
Stay tuned!
 

hollis

Active Member
Joined
Sep 3, 2018
Messages
120
Likes
86
I’ve built some before! My project built truncated MCLA before the big ones, as a driver and air seal test.

I like your thinking here. Be prepared, vertical directivity will be crazy narrow. Think, a flat pancake of sound. You would absolutely want to mount them at ear level. Your six drivers vs my four will help add a little flexibility here.

We used 3/4” wood, which is very close to your 2x9mm.
 

Attachments

  • C69BE05A-2F8B-4DB5-A643-E7D991E4522F.jpeg
    C69BE05A-2F8B-4DB5-A643-E7D991E4522F.jpeg
    364.2 KB · Views: 206
OP
P

ppataki

Major Contributor
Joined
Aug 7, 2019
Messages
1,248
Likes
1,413
Location
Budapest
Thank you @hollis, that sounds great!
I will definitely mount them at ear height then :)
I will keep posting updates; I hope build will start in the coming weeks
Good news: the drivers have already arrived!
 

BDE

Active Member
Joined
Nov 11, 2020
Messages
135
Likes
275
We are talking about rear speaker, so do you really think it is necessary to go as deep as 45Hz?
I would also try out a Bessel array configuration.
 
OP
P

ppataki

Major Contributor
Joined
Aug 7, 2019
Messages
1,248
Likes
1,413
Location
Budapest
We are talking about rear speaker, so do you really think it is necessary to go as deep as 45Hz?
I would also try out a Bessel array configuration.
Yes, it is since I listen to many quadraphonic recordings and they do have full range content in the rear channels too
 

hollis

Active Member
Joined
Sep 3, 2018
Messages
120
Likes
86
We are talking about rear speaker, so do you really think it is necessary to go as deep as 45Hz?
I would also try out a Bessel array configuration.
I just finished watching Dark Night in 4.1 (center ch routed to LR) with a 40hz bass management crossover on all speakers. There is definitely directional bass information in that film, especially in the “take lower 5th” car chase scene. Really fun to get bombarded from various sides as they play bumper cars. In this case mains were 8’ MCLA and rears were powered studio monitors.

A 45hz -3dB point would work well. I dont think my 4 driver version could do that at HT playback levels.

Not sure if this is the right thread, but I’m considering a truncated line array for a center. Maybe 8-10 drivers across the front. Horizontal line array has some issues though, but I only really have two seats that I really care about.
 
OP
P

ppataki

Major Contributor
Joined
Aug 7, 2019
Messages
1,248
Likes
1,413
Location
Budapest
Finally we managed to start this project!
The construction of the boxes are in progress, see the below pictures

There have been a couple of changes in the design:
- instead of 3x6mm birch plywood with Green Glue in between we are using 1x18mm beech hardwood (I know, pros and cons but I have never had any cabinets made of hardwood so I definitely wanted to give it a try)
- we are using 4mm thick anti-vibration damping material called CTK Dominator
- the cabinet will be slightly bigger because of the above points

Photos about the cabinet:
20220424_214146.jpg


20220424_221953.jpg


Photo about the CTK Dominator:

20220426_145342.jpg


Knock test video (note: cabinet is fully empty; I will create another one after applying the CTK Dominator)


Next step is to finish the cabinet (puttying, cutting and painting the inside with Raptor coating then applying the CTKs)
Stay tuned!
 
OP
P

ppataki

Major Contributor
Joined
Aug 7, 2019
Messages
1,248
Likes
1,413
Location
Budapest
Today we have made some further progress with my neighbor (best carpenter in the world :)) - actually the carpentry is all done!

20220508_165127.jpg


20220508_171125.jpg


Now the speakers are in my garage, I will start working on them in the coming days: Raptor coating on the inside, CTK panels, fixing the drivers, cabling, damping, etc...
 
OP
P

ppataki

Major Contributor
Joined
Aug 7, 2019
Messages
1,248
Likes
1,413
Location
Budapest
Some further progress has been made!
The inside of the cabinets has been painted with Raptor, the CTK Dominators have been applied along with polyester damping.

20220511_170659.jpg

20220511_170726.jpg

20220512_101358.jpg


20220512_101547.jpg


And a comparative knock test (empty box vs. above box):

 
Last edited:
OP
P

ppataki

Major Contributor
Joined
Aug 7, 2019
Messages
1,248
Likes
1,413
Location
Budapest
After a long time, here is an update on this project:

After I posted the above pictures I started fixing the drivers and doing the wiring:
20220526_114518.jpg


But then this happened..........

20220526_171900.jpg


So the front panel had to be started from scratch

After like 6 weeks I managed to get it done:

20220703_155938.jpg


So I continued the project accordingly
And yesterday I managed to finish them completely!

20220720_170107.jpg


20220720_170116.jpg


A few notes for those who will try the same design:
- make the cabinet a tad larger so you will have more space inside for the wiring (I did not do that, unfortunately)
- since this is a sealed cabinet design you will need to spend a lot of effort (and time, probably) making sure that there is no air leakage. Air can leak from the cabinet itself (mostly where the panels are joined) and from the drivers too. I have applied acoustic rubber foam both for the cabinet and for the drivers. I use a 30Hz burst tone to test for air leakage - you can easily hear that since it emits a 'farting-like' sound
- the reason why my original front panel got broken is that it was made of hard beech wood and I did not perform pre-drilling when installing the drivers.....lesson learned.....always perform pre-drilling!!!
- I used Raptor coating for the finish, as always. 3 layers this time (also used Raptor for the inside to further reduce cabinet resonance and potential air leakage)

Next post will be about the measurements but only in about 2-3 weeks' time, reason being that I am replacing my DAC:
Okto DAC8 Pro --> Topping DM7
 

-Matt-

Addicted to Fun and Learning
Joined
Nov 21, 2021
Messages
679
Likes
569
Ah, gutted for you that it split like that. It does look pretty narrow for wiring, especially with the foam in there too. Well done for getting this interesting project finished.

I'll be interested to see some eq outcomes.

Any plans for a centre channel? Would you use a line array for that too?
 
OP
P

ppataki

Major Contributor
Joined
Aug 7, 2019
Messages
1,248
Likes
1,413
Location
Budapest
I'll be interested to see some eq outcomes.

My Topping DM7 shall arrive next week so I will publish the measurements the week after

Any plans for a centre channel? Would you use a line array for that too?

No, I have no room physically for a center channel (+ I don't need it since the phantom center is good enough for me)
 
OP
P

ppataki

Major Contributor
Joined
Aug 7, 2019
Messages
1,248
Likes
1,413
Location
Budapest
And here are the measurements with my Topping DM7 finally in place:

FR left and right channels without any DSP:

1661241042388.png


As ugly as expected :) No surprises here!

Let's apply some basic shelves with Q=0.707 values:

1661241104778.png


This will be the basis for the subsequent corrections

I have used 40-50 correction filters/channel and then a final touch of CurveEQ to further flatten the range above 200Hz and there we go:

1661241222887.png


I think this is a pretty nice response there!
As I anticipated I can go down to 40Hz - awesome!

Distortion is not too low but this is 'normal' for a 1-way system after heavy DSP correction:

1661241335919.png


Step response has a tiny pre-ringing, definitely not audible:

1661241415072.png


Phase and excess phase:

1661241503497.png


Group delay and Excess group delay:

1661241562935.png


Overall I am very satisfied with the results, sound is totally awesome!!!
Happy to recommend this concept as a rear speaker but with a sub even as a front speaker solution!
 

ernestcarl

Major Contributor
Joined
Sep 4, 2019
Messages
3,113
Likes
2,330
Location
Canada
You could use a little FDW and IR offset to make the phase more humanly readable — not that I expect to see anything unusual.

So what DSP mixer are you using for the surrounds? Is just JRSS or some other VST?
 
OP
P

ppataki

Major Contributor
Joined
Aug 7, 2019
Messages
1,248
Likes
1,413
Location
Budapest
You could use a little FDW and IR offset to make the phase more humanly readable — not that I expect to see anything unusual.

So what DSP mixer are you using for the surrounds? Is just JRSS or some other VST?

Here is the right channel with FDW15:
1661271639509.png


I use JRSS + some manual stuff, like this:

1661271247459.png


then (only those that are ticked)

1661271305369.png


and then:

1661271340610.png


I have to admit that I went back to the CraveEQ + CurveEQ combo since for some weird reason that gives me the best sound vs whichever convolution (either using PEQ filters or using the new inversion method in REW which is really great and I love it but again, the aforementioned combo is the best for me subjectively)

And with this I have literally zero delay when watching external content such as Youtube, etc.
 

ernestcarl

Major Contributor
Joined
Sep 4, 2019
Messages
3,113
Likes
2,330
Location
Canada
Here is the right channel with FDW15:
View attachment 226197

I use JRSS + some manual stuff, like this:

View attachment 226194

then (only those that are ticked)

View attachment 226195

and then:

View attachment 226196

I have to admit that I went back to the CraveEQ + CurveEQ combo since for some weird reason that gives me the best sound vs whichever convolution (either using PEQ filters or using the new inversion method in REW which is really great and I love it but again, the aforementioned combo is the best for me subjectively)

And with this I have literally zero delay when watching external content such as Youtube, etc.

So you are letting JRiver mix the center channel to the front L and R automatically — which should subtract 4.7 dB to all channels in order to increase headroom — they should seriously add that info as a tooltip, BTW.

The .1 LFE channel (sub) is manually redistributed to the front left and right with +3 dB gain applied per channel to avoid overloading the mains.

And, finally the bulk of the finer EQ is handled by the Crave plugin.

Tell me if I got anything wrong.

It actually is simpler this way too as adding a sub would make bass management a tad bit more complicated.
 
Last edited:
OP
P

ppataki

Major Contributor
Joined
Aug 7, 2019
Messages
1,248
Likes
1,413
Location
Budapest
So you are letting JRiver mix the center channel to the front L and R automatically — which should subtract 4.7 dB to all channels in order to increase headroom — they should seriously add that info as a tooltip, BTW.

The .1 LFE channel (sub) is manually redistributed to the front left and right with +3 dB gain applied per channel to avoid overloading the mains.

And, finally the bulk of the finer EQ is handled by the Crave plugin.

Tell me if I got anything wrong.

It actually is simpler this way too as adding a sub would make bass management a tad bit more complicated.

Yes, you are right :)

Re. headroom I am not worried about it since I use volume control upstream (Jriver's 64 bit internal volume) so the incoming signal is attenuated already

Edit: plus I actually increase the signal post EQ since I experience a drop in dynamics if I don't do that (I guess it is because I lower the target curve in REW by 15-20dB and that needs to be compensated afterwards).
 
Last edited:

ernestcarl

Major Contributor
Joined
Sep 4, 2019
Messages
3,113
Likes
2,330
Location
Canada
Yes, you are right :)

Re. headroom I am not worried about it since I use volume control upstream (Jriver's 64 bit internal volume) so the incoming signal is attenuated already

Edit: plus I actually increase the signal post EQ since I experience a drop in dynamics if I don't do that (I guess it is because I lower the target curve in REW by 15-20dB and that needs to be compensated afterwards).

Digital clipping in your scenario is unlikely; but, if volume leveling were unchecked/disabled and gain-staging from EQ not fully accounted for, it’s still quite possible to clip with certain extreme tracks when JR is set at maximum volume.

The aforementioned automatic -4.7 dB attenuation is not a “bad” thing, only that it should be clearly indicated somewhere — in a tooltip description or as a line in the DSP path window.
 
Top Bottom