• WANTED: Happy members who like to discuss audio and other topics related to our interest. Desire to learn and share knowledge of science required. There are many reviews of audio hardware and expert members to help answer your questions. Click here to have your audio equipment measured for free!

Review and Measurements of Hypex NC400 DIY Amp

casual_audio_nerd

Member
Forum Donor
Joined
Sep 8, 2019
Messages
12
Likes
13
A common beginner's mistake is not scratching the paint to make a good contact the metal case with the ground wire. I guess you did it. It cannot be seen in the photos or you were very careful when scratching just the right amount of surface.

Can you increase the distance between the two modules? For the yellow transformer to interfere less. What real distance is there?

I like more with the NC400 module implemented like this:

View attachment 33824


Like the amp of the ASR review:

index.php
Thanks, @maty - I had hadn't scratch the surface to expose the metal, so thanks for picking up on that. I do that tonight when I get home. And I using the stand casing the Hypex DIY Kit, so it's a little smaller than the sample illustration you provided. I don't think the pre-drilled holes allow for creating more distance, however, I'll take another look for sure.
 

casual_audio_nerd

Member
Forum Donor
Joined
Sep 8, 2019
Messages
12
Likes
13
Nice and neat - the one issue I spotted is having the speaker leads coming out of the screw clamps in opposite directions, leading to a pretty big loop (as in "antenna") before the twisting starts.

Thanks@Julf - I'll re-wire that tonight as well.
 

casual_audio_nerd

Member
Forum Donor
Joined
Sep 8, 2019
Messages
12
Likes
13
Nice build @casual_audio_nerd!

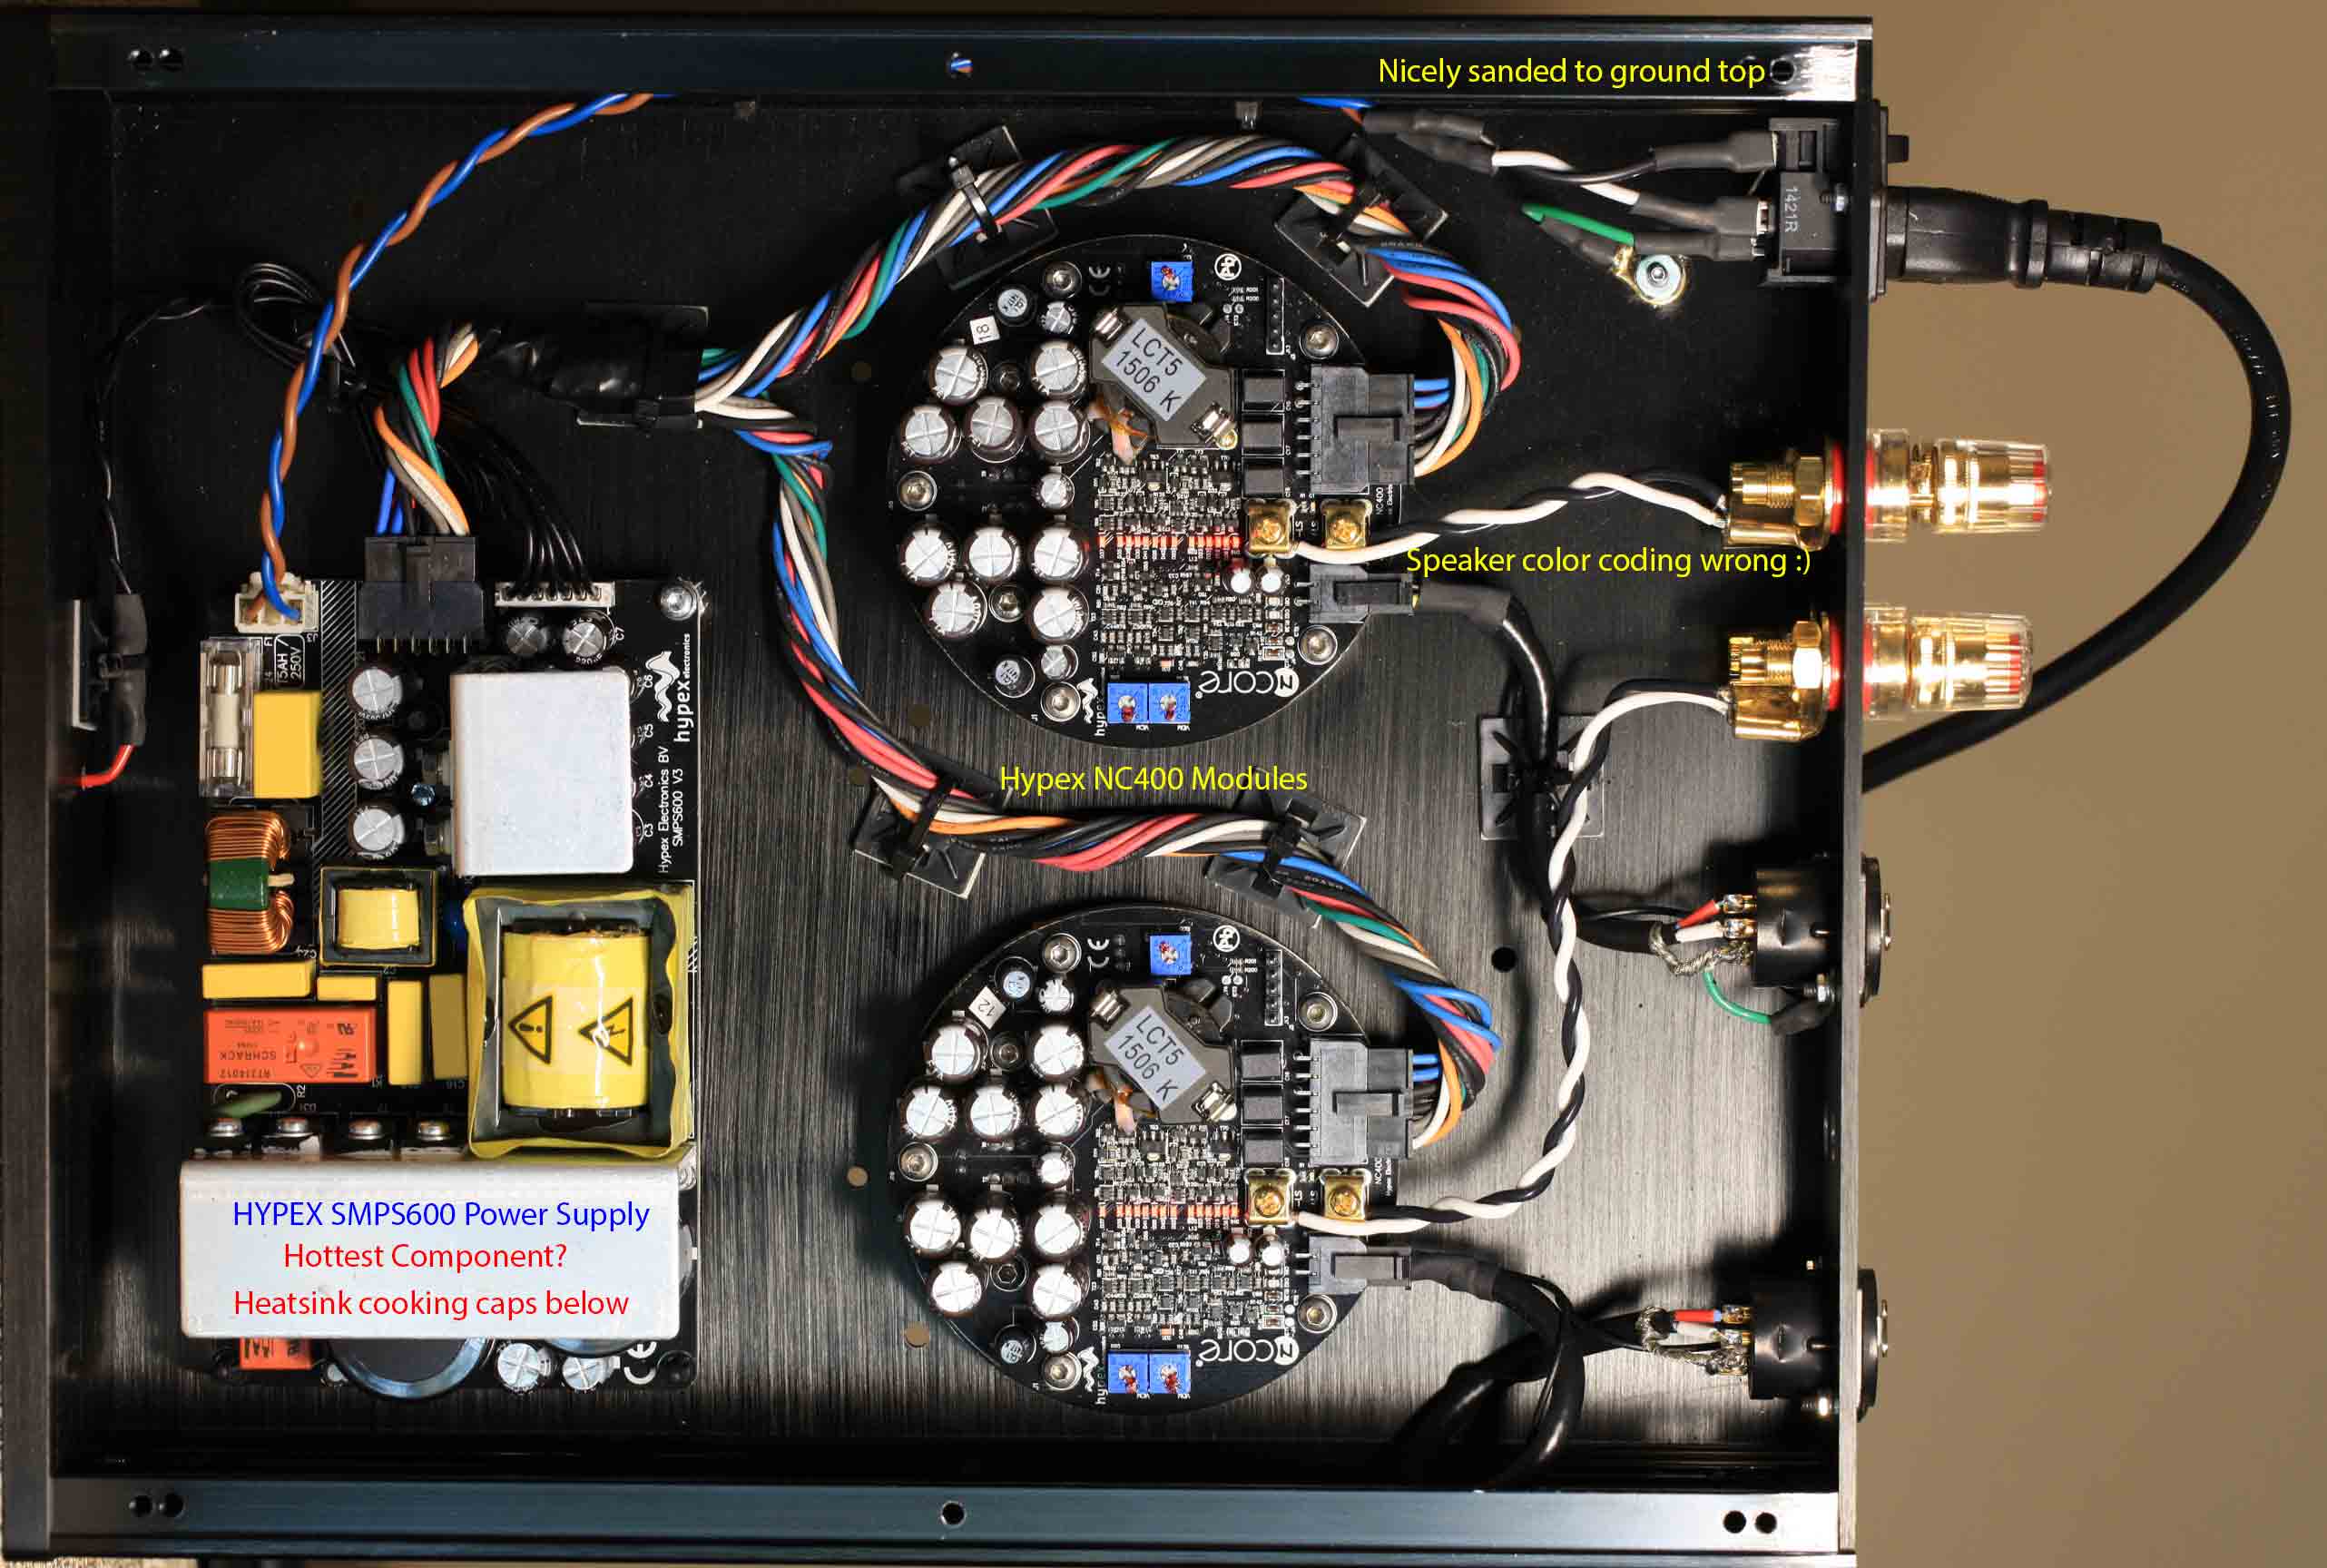
One word regarding earthing/safety:

These modules and SMPS are class II, so you should not need safety earth, but then you should maintain class II throughout the assembly which in that case implies isolating the power wires (from the enclosure as well as other cables) with a second layer such as some electrical plastic tubing (not nice to look at, but effective and affordable).

If you prefer to rely on the safety earth, then you should make sure it is effective on the entirety of the enclosure, which first implies making sure the wire is appropriately connected to the lower part of the enclosure (sanding if necessary, toothed washer biting the enclosure, blocking nut, etc.), and that all enclosure parts are adequately connected together (sanding again).

There is also a small thermal "optimization" that can be done for the SMPS...

Thanks, @pos - are you referring to just sanding the eclosure where the NC400 & SMPS600 boards attach to the case (in addition to ground)? Sorry new to this so learning a lot quickly. As it related to thermal optimization - that is probably outside of my realm of budget/time/interest for this first DIY project :)
 

NTK

Major Contributor
Forum Donor
Joined
Aug 11, 2019
Messages
2,707
Likes
5,964
Location
US East
Thanks, @maty - I had hadn't scratch the surface to expose the metal, so thanks for picking up on that. I do that tonight when I get home. And I using the stand casing the Hypex DIY Kit, so it's a little smaller than the sample illustration you provided. I don't think the pre-drilled holes allow for creating more distance, however, I'll take another look for sure.
I don't think you need to worry about scratching the anodization off. Hypex has already masked off areas around holes for the chassis ground connections. Their attention to details should give confidence in their engineering abilities :)

4_case-hypex-diy-mono.jpg
 

pos

Addicted to Fun and Learning
Forum Donor
Joined
Feb 13, 2018
Messages
573
Likes
720
Thanks, @pos - are you referring to just sanding the eclosure where the NC400 & SMPS600 boards attach to the case (in addition to ground)? Sorry new to this so learning a lot quickly. As it related to thermal optimization - that is probably outside of my realm of budget/time/interest for this first DIY project :)
I was referring to sanding the ground connection. I see this was already mentioned by user Maty, but I missed it as I have him on my ignore list, sorry about that :D (nothing personal, just too much spam)

If this area is already sanded then no problem. You should also make sure the 4th leg of the SMPS has a nice connection to the enclosure.
This seem to be the case looking at the above photo.
Your hypex enclosures are made by ghentaudio, as are mine, and I know for a fact I had to sand those parts, contrary to what was shown in the photo on the ghentaudio website...

Regarding thermal optimization, this is fairly easy to do: you just need to connect the main heatsink of the SMPS to the enclosure, with at least one layer of electrical isolation.
User @rajapruk and myself did it on our build, using a U shaped aluminium bar and two layers of blue thermal tack.
The drop in temperature on that heatsink was significant.
 
Last edited:

digitalfrost

Major Contributor
Joined
Jul 22, 2018
Messages
1,532
Likes
3,119
Location
Palatinate, Germany
Regarding thermal optimization, this is fairly easy to do: you just need to connect the main heatsink of the SMPS to the enclosure, with at least one layer of electrical isolation.
User @rajapruk and myself did it on our build, using a U shaped aluminium bar and two layers of blue thermal tack.
The drop in temperature on that heatsink was significant.
Got any pictures?
 

maty

Major Contributor
Joined
Dec 12, 2017
Messages
4,596
Likes
3,167
Location
Tarragona (Spain)
I was referring to sanding the ground connection. I see this was already mentioned by user Maty, but I missed it as I have him on my ignore, sorry about that :D (nothing personal, just too much spam)..

Yesterday I read an interesting interview to a journalist and writer who has a seat at the Royal Spanish Language Academy. I made a cut of what caught my attention, so well expressed.

[IMG, link] http://maty.galeon.com/WP-imagenes/cultura/ABC-Perez-Reverte-Cid-mediocres.png
 

March Audio

Master Contributor
Audio Company
Joined
Mar 1, 2016
Messages
6,378
Likes
9,319
Location
Albany Western Australia
A common beginner's mistake is not scratching the paint to make a good contact the metal case with the ground wire. I guess you did it. It cannot be seen in the photos or you were very careful when scratching just the right amount of surface.

Can you increase the distance between the two modules? For the yellow transformer to interfere less. What real distance is there?

I like more with the NC400 module implemented like this:

View attachment 33824


Like the amp of the ASR review:

index.php


First explain why and how you know the transformer is interfering. How do you know its a problem that needs to be solved?
 
Last edited:

March Audio

Master Contributor
Audio Company
Joined
Mar 1, 2016
Messages
6,378
Likes
9,319
Location
Albany Western Australia
And you can try too, after you know well the sound of your diy amp, to add a two-stage RF / EMI inlet filter.

https://blog.naver.com/PostView.nhn?blogId=booilair&logNo=220836931597

View attachment 33862


Can someone turn him off?


Everyone please ignore @maty, he does not understand the subject and is spamming this bad advice on every thread regardless of being shown the following.

The designer of the NC400 Bruno Putzeys advice is this:

https://www.diyaudio.com/forums/class-d/38199-ucd180-questions-post466003.html

Do not use mains filters with Y capacitors installed. An Y capacitor makes a capacitive connection (several nf) from the mains lines to your chassis and hence audio ground.

So there is the audiophile designer, using transformers with a shield to remove the slightest chance of the mains polluting his system ground, then installing a schaffner inlet that puts 2.2nF straight from the mains into the chassis, simply because he heard somewhere that mains disturbances are audible. They are, more precisely when such a filter is used.

All commercially available "combined mains filters" have Y capacitors. Don't use them. If all your audio devices are connected to one wall outlet (likely), you can use such a filter there, but by no means on individual boxes.

In principle you could make a filter with only chokes (cm/dm) and an X capacitor. Fine with me, but unless you have a problem with heavily polluted mains you don't need them. The UcD will not be a source of mains pollution. If your mains are polluted by an external cause (like you have a car factory next door), a centralised filter on the outlet is more effective.

Fyi, none of my audio devices have mains filters on them

.
 
Last edited:

boXem

Major Contributor
Audio Company
Joined
Jun 19, 2019
Messages
2,016
Likes
4,888
Location
Europe
Yesterday I read an interesting interview to a journalist and writer who has a seat at the Royal Spanish Language Academy. I made a cut of what caught my attention, so well expressed.

[IMG, link] http://maty.galeon.com/WP-imagenes/cultura/ABC-Perez-Reverte-Cid-mediocres.png
A bit cryptic...
Who stands for virtue?
Who is mediocre?

It's not the first time you make subtle comments suggesting we are just idiots. Maybe it's time to stop now?

Everyone please ignore @maty, he does not understand the subject and is spamming this bad advice on every thread regardless of being shown the following.

Not a solution. He will be able to continue spreading his opinions backed by pure subjectivism to people not especially in the knowing coming here for serious advice.
 

Thomas savage

Grand Contributor
The Watchman
Forum Donor
Joined
Feb 24, 2016
Messages
10,260
Likes
16,304
Location
uk, taunton
I don't think you need to worry about scratching the anodization off. Hypex has already masked off areas around holes for the chassis ground connections. Their attention to details should give confidence in their engineering abilities :)

View attachment 33881
Good spot, this can cause issues and indeed iv had kit that did strange things that were traced back to bad contact area due to anodisation of the case.

It's good to see this one's been done right.
 

Thomas savage

Grand Contributor
The Watchman
Forum Donor
Joined
Feb 24, 2016
Messages
10,260
Likes
16,304
Location
uk, taunton
A bit cryptic...
Who stands for virtue?
Who is mediocre?

It's not the first time you make subtle comments suggesting we are just idiots. Maybe it's time to stop now?


Not a solution. He will be able to continue spreading his opinions backed by pure subjectivism to people not especially in the knowing coming here for serious advice.
I'm sure @maty has cast himself as the virtuous hero lol

Maty , there's a ton of guys who have you on ignore that should tell you something. You do bring some valuable content but you also run about repeating the same erroneous nonsense all over the forum . Reigniting old arguments and disrupting threads .

You have received multiple warnings and direct appeals from me not to do this . I'm issuing you a final warning regarding these long standing issues .

To prevent further distraction in this thread I'm issuing you with a reply ban .
 

pos

Addicted to Fun and Learning
Forum Donor
Joined
Feb 13, 2018
Messages
573
Likes
720
Got any pictures?
Here is a top view.
You can also see the dirty electrical conduit I am using on the power wires :p

I also added one on the smaller heatsink but this one is not that hot, and the contact with the enclosure is not great due to the curvature there...
 

Attachments

  • SMPS600 heatsinks 1.jpg
    SMPS600 heatsinks 1.jpg
    291.7 KB · Views: 361

pos

Addicted to Fun and Learning
Forum Donor
Joined
Feb 13, 2018
Messages
573
Likes
720
Here are the associated temperature measurements:

home temperature around 21/22°C
without modification, idling for 10 hours: heatsink 57°C, top cover 33°C
with modification, idling for 10 hours: heatsink 41°C, top cover 34°C

That is a 16°C difference :)

(note: my SMPS is an older gen, similar to the one measured by Amir in this thread)
 

casual_audio_nerd

Member
Forum Donor
Joined
Sep 8, 2019
Messages
12
Likes
13
Very grateful for all the advice/help here folks. I've finished the builds as a standard-issue from Hypey and power tested (they didn't explode or catch on fire, so that feels like a good result :D). Didn't get a chance to connect them to the NAD C 658 / PSB T3's yet as I need longer XLR's, but I'll be doing that over the weekend. I'll keep an eye on the temperature and report back.

IMG_20190919_220533.jpg . IMG_20190919_222518.jpg
 
Top Bottom