• WANTED: Happy members who like to discuss audio and other topics related to our interest. Desire to learn and share knowledge of science required. There are many reviews of audio hardware and expert members to help answer your questions. Click here to have your audio equipment measured for free!

Pad Replacement for Oppo PM-3

Jorj

Active Member
Forum Donor
Joined
Jan 26, 2018
Messages
293
Likes
343
Location
Washington, DC
For all owners or prospective owners of these excellent little planars, if you're like me, you were bummed to see that Oppo is now out of the audio game. Getting parts is going to be harder, going forward.

My ear pads were suffering from cheap pleather leprosy, losing bits and pieces of themselves all over my head and face. I inquired with Oppo, and they said replacements were $70+shipping, and they were not certain they even had any. That is pricey for a pad that simply wears out in a year.

A bit of searching revealed this for $24 minus a 15% coupon....https://www.amazon.com/gp/product/B07FSPNJH6/ref=oh_aui_detailpage_o02_s00?ie=UTF8&psc=1

1544454643787.png


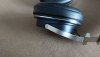
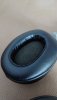
These fit perfectly. Just get your fingernail under the plastic edge of the pad-base, and pull up all six of the tabs, then pop the whole base up. I unceremoniously ripped the pad covers and pads off the rubber cement, then swabbed on some new contact cement on the base and on the new pads. Once it glazes over, carefully place them on the base and lay a book on them for a while to allow the cement to cure. Pushing the base back onto the cases takes effort, but be patient and they eventually snap back on.

Good to go, and these are natural sheepskin, so they should last a lot longer. Seem to sound just the same as the leprous pleather ones.

1544454510515.png


I could clean up the little bit of excess rubber cement, but this photo makes it look worse than it really looks IRL.

1544454579852.png


--edit---

Added some photos.
 
Last edited:

Hrodulf

Member
Joined
May 17, 2018
Messages
64
Likes
135
Location
Latvia
I got my replacement pads from some French site which had them listed in French. Took almost 10 months to find them. But yeah, 2 years is what you can expect to get from them with heavy use. Too bad that the headband is giving me black dandruff...
 
OP
Jorj

Jorj

Active Member
Forum Donor
Joined
Jan 26, 2018
Messages
293
Likes
343
Location
Washington, DC
Oddly, my headband is doing just fine so far, but once it does fall apart, I'll happily mod it with a more durable natural leather version also. It's not as though I have any warranty concerns.
 

pponce

Member
Joined
Mar 27, 2020
Messages
6
Likes
3
I performed the upgrade using the same Brainwavz sheepskin leather ear pads.
Upgrade went very well.
Pictures of final product at the bottom.

Procedure:
- I took the original pads off just with my fingernails. Pretty easy to pull off if you wedge your fingernail between the original ear-pad and the silver ring you see in the photos. There are 6 tabs that need to snap off.
- I then proceeded to remove the original ear pads from the base plastic attachment ring.
The pleather ear-pad is glued on to this plastic attachment ring. Just used my fingernails again to pull it off of this part.
I pulled out the ear pad foam then pulled what remained of the pleather material completely off the plastic attachment ring.
If you are careful you can remove the fake leather ear-pad mesh screen using a razor blade. See image of the mesh screen below on the left.
I did not end up using this original mesh screen though i wish i had!
- You will need to cut the new ear-pads a bit with a razor blade as i did if you want to attach and glue them to the original plastic attachment ring the same way the originals were attached.
There is excess material that needs to be cut. To do this I placed the plastic attachment ring in the new ear pads. Then used a razor to cut out what you see on the the right in the image below. I did this so that the tabs that are used to snap the ear pads back in place are not obstructed.
- I then used "shoe glue" to glue the ear-pads to the plastic attachment ring. If you have a better glue than I did, use that instead. Other than a bad smell for a couple of days the shoe glue worked fine though. I just placed the new ear-pads over the attachment ring and put glue around the outside edge of the plastic ring between the plastic and the leather. pressed around the outside for a little while to make sure it would glue properly.

IMG_5733.jpeg


Final results below. I think they came out well.
If I were to do it again i would have cut out the foam mesh screen from the new Brainwavz ear pads and glued the original mesh screen that i carefully cut out. See first image.

IMG_5731.jpeg


The Brainwavz as I have assembled them end up being pretty much the same height as the originals. If not exactly pretty darn close.
Wish I had used the original screens as then i think there would be little to no difference. The screen on the Brainwavz is a slightly thicker foam material vs more of a thin mesh material on the originals. I've saved the original mesh just in case i need to replace the ear pads again and need to do this procedure again in the distant future.
Sonically have no idea if it changes the "signature". I'm just happy they look new again.

IMG_5732.jpeg


Hope this helps others.
If anyone has a good way to replace the fake leather on the headband please do share!
That is starting to show some wear. Not as bad as the ear-pads yet but i expect i'll need to do something about the head band in a couple of years.
 
Last edited:

Koeitje

Major Contributor
Joined
Oct 10, 2019
Messages
2,306
Likes
3,962
Nice tutorial, the headband on mine is also driving me nuts. The pleather has started to flake on mine, so I use some cheap headband cover I got on Aliexpress. Looks like shit, but at least it works.
 

Lopsy

Member
Joined
Apr 16, 2020
Messages
7
Likes
14
Hi all, I'm in process of replacing PM3 headband. I used real leather from my old leather bag. I thought I'll share my process. All you need is some sawing skills. Once is finished I'll send more detailed photos of the process and of the finished job.
20200409_110319.jpg
20200409_110351.jpg
20200409_110651.jpg
20200409_110710.jpg
20200416_122942.jpg

New leather headband.
 

Lopsy

Member
Joined
Apr 16, 2020
Messages
7
Likes
14
More photos.
20200411_155124.jpg

Before leather is trimmed and clips clicked back in place. In my previous post last photo shows clips back in place.
20200411_155151.jpg

Stitched roughly to stretched the leather. Top will be finished with strip of leather similar to the B&O H9. I'm still waiting for the leather earpads. To be continued.
 
Last edited:

pponce

Member
Joined
Mar 27, 2020
Messages
6
Likes
3
Nice! Looking forward to seeing the end result.
I purchased some leather "ribbon" and was thinking of gluing it somehow to the underside of the headband as that is the only part of mine showing some wear right now. Not sure what glue to use but I may decide to go your route.
what ear pads did you use to replace your originals?
 

Lopsy

Member
Joined
Apr 16, 2020
Messages
7
Likes
14
Nice! Looking forward to seeing the end result.
I purchased some leather "ribbon" and was thinking of gluing it somehow to the underside of the headband as that is the only part of mine showing some wear right now. Not sure what glue to use but I may decide to go your route.
what ear pads did you use to replace your originals?
Hi, I used these: https://www.amazon.com.au/Pads-Cushion-Earpads-Pillow-Headphones/dp/B07QZJ788X
Better than the original. I also ordered sheepskin leather ones, same as previous post members used to replace their.
 

pponce

Member
Joined
Mar 27, 2020
Messages
6
Likes
3
it looks pretty sweet.
Have some questions.
How did you remove the pleather from the metal part at both ends? Just pull the pleather out? Or are the metalic ends just clipped on somehow and with some force one can pull the metal ends down and away from the head band.
How did you insert the leather back in to both ends?
Did you use any glue to keep the ends in place under the metallic part?

The stitching on the top leather band looks really nice. How did you do that? Did you do it by hand?
Did you roll over the edges of the leather for that top band?
Did you use any glue to keep it in place while working on the stitching?

Really nice job.
 

Lopsy

Member
Joined
Apr 16, 2020
Messages
7
Likes
14
it looks pretty sweet.
Have some questions.
How did you remove the pleather from the metal part at both ends? Just pull the pleather out? Or are the metalic ends just clipped on somehow and with some force one can pull the metal ends down and away from the head band.
How did you insert the leather back in to both ends?
Did you use any glue to keep the ends in place under the metallic part?

The stitching on the top leather band looks really nice. How did you do that? Did you do it by hand?
Did you roll over the edges of the leather for that top band?
Did you use any glue to keep it in place while working on the stitching?

Really nice job.
I will post detailed process and will answer all your questions with supporting photos. I just need bit more time to edit the photos to make it as clear as possible.
 

W1ll1eTheP1mp

Member
Joined
May 26, 2020
Messages
73
Likes
12
Hey. Can you pm me the materials u used?
I will post detailed process and will answer all your questions with supporting photos. I just need bit more time to edit the photos to make it as clear as possible.
 

Lopsy

Member
Joined
Apr 16, 2020
Messages
7
Likes
14
Sorry about the delay. I'll do my best to post detailed instructions with supporting photos asap. I used real thin leather for the headband which I sourced from my old leather bag, super glue and sawing machine.
 

Oppotunist

Member
Joined
Jun 30, 2020
Messages
13
Likes
3
My experience with the aftermarket earpads is that they are less comfortable than the original one . However I tried some earpads like velour and sheepskin but the velour are quite comfortable but the sound karakter isn't so well. The best what I did was to order original Sony MDR 1 a earpads. They are the same softness but much better quality .the headband I peal off and stick on the bottom a original Sennheiser HD 600 headband. 10 €. Total cost with the Sony earpads 54 €. Also a lot of money but the original oppo earpads are almost 100 € and less quality .
 

Attachments

  • DSC_0595.JPG
    DSC_0595.JPG
    4.1 MB · Views: 381

Oppotunist

Member
Joined
Jun 30, 2020
Messages
13
Likes
3
My experience with the aftermarket earpads is that they are less comfortable than the original one . However I tried some earpads like velour and sheepskin but the velour are quite comfortable but the sound karakter isn't so well. The best what I did was to order original Sony MDR 1 a earpads. They are the same softness but much better quality .the headband I peal off and stick on the bottom a original Sennheiser HD 600 headband. 10 €. Total cost with the Sony earpads 54 €. Also a lot of money but the original oppo earpads are almost 100 € and less quality .
Buy the way. The Sennheiser headband is very comfortable and more secure on my head
 

Oppotunist

Member
Joined
Jun 30, 2020
Messages
13
Likes
3
Also the foam inside is Sennheiser HD. .with the 4.4 balanced cable is the oppo upgraded again . Still one of the best sounding headphones on my fiio x7 second generation .
 

Attachments

  • DSC_0597.JPG
    DSC_0597.JPG
    1,005.3 KB · Views: 250
Top Bottom