• WANTED: Happy members who like to discuss audio and other topics related to our interest. Desire to learn and share knowledge of science required. There are many reviews of audio hardware and expert members to help answer your questions. Click here to have your audio equipment measured for free!

Lego loudspeaker project using Dayton ND91-8

ppataki

Major Contributor
Joined
Aug 7, 2019
Messages
1,240
Likes
1,385
Location
Budapest
This project is rather for fun but who knows, maybe it will work out well and will do more of these....

I have some spare Dayton ND91-8 full range drivers (leftover from my MCLA and my truncated line array projects) and I will put one of those into a closed cabinet made of Lego bricks
Cabinet is approx. 0.5 liters with a Qtc = 0.707. External dimensions are approx. 13x13x10cm.

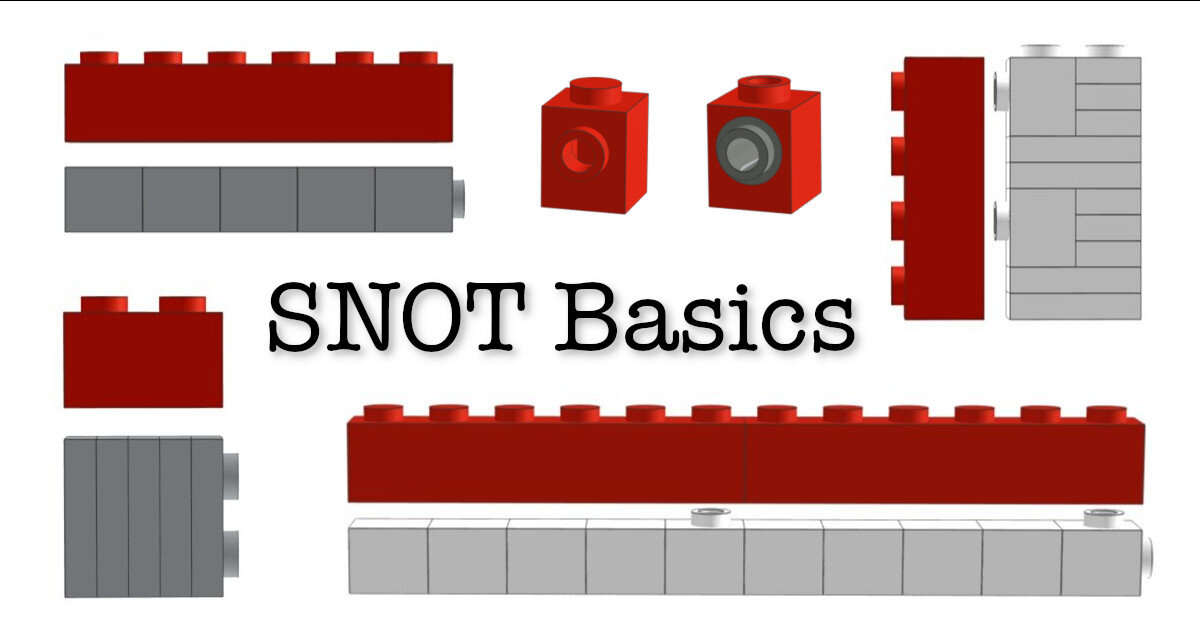
3D rendering of the cabinet (made with Bricklink Studio 2.0)

ND91-8_5.png


ND91-8_6.png


Wall thickness is approx. 16mm (and around 10mm for the bottom and the top)
I am planning to rear-mount the driver with screws. I have tested using screws in Lego bricks and it seems to work pretty well.
Making the cabinet airtight might be a challenge; I am planning to use silicone paste to cover the cabinet walls inside - any other ideas for that would be highly appreciated.
(+ polyester wad filling at the end to 'increase' the volume of the cabinet)

The bricks shall arrive later this week - total cost was about 40 EUR (for just this one box - but think about this: no need for carpentry, no need for paint, literally endless options for colors, decoration, shapes, etc.....)
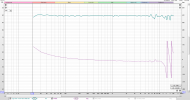
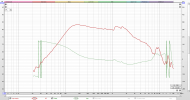
Will post pictures and also some measurements at the end :)
 

Sashoir

Active Member
Forum Donor
Joined
May 15, 2020
Messages
118
Likes
140
I follow your posts with great interest and admiration, but I do worry that you are going to perish inside your home after trapping yourself inside by building too many loudspeakers.

Edit: at least if they're hooked up you should be able to call for help.
 

mhardy6647

Grand Contributor
Joined
Dec 12, 2019
Messages
11,372
Likes
24,577
dang.
Now I'm thinking about doing a Lego transmission line... or a Lego back loaded horn... or maybe a Lego Klipschorn.
dang.

1000w
 

abdo123

Master Contributor
Forum Donor
Joined
Nov 15, 2020
Messages
7,444
Likes
7,954
Location
Brussels, Belgium
Lego bricks leak air, you need to glue the whole thing or it will be basically an open baffle.
 

GXAlan

Major Contributor
Forum Donor
Joined
Jan 15, 2020
Messages
3,905
Likes
6,025
Having watched plenty of Lego Masters, using Technic blocks can also be used to enhance the rigidity of your enclosure. :)

What I would say is that you should take advantage of LEGO to create something nicer than a box and to curve the baffle.

And what would be more ambitious is to try to seal the enclosure without tape or glue. Perhaps if you had cling wrap/plastic wrap that was sandwiched between different Lego layers, it would reduce the leakage sufficiently to work well.
 
OP
P

ppataki

Major Contributor
Joined
Aug 7, 2019
Messages
1,240
Likes
1,385
Location
Budapest
Having watched plenty of Lego Masters, using Technic blocks can also be used to enhance the rigidity of your enclosure. :)

What I would say is that you should take advantage of LEGO to create something nicer than a box and to curve the baffle.

And what would be more ambitious is to try to seal the enclosure without tape or glue. Perhaps if you had cling wrap/plastic wrap that was sandwiched between different Lego layers, it would reduce the leakage sufficiently to work well.
Good ideas, thanks!
Let's see how this prototype works
If it matches my expectations I will consider building a pair of much bigger boxes for 8" fullrange speakers
 

mhardy6647

Grand Contributor
Joined
Dec 12, 2019
Messages
11,372
Likes
24,577
Lego bricks leak air, you need to glue the whole thing or it will be basically an open baffle.
or... aperiodic loading. :cool:
You know -- when loudspeaker alignments give you lemons -- make lemonade. ;)

index.php
 
OP
P

ppataki

Major Contributor
Joined
Aug 7, 2019
Messages
1,240
Likes
1,385
Location
Budapest
Finally, the baby is born! :)

Let me share some photos about the process:

This is how I got started:
20221104_164713.jpg


I deliberately chose to buy used Lego to be as eco-friendly as possible but it took its toll on the looks as you will see later on

Then started building:

20221104_194228.jpg


20221104_211616.jpg


And this is where things started to get messy.......

How to fix the driver in the cabinet?
I tried with screws as I have tested that before but it turned out that where the Lego bricks are joined the screw would tear that apart....
I tried gluing together those parts only where the screws would enter the baffle but still it just did not work:

20221105_083156.jpg


And I managed to accidentally drill too deep too - twice....

So finally I decided to ditch the screws and just used glue to fix the driver
Also I chose to use silicone paste to make the cabinet airtight at the end of the day:

20221109_203218.jpg


And this is how it looks:

20221109_204502.jpg


20221109_204522.jpg


20221109_204552.jpg


The bricks (being used) are not equally white and those two holes on the baffle also look a bit messy but anyway, it was good fun and turns out that this whole concept is feasible nevertheless!

Later this week or early next week I will be coming back with measurements and subjective comments too!
Bated breath in the meantime :)
 
OP
P

ppataki

Major Contributor
Joined
Aug 7, 2019
Messages
1,240
Likes
1,385
Location
Budapest
So here are the measurements!
(1cm away, 0 degrees)

20221110_113150.jpg


Frequency response with empty box, then felt on the inner walls then felt + wad filling and finally vibrodamping panels + felt + wad filling:

1668093413675.png


The low frequency ripple I guess is just a measurement glitch - otherwise there are not much a difference anywhere

Let's see the phase for the same:

1668093513420.png


The empty box stands out, otherwise the rest is pretty much the same

Distortion:

1668093645119.png


IR:

1668093702290.png


Step:

1668093724152.png


I will provide the mdat file at the end of this post so you can check the Waterfalls and the Spectrograms too

Now I think what is much more interesting is to see these same graphs when EQ-d to flat:

1668093972388.png


1668094091481.png


1668094126705.png


1668094148538.png


1668094172136.png


Here is a video about how it sounds (EQ-d to flat as shown above + a linear phase 24dB/oct HPF at 40Hz + a high shelf to tame the top)

Personally I think it sounds awesome! (if EQ-d, obviously)

I will keep it as a souvenir on my shelf but I think the point is that it is totally possible to build a loudspeaker out of Lego and it works perfectly
With a subwoofer crossed around 100Hz to avoid a lot of distortion it would be a great desktop solution and it looks really cool too (when built using brand new bricks and using glue instead of screws - just make sure the cabinet is airtight)
On that note: my box finally is not totally airtight, there is air leakage around the driver itself but that could be resolved by applying an extra layer of gasket - just a word of advice to those who would like to venture into this domain
Probably that is one of the reason for the really high distortion too for the lows (btw at moderate listening levels it is not really audible by ear)

Finally the measurement itself: https://drive.google.com/file/d/1i7osJBhWnwTAoZJfzY0VdAcvdj9WAFd0/view?usp=sharing

Any questions, comments are welcome!
 

Attachments

  • 1668093936945.png
    1668093936945.png
    91.5 KB · Views: 36
  • 1668093315959.png
    1668093315959.png
    106.8 KB · Views: 35
Top Bottom