• WANTED: Happy members who like to discuss audio and other topics related to our interest. Desire to learn and share knowledge of science required. There are many reviews of audio hardware and expert members to help answer your questions. Click here to have your audio equipment measured for free!

Hypex NC122MP repair : blown SMD component L15

zeworks

Member
Joined
Jan 11, 2023
Messages
8
Likes
12
Location
Provence, France
Hi and best wishes for 2023 !
Whilst putting the finishing touches to fixing a Hypex NC122MP amp in an aluminium enclosure, I accidently shorted the Vaux positive auxiliary supply (pin J6.1): there was a hiss in the speakers and the amp went dead - that moment when you want to reverse time by 5 seconds and replay without the silly oversight :(

After 30 min off mains, and checking that the SMPS shrinkwraped mains fuse is not blown (tested for continuity), feeding mains again to the board brings the standby SMPS J6.3 pin to nominal 5V, and after asserting the J6.9 PS Enable pin, the Vaux negative auxiliary supply (pin J6.2) is nominal -20V, but the Vaux positive auxiliary supply (pin J6.1) is around 500mV instead of 20V, and the board does not drive speakers when fed audio signal. The J6.7 DC error pin isn't activated.

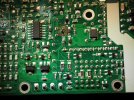
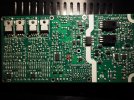
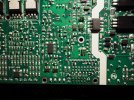
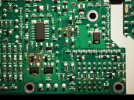
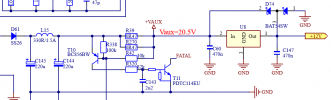
Visual inspection of the top part of the board does not show any signs of arcs or blown components, however removing the bottom heatsink plate shows at least one obvious blown L15 SMD component (pictures attached).

I don't have the design diagrams for the PCB, would anyone be able to put me on the right track to determine what that component value might be ? This L15 is one of those SMD's with no markings that I can see. Maybe there's a way to guess from a measurement of an equivalent component, maybe on the Vaux negative line (say L16 for instance), as there might by some symetry involved asks the newby naively ?

As can probably be guessed I am a just a hobbyist but at ease with DIY, equiped with a Voltcraft VC830 multimeter, a very fine tipped soldering iron, and the will to make good my f***k up however much effort I need to put into it :) If need be, I can access hot air gun and more advanced measuring instruments.

Many thanks in advance for your help !
Cheers,
Pascal
 

Attachments

  • P1110013s.JPG
    P1110013s.JPG
    809 KB · Views: 208
  • P1110007s.JPG
    P1110007s.JPG
    776 KB · Views: 212

restorer-john

Grand Contributor
Joined
Mar 1, 2018
Messages
12,678
Likes
38,779
Location
Gold Coast, Queensland, Australia
Pascal, you may have been lucky as L15 is most likely a series inductor on the aux/LV supplies and maybe, just maybe, it may be all that is dead. It has stood up and broken the circuit, maybe also shorting to the Alu plate in the process.

Check it for continuity and re-solder it and test. Also, check all the secondary rectifier diodes around it, for forward voltage drop. Some will show around 0.4-0.5V. If you find shorted diodes, then you have other damage.
 
OP
Z

zeworks

Member
Joined
Jan 11, 2023
Messages
8
Likes
12
Location
Provence, France
Thanks for the encouragement @restorer-john :) . Whilst checking it for continuity, it actually dropped off the PCB. OL for continuity I'm afraid, and looking under a microscope a full corner of the component body is actually blown off. Under the mic, none of the faces of the SMD have any markings, so it's plan B to guess what replacement to look for.

I've checked large diodes in situ (attached pic), two behave as expected, but four differ: one has 0.18 voltage drop and OL, the other two have also 0.18V drop but 1.8V drop the other way round, one has 0.18 V one way and increasing >1.5V the other. I'm guessing the only way to really check these would be to unsolder from PCB because I'm probably measuring other PCB routes?
 

Attachments

  • P1110009s.JPG
    P1110009s.JPG
    807.5 KB · Views: 98

restorer-john

Grand Contributor
Joined
Mar 1, 2018
Messages
12,678
Likes
38,779
Location
Gold Coast, Queensland, Australia
one has 0.18 voltage drop and OL, the other two have also 0.18V drop but 1.8V drop

That's fine- those large diodes have a very low fwd voltage drop.

I have a NC-252 board here and can check that inductor's value, but it will likely be identical to another inductor in the same position on the opposite rail. You could also try a 1R SMD resistor and put a bit of kapton tape around it in case it immediately smokes up. You can't really power up the module without the heat spreader and it is dangerous due to exposed high voltages on the primary side. If it works with the 1R resistor, you then know where you stand.

Safety is key remember.

I'm hoping you can fix it. I noticed there is some Hypex manual reworking in the first pic too.
 
OP
Z

zeworks

Member
Joined
Jan 11, 2023
Messages
8
Likes
12
Location
Provence, France
Here's a plan C to locate a suitable replacement inductor: I used a precision caliper to measure the L15 inductor dimensions (L=2mm, W=1.25mm, T=0.8mm, so seems to be 0805/2012 metric size factor), then on the mouser web site filtered the SMD power inductors according to those dimensions (adding >1A current according to Hypex module Vaux specification), which leaves just a handful of suitable parts out of tens of 1000s of references.

Advice welcome to guess if L15 is Shielded or Unshielded, and which out of Multilayer/Wirewound/Thin Film, since there would then only be three models to choose from ranging from 240 nH to 2.2 uH. I could order all three and start by soldering in the middle one at around 1 uH ?

I noticed there is some Hypex manual reworking in the first pic too.
Are the few shiny solderning points drawing your attention here ? At least some I suspect could be related to the short, as following the track along the PCB from the blown L15, it does look like there is a trail of several components (in red on attached pic) that have a different look to their twin on the opposite Vaux rail: shiny soldering, and sometimes also slightly glazed component case :( If the short was enough to melt the soldering, I'm concerned the component internals might not be pretty sights even if not visually blown from the outside. The U8 component middle pin's solder looks like it shed a drop whilst upside down :eek:. Maybe I should see if I can order replacements for those 3 as well, just in case. U8 and D74 have markings, C147 hasn't, so another candidate for plan C unless there's a better way...
I'm hoping you can fix it.
Thanks to your help I'm certainly gonna have a go
 

Attachments

  • P1110010s.JPG
    P1110010s.JPG
    885.6 KB · Views: 88

restorer-john

Grand Contributor
Joined
Mar 1, 2018
Messages
12,678
Likes
38,779
Location
Gold Coast, Queensland, Australia
Are the few shiny solderning points drawing your attention here ? At least some I suspect could be related to the short, as following the track along the PCB from the blown L15, it does look like there is a trail of several components (in red on attached pic) that have a different look to their twin on the opposite Vaux rail: shiny soldering, and sometimes also slightly glazed component case

That's just rework in the factory- nothing to do with your exploded inductor.

Just try the suggestion I made with a 1R SMD resistor. Also, check T117 as it looks like the inductor feeds that transistor. Just do a diode test over BCE junctions and check it's not a short.
 
OP
Z

zeworks

Member
Joined
Jan 11, 2023
Messages
8
Likes
12
Location
Provence, France
I described my issue yesterday in a message to Hypex tech support via their online form, asking for references for four components that looked potentially affected by the short. Well I dare say I'm impressed with Hypex support :) : they replied first thing this morning, with details I asked for, even going further by pointing out two resistors that I should also check, plus an extract of the Vaux schematics.
Boy am I lucky that for my first venture into quality audio I chose a company that cares enough for customers that they choose to freely help even a noname non professional DIY stupid enough to fry their product.
I'm posting the reply here as it may help someone in the same situation:

Please find the schematic of the Vaux circuit below.
The components in question are:
L15: 330R/1.5A bead
C147: 470nF
D74: BAT54SW
U8: 7812 SOT89
I suggest also checking resistors R39 and R270. These are there for overcurrent protection and can break due to high load or short circuit.
These resistors are 0,47 ohm, preferably 500mW.
 

Attachments

  • hypex_Vaux_schema.png
    hypex_Vaux_schema.png
    28.5 KB · Views: 133

somebodyelse

Major Contributor
Joined
Dec 5, 2018
Messages
3,745
Likes
3,032
I was going to suggest asking them as they have sent partial schematics before, but I see they've already done the same for you.
 

restorer-john

Grand Contributor
Joined
Mar 1, 2018
Messages
12,678
Likes
38,779
Location
Gold Coast, Queensland, Australia
I'm probably not looking in the right area, I'm struggling to locate T117.

I wouldn't worry about it- it's not in that part of the circuit. It's difficult to see exactly what goes where from one photo of one side of the board and making assumptions about what is on the other side.

The hypex partial schematic shows there is only the two paralleled 0R47 resistors downstream from the vaporised inductor for the Vaux. They appear to be a tiny bit discoloured, but I'll bet they are fine. Continuity test will be fine in circuit for them as they are 0.23 ohms together.

Also check continuity between the blown L15 pad and R39/R270. The track is on the other side of the board.

1673561146370.png
 
Last edited:
OP
Z

zeworks

Member
Joined
Jan 11, 2023
Messages
8
Likes
12
Location
Provence, France
Continuity test will be fine in circuit for them as they are 0.23 ohms together.

Also check continuity between the blown L15 pad and R39/R270. The track is on the other side of the board.
Both tests were fine. I ordered replacements for all 5 suspect components from mouser, with the intention of progressively attempting to replace them starting with the vaporized inductor L15.
Turn out soldering a new L15 ferrite bead brought back exactly 20.5V to Vaux, and brought back sound amplification to life, music to my ears again !
Would you now just leave the amp as is, or go all the way and replace the other 4 components ? Said otherwise, could slightly degraded performance of these have any impact on amplifier sound quality, or if they are functional then that's all there is to it ?
Geez am I happy though :)
 

Rick Sykora

Major Contributor
Forum Donor
Joined
Jan 14, 2020
Messages
3,603
Likes
7,302
Location
Stow, Ohio USA
Since you already measured 20.5V for Vaux, if you measure 12 volts on the output side of U8, your amp is likely fine.

If you want be sure the sound quality is good, you could use REW and an audio interface to check. Otherwise, if you have a local electronics repair shop, they should be able to verify for you.
 
Last edited:
OP
Z

zeworks

Member
Joined
Jan 11, 2023
Messages
8
Likes
12
Location
Provence, France
If you want be sure the sound quality is good, you could use REW and an audio interface to check
Great advice thanks, could even start learning how to measure with the PC's integrated card, a significant impact on one of the power rails might even show up. For more subtle estimates I'll look round for an external audio interface. Geez REW even works on Linux :).
 

Rick Sykora

Major Contributor
Forum Donor
Joined
Jan 14, 2020
Messages
3,603
Likes
7,302
Location
Stow, Ohio USA
Great advice thanks, could even start learning how to measure with the PC's integrated card, a significant impact on one of the power rails might even show up. For more subtle estimates I'll look round for an external audio interface. Geez REW even works on Linux :).

If you use a computer soundcard be very careful with levels. You can easily damage inputs when they are connected to amplifier outputs. But even measuring at low levels can give you some idea if channels have expected output and they match well.:cool:
 

restorer-john

Grand Contributor
Joined
Mar 1, 2018
Messages
12,678
Likes
38,779
Location
Gold Coast, Queensland, Australia
Would you now just leave the amp as is, or go all the way and replace the other 4 components ?

Just leave it would be my advice. I had hoped the inductor was the only issue and it seems to have turned out to be the case. :)

Glad to save another one from the landfill.
 

Rick Sykora

Major Contributor
Forum Donor
Joined
Jan 14, 2020
Messages
3,603
Likes
7,302
Location
Stow, Ohio USA
Agree on only fixing what is broke. Particularly for SMD devices. Unless you are really good soldering them, might cause more trouble.

Congrats that your effort paid off!:)
 
Last edited:
OP
Z

zeworks

Member
Joined
Jan 11, 2023
Messages
8
Likes
12
Location
Provence, France
Unless you are really good soldering them, might cause more trouble.
Yeah well I admit I struggled a bit with just that ferrite bead SMD. Took me so long to get it in the right position that in the end I feared I'd overheated it, so unsoldered and soldered a second one from my strip of ten - still not perfect but it brought back continuity so I just left it at that. So indeed no, I now know I'm not good at soldering SMD with a soldering iron :rolleyes:, I'll follow your wise advice & leave it at that unless forced otherwise.
 

wyup

Active Member
Joined
Mar 29, 2018
Messages
196
Likes
75
Location
Bilbao, Spain
I bought this amp recently paired to an Aune X8 XVIII dac's TRS pre-outs by means of its 10k potentiometer and a pair of PSB speakers (89db,6 ohm).
I find this amp has too much gain for a 2 Vrms source, volume ramps up very fast from the potentiometer and I find it hard to find a desired low volume in a few degrees of a +270º pot range. My source is a TV that already outputs -9db from its digital out (and can't select less).

I don't know if it's normal that an amp reaches full 125W power at only 1.17 Vrms and 4 ohms, according to its datasheet. It requieres almost half-voltage RCA signal attenuation to just begin full power. I wonder how much will I need for low volumes and how much noise/dynamic range do I lose...
I'm thinking of using a dedicated passive stepped preamp of the same 10k impedance, but if the preamp has similar attenuation range it would be the same ramp-up, if not worse due to a pot's better control.

Isn't a 10k pot already detrimental, since NC122MP input impeance is 47k, only a 4.7:1 ratio instead of the recommended +10:1 one?

I tried another dac 40-step digital volume by XLR (4V max, double than my Aune), however the volume ramped up slower than the other dac's pot, which I don't understand why.

Can anyone help?
 
Last edited:

somebodyelse

Major Contributor
Joined
Dec 5, 2018
Messages
3,745
Likes
3,032
The output impedance of the DAC/pot combination is lower than the pot's resistance, but varies with pot position. The pot is usually used as a variable L-pad attenuator, and most of the L-pad tutorials and calculators have a section on output impedance if you want more explanation.

I'm not familiar with the Aune DAC - is the TRS pre-out balanced or stereo? Balanced needs a dual gang pot to attenuate both hot and cold, but inevitably unbalances the line slightly.

Pots are available with different 'slopes' - rates of change as you turn or slide the pot. The common ones are log and linear, with log usually being used for volume control. Log isn't really logarithmic though - it's usually a combination of two linear slopes to give an approximation. The datasheets have the details. Depending on manufacturer and series other slopes may be available, and they don't all use the same slopes in their log pots. Digital volume controls usually use equal increment steps, say 1dB. You are probably hearing the difference between the pot's approximation of a log slope and the exact increments on the digital one.

There are several different interpretations of 'normal' for amp gain or sensitivity, particularly with power amps, so there isn't a single 'right' answer. THX certification requires a fixed gain, so you can swap any certified amp for any other and not get a change in output level. This does mean that a more powerful amp will need more input level to reach its full output though. Hypex seem to have gone with a fixed gain for most of their buffered modules too, although that gain has changed in some revisions (see datasheets). Another approach is a fixed amp sensitivity, so amps need a certain level of input to reach full output, whatever that may be. The trouble is deciding what the 'right' level is as whatever you pick someone will be upset. A lot of pro amps have an attenuator with some form of protection from accidental changes so you can set it to whatever suits your purpose.

I'm not quite sure what help you want. Are you looking to buy or make an attenuator, an active preamp with a suitable output level, or what?
 

wyup

Active Member
Joined
Mar 29, 2018
Messages
196
Likes
75
Location
Bilbao, Spain
The output impedance of the DAC/pot combination is lower than the pot's resistance, but varies with pot position. The pot is usually used as a variable L-pad attenuator, and most of the L-pad tutorials and calculators have a section on output impedance if you want more explanation.

I'm not familiar with the Aune DAC - is the TRS pre-out balanced or stereo? Balanced needs a dual gang pot to attenuate both hot and cold, but inevitably unbalances the line slightly.

Pots are available with different 'slopes' - rates of change as you turn or slide the pot. The common ones are log and linear, with log usually being used for volume control. Log isn't really logarithmic though - it's usually a combination of two linear slopes to give an approximation. The datasheets have the details. Depending on manufacturer and series other slopes may be available, and they don't all use the same slopes in their log pots. Digital volume controls usually use equal increment steps, say 1dB. You are probably hearing the difference between the pot's approximation of a log slope and the exact increments on the digital one.

There are several different interpretations of 'normal' for amp gain or sensitivity, particularly with power amps, so there isn't a single 'right' answer. THX certification requires a fixed gain, so you can swap any certified amp for any other and not get a change in output level. This does mean that a more powerful amp will need more input level to reach its full output though. Hypex seem to have gone with a fixed gain for most of their buffered modules too, although that gain has changed in some revisions (see datasheets). Another approach is a fixed amp sensitivity, so amps need a certain level of input to reach full output, whatever that may be. The trouble is deciding what the 'right' level is as whatever you pick someone will be upset. A lot of pro amps have an attenuator with some form of protection from accidental changes so you can set it to whatever suits your purpose.

I'm not quite sure what help you want. Are you looking to buy or make an attenuator, an active preamp with a suitable output level, or what?
I'm trying to choose between a 10k or a 50k passive preamp impedance choice to make volume slope slower (more progressive) than the Aune 10k pot, and get better sound quality and future-proof compatibility.
Aune dac balanced TRS output I'm using now I think doubles-up for the RCA pre-outs for convenience and is only unbalanced internally since the output is 2V. Aune output impedance is unkwnown but it is supposed to be low, say 200 ohms.
The preamp I have in mind is this:
It has constant input and output impedance since it is a relay-based shunt-type. I would be using Aune RCA line-outs to the preamp.

In paper the 10k seems more appropiate since it is be the same impedance as the Aune internal pot. However if in the future I connect a 1k balanced source impedance to the preamp, would 50k be better to allow for more headroom between the source and the preamp? Also it would increase the total pre+amp impedance, getting closer to the amp's input inpedance.

At his point I'm confused: what is better, the preamp to source impedance ratio or the amp to preamp ratio?
With 10k, amp to preamp ratio is only 4.7:1, lower than the 'standard' 10:1. With 50k, only 0.9:1...

thanks for the help
 
Last edited:
Top Bottom