• WANTED: Happy members who like to discuss audio and other topics related to our interest. Desire to learn and share knowledge of science required. There are many reviews of audio hardware and expert members to help answer your questions. Click here to have your audio equipment measured for free!

Entertainment with the Topping D90.

Rigel

Active Member
Joined
Apr 14, 2019
Messages
110
Likes
240
I hope Topping is not offended by this modification :)

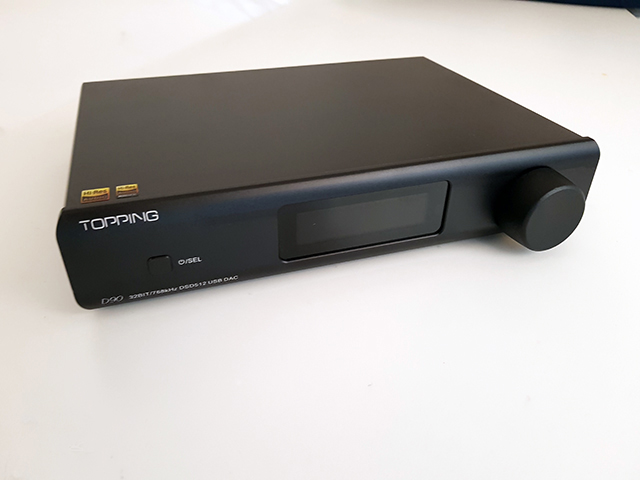
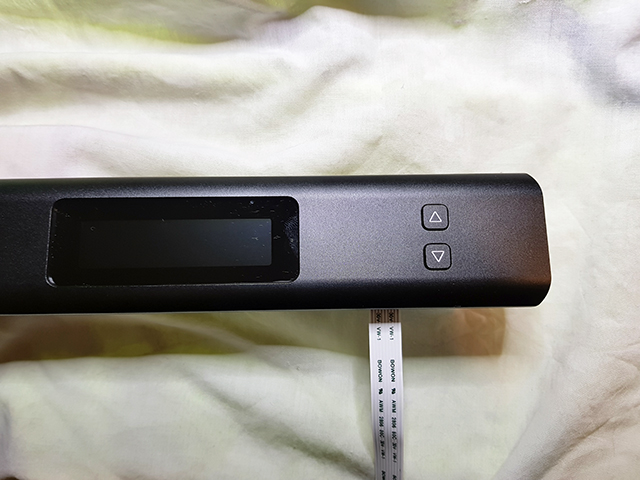
I am very satisfied with the very good sound and finishes of this DAC and its quality / price ratio, that's why I bought it. Good finishes and internal machining. I liked seeing the solid aluminum keypad and the front glass and not plastic protector.

But one of the details that I did not like, are the handling of the menus and especially the volume, through the keyboard.

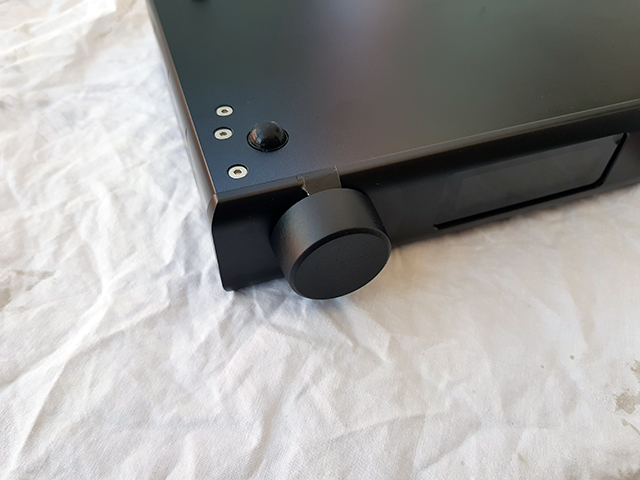
It is not important, when I also have the headphone amplifier at hand, but it has served me more than anything else as entertainment and approach, because it needs improvement to be really practical. The size, the finish, and specially in the number of beats per turn, which do not seem enough to me.

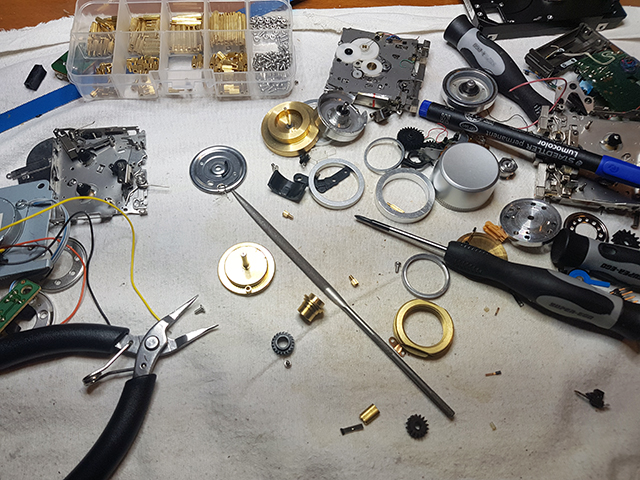
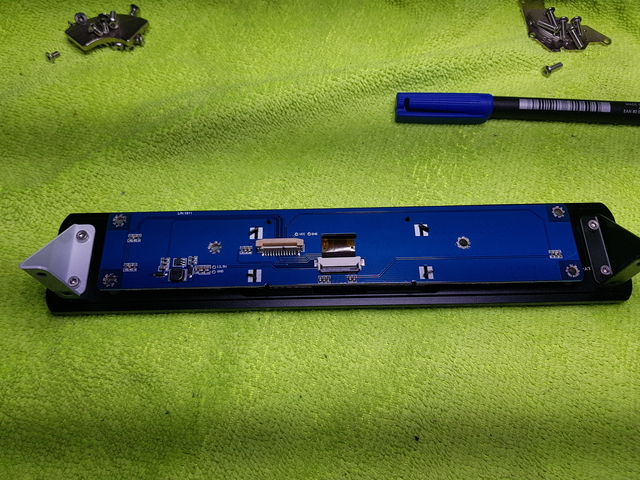
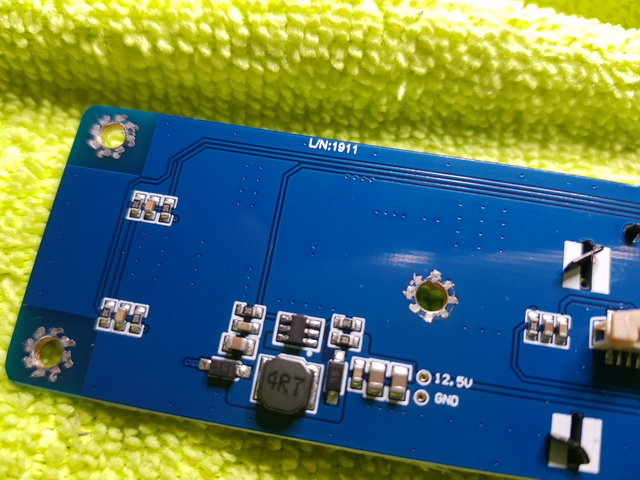
At the moment, I have not wanted to make changes to the electronics or mechanics of the equipment. It is mounted with remains of CD players, etc. Maybe I will take it apart, maybe I will improve it.

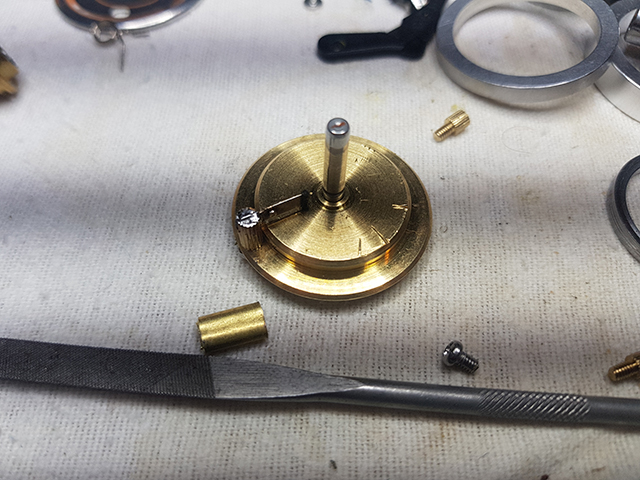
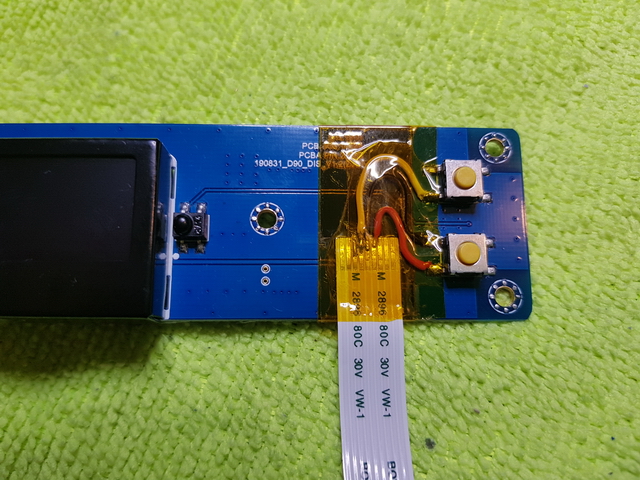
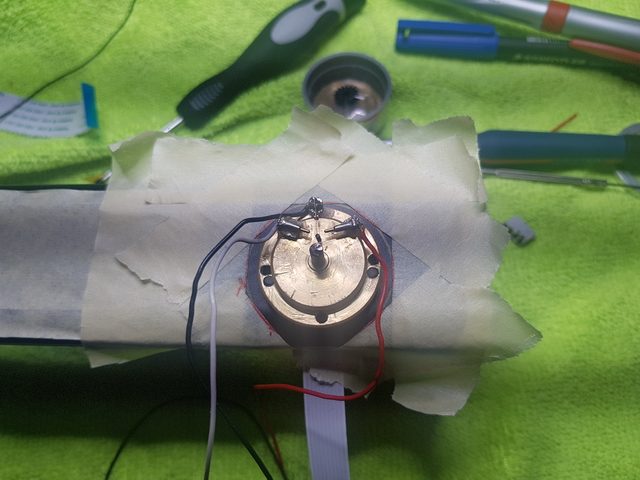
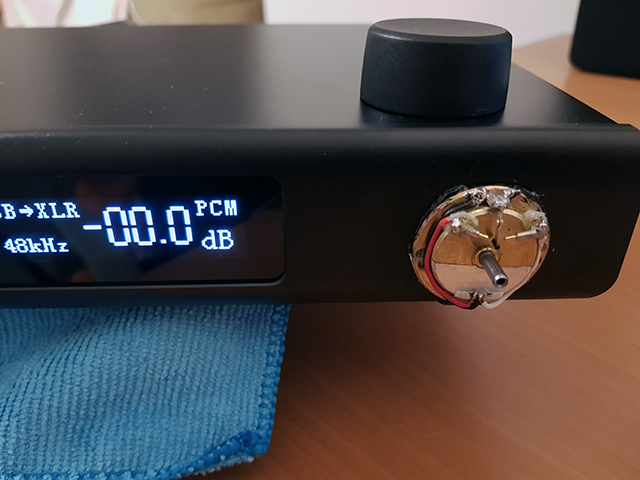
The operation is very simple. On the DAC, each of the buttons on the front, up and down, ground a contact.
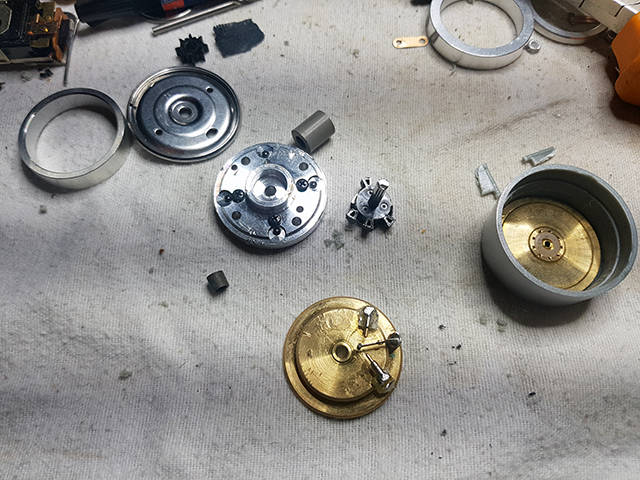
I have used a ribbon cable for connections which could have been smaller, only three wires are needed and black in color.

The central strap, of a limit switch, serves as a spring to center the button so that it does not make continuous contact, and the lateral contacts have internal springs to cushion excess travel.
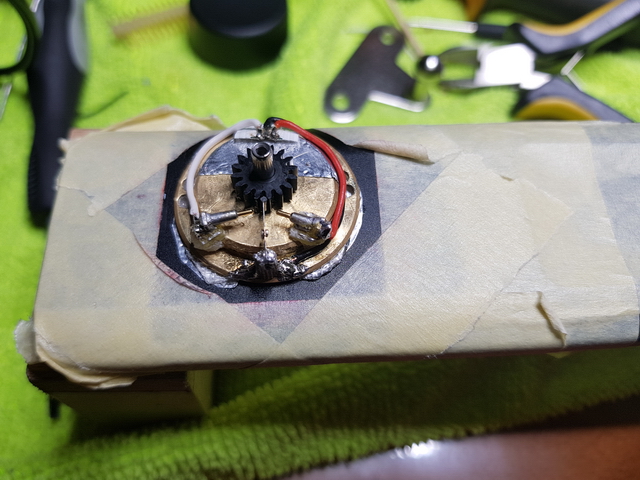
The gear itself selects the repetitive contact according to the direction of rotation. The more teeth, the more contacts one way or the other.
Perhaps I will modify it with a gear with internal teeth to increase the speed of the contacts. The rest is done by the routes and distances to avoid excessive rebounds.

A greeting. I hope it will at least entertain you for a while :)
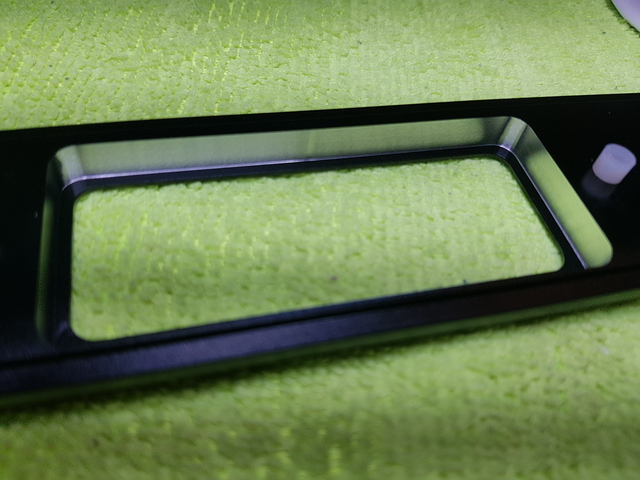


51kEBpvmmeL._AC_SX569_.jpg


Mod-Vol-D90.jpg

20200424-195943.jpg

20200424-203803.jpg

20200430-142425.jpg


Good machining

20200501-195300.jpg

20200501-164654.jpg

20200501-170257.jpg


Only three threads are necessary, if I make another version I will change it for one with fewer threads or I will use fine thread to wind transformers so that it goes more unnoticed. Although not seen from the front
20200501-195050.jpg

20200501-200725.jpg


20200502-131345.jpg

20200504-164802.jpg

20200506-155525.jpg

20200507-191101.jpg


Roberto

Member
Joined
Dec 10, 2018
Messages
22
Likes
13
Rigel,

Very impressive.

You could start a business making this modification to D90s.

However, I think your warranty is now void.

Still can’t understand why Topping can’t fit a proper volume knob.
 
OP
R

Rigel

Active Member
Joined
Apr 14, 2019
Messages
110
Likes
240
Thank you for commenting Roberto

I like DIY and I have never commercialized any of the things I have ever done, it is just a hobby.
If I get paid to do a job, it carries a responsibility I don't want to take. Also, it is easy to do and improve it.

Yes, I already had the loss of the warranty and I am not concerned enough to avoid doing so. From the moment I disassemble some equipment, I assume the consequences. It is almost a habit.

I'm glad you like it. A greeting.
 

A800

Addicted to Fun and Learning
Joined
Dec 22, 2019
Messages
734
Likes
616
Wow!
Impressive.
Great job.
 

Tks

Major Contributor
Joined
Apr 1, 2019
Messages
3,221
Likes
5,497
You know when people mod stuff and it looks like they went at it with a hacksaw? Yeah, this is not one of those, it looks like a new iteration done by the company themselves. Amazing work dude.
 

da Choge

Active Member
Forum Donor
Joined
Dec 31, 2018
Messages
232
Likes
220
Location
DFW
Totally awesome !!! Congrats. I'm using the D90 MQA as a DAC only for my bedroom AVR system, but if I was using it as a DAC/Audio preamp for a desktop PC, this would be a most welcome and amazing mod !!! Really nice intricate work.
 
OP
R

Rigel

Active Member
Joined
Apr 14, 2019
Messages
110
Likes
240
Thanks to all for your comments. I'm glad you like it
 

Veri

Master Contributor
Joined
Feb 6, 2018
Messages
9,598
Likes
12,040
This is a truly impressive modification!
 

Koeitje

Major Contributor
Joined
Oct 10, 2019
Messages
2,306
Likes
3,965
Before I read your post and only saw the pictures, I thought it was a mock-up button you put on it to show how it would look with a volume knob. Then it turned out you actually made a functional knob, very nice. I like a good knob :eek:.
 
OP
R

Rigel

Active Member
Joined
Apr 14, 2019
Messages
110
Likes
240
Thanks Koeitje


I am sorry if the translator does not get the text right.

In case someone else is encouraged to do it, in any other place or equipment, I will tell more or less about the problems I have had.

First of all, say that we lose the warranty of the device. I have the habit and I would almost say that need, to disassemble everything that falls into my hands since I was a boy, I can not avoid it and it is something that I do not care and I have assumed the risk, but whoever wants to foresee future breakdowns, Better not do anything because it's not that important either.
Please, I don't want anyone to be able to deal with these problems because of me.

That said, the operation is very simple, there is no mystery as you can see, but it has several points of difficulty that I have had, although there are many ways to pose the problem, everyone can choose their own.

-Obviously, the button must remain at rest, without making any contact. The strap acts as a spring that holds it in a neutral position through the gap between each tooth.

-It is easy to make a contact by turning the knob, but it is necessary to discern what contact to make, according to the direction of rotation. In this case, it is also the gear hole itself that initially directs it in the correct direction.

-It is necessary to hold the strap so that, in the rebound of the torsion, it does not hit the opposite contact. It happened to me at first. This is avoided by the next tooth, which also ends up pushing the strap for the next contact.

Use an appropriately sized gear. The more teeth, the greater number of contacts per turn and also the higher speed, while maintaining torsion distances without being excessive, so that the strap does not break.

At the same time that everything fits inside the button itself. I didn't want external switches or levers.

If a gear with the same size but with more teeth is chosen, these have to be smaller and the margins in the distances and gaps change making it difficult to play.

Each one of the lateral contacts must give a little, to avoid that the strap bends and ends up breaking.

The strap and the piece of brass are the ground of the keypad, which derive the lateral contacts for each of the buttons to ground.

Maybe try a gear with internal teeth to have more contacts or maybe with some electronics, right now I'm not comfortable with speed, but I wouldn't want to draw current from inside the keypad. Right now I do not know the consumption margins that it could have.

This is the photo of one of the side contacts that I have used. it has a spring inside.


20200508-111819.jpg
 

DWPress

Major Contributor
Forum Donor
Joined
May 30, 2018
Messages
1,022
Likes
1,472
Location
MI
@Rigel Brilliant! I've been trying to figure out a way to convert buttons to a rotary dial for years! Where did you source the spring loaded mechanism in your last picture? God I hate buttons for volume control, that was one of the big reasons I didn't go for a D90.
 
OP
R

Rigel

Active Member
Joined
Apr 14, 2019
Messages
110
Likes
240
Hi, thank you DWPress. I'm glad you like it.

Indeed, I did not like the adjustment with the buttons either, it is the only thing I did not like about the DAC, even so I bought it for its good sound.

I think I remember that I got them from the contacts of a limit switch on a disassembled recorder or video player. They are designed to be able to flex repeatedly without breaking.
Although small size relay contacts could also be used. They can have varying lengths, widths or stiffness.

Anyway, it was kind of improvised, I'm trying to improve it in reliability and usability with more contacts per turn and I probably outsource it wired as a PC mouse to make it more comfortable for me and add the on / off / SEL button.
At the moment it is only an approximation, I lack time and I do not know if I will finish it.
Tomorrow with more time I will post photos of the new version, in case someone is encouraged to use it for this or other functions.

A greeting.
 

MakeMineVinyl

Major Contributor
Joined
Jun 5, 2020
Messages
3,558
Likes
5,875
Location
Santa Fe, NM
Very clean install. Personally, I would have done it with a cheap rotary quadrature encoder and a small microcontroller as I did with controlling the volume on my preamp, but that's just me. The microcontroller programming is dirt easy.
 

BDWoody

Chief Cat Herder
Moderator
Forum Donor
Joined
Jan 9, 2019
Messages
7,079
Likes
23,523
Location
Mid-Atlantic, USA. (Maryland)
OP
R

Rigel

Active Member
Joined
Apr 14, 2019
Messages
110
Likes
240
Very clean install. Personally, I would have done it with a cheap rotary quadrature encoder and a small microcontroller as I did with controlling the volume on my preamp, but that's just me. The microcontroller programming is dirt easy.

Hi MakeMineVinyl. Thanks for commenting and suggestion.

It is indeed a way to do it, and I do not rule out doing it in the future, but my initial intention was to modify the equipment as little as possible and dispense with power, both internal and external to the equipment. That it was purely mechanical.

A greeting.
 

DWPress

Major Contributor
Forum Donor
Joined
May 30, 2018
Messages
1,022
Likes
1,472
Location
MI
Tomorrow with more time I will post photos of the new version, in case someone is encouraged to use it for this or other functions.

Please do share!
 
OP
R

Rigel

Active Member
Joined
Apr 14, 2019
Messages
110
Likes
240
Hi DWPress.

Sorry for the delay. Here are the pictures.

I've been with it for weeks, to see if I have time to continue.
The wiring and part of the selection mechanism is still missing. If I finish it, I will post the final photos.

The previous version was somewhat improvised, in this version I want to use reed switches and motor parts from a hard drive.
It will be much more reliable and hopefully also more usable with a higher number of contacts per turn.

Both the Reed sensors and the magnets (2x1mm) that activate them are the smallest that I have been able to find to have a greater number of them and therefore also contacts per turn.
A pair of Reed sensors together with a group of associated magnets will decide if the contact of the other group of magnets is to raise or lower the volume. I also want to add a push button to integrate the On / Off / SEL button.

I put a link where you can see how these switches work:
https://www.explainthatstuff.com/howreedswitcheswork.html

To avoid the overlapping of the magnetic field of the magnets, I have had to separate them, the smaller number of magnets is compensated with each of them activating the Reed sensor twice, once at each end of the switch and more switches can be added Reed in parallel to multiply the pulses.
To a certain extent clear. The limit is determined by the extent of the magnetic field and the detection zone of the reed switch and also the distance between each magnet.
I plan to put only two.
Trimming the pins also decreases the sensitivity of the sensor and also the polarity affects, the magnets must be in the same position. A compass or smartphone can be used for this, although it may not be very reliable.


This video is from when I was testing the necessary distances between magnets.


Reed09.jpg

Reed13.jpg
Reed07.jpg

Reed10.jpg

Reed02.jpg
Reed12.jpg

Reed04.jpg
 
Last edited:
Top Bottom