No idea what you meanThere is no replacement for knowing what you are doing, and it is lazy to argue otherwise?

-
WANTED: Happy members who like to discuss audio and other topics related to our interest. Desire to learn and share knowledge of science required. There are many reviews of audio hardware and expert members to help answer your questions. Click here to have your audio equipment measured for free!
You are using an out of date browser. It may not display this or other websites correctly.
You should upgrade or use an alternative browser.
You should upgrade or use an alternative browser.
DIY speakers with Waveguide
- Thread starter 617
- Start date
frabor
Active Member
if you were responding to me, the answer is I don’t know yet. I will keep folks here aware.
I have long suspected waveguides are ‘the answer’, will be fun to see if that’s as true as my instincts predict.
yes (i was talking to u) yes, i think your instincts, regarding wave-guides, are true. the dispersion control and lower xover point are a good thing.
frabor
Active Member
yes the pi are nice. the m2 are not bad eitherNo idea what you mean
")
great system, btw, what sub do you have in your profile pic.
Yeah they're not bad.yes the pi are nice. the m2 are not bad either
great system, btw, what sub do you have in your profile pic.
That's the SUB18 from JBL when I went on a Harman factory tour.
yes (i was talking to u) yes, i think your instincts, regarding wave-guides, are true. the dispersion control and lower xover point are a good thing.
I got the print files for the 8” waveguide but am being told they are less than ideal for printing, and need adjustment. Something about them being optimized for CNC not printing. Will be talking to my expert today to sort that out and make material choice etc.
Will initially set this up with tweeter on its own dsp channel...should allow rapid evaluation of alternate cross frequencies (and possibly topology) to get the dispersion match needed.
I also want to explore the creation of a two tweeter dipole “pod” with waveguide dispersion control that could sit atop an open baffle. There are some inherent problems to overcome with that, so it’s a “later on” project.
Update, we have modified the 8” wide waveguide for the SB26SCTN dome tweeter, as confidence wasn’t high it could print successfully...added ribs.
should get first sample in next week or so, one of these about a 12 hr print job.


should get first sample in next week or so, one of these about a 12 hr print job.
frabor
Active Member
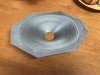
First version is printed...not fully successful print. In short I need to make an adapter* for it to fit exactly.
it’s a deliberately “coarse” print as the first try...LOL we were hoping to speed things up...that didn’t happen.
The essential shape is ok but a bit rough...it should be good enough once I get off my butt and figure out adapter.
*didnt print full file, started a few layers up from throat opening, so the dome opening is a bit too large at the moment.
I might use what has been printed as a template to router-duplicate-carve the shape into a live edge baffle if tests on this sample do what I hope they will do.
Attachments
frabor
Active Member
Great first print (pla?) Patrick Bateman in DIYUADIO recommends the use of some kind of plaster or putty to seal the area between the driver and the throat. I have seen his charts and the difference is impressive, several db at crucial points. That technique will cover less that a 5 mm radius difference. for more you need and adapter. You can try also with an acetone bath or some paint/fluid to smooth the surface if if bothers you. Throat is probably much more important that the ridges. I outsource my 3d prints, but it is a common well documented procedure.
The guy who makes my molds for the motion control rigs I build, 3d prints the brackets, then uses bondo for filing and polishes to finish the parts. Afterwards he applies some coating for finishing. Its a length process but the results are amazingly glass smooth ( we have to do that as we mold and cast them later), but...
....if I were you will not even bother at this time, make your adapter, try it, test it, and see how you like it. I think it will be great.
keep posting pics, really interested on your printing / fabing process.
pd: you maybe able to use a small scaling factor to scale down the size of the print to make it fit the driver. Measure the difference of the print and the whole opening and calculate the scale down factor.
Last edited:
I saw detail from another gent...Joseph Crowe...who stressed importance of the detailed shape at the tweeter interface. (His horns look great.) I will try to create that detail.
The print is good enough to test now, I expect high freq anomalies due to the imperfections. Key is the effect on freq response near 2 kHz...hoping there is a good enough boost from the horn that I can cross it in below 2khz with low distortion with a simple single order cap.
The print is good enough to test now, I expect high freq anomalies due to the imperfections. Key is the effect on freq response near 2 kHz...hoping there is a good enough boost from the horn that I can cross it in below 2khz with low distortion with a simple single order cap.
frabor
Active Member
I saw detail from another gent...Joseph Crowe...who stressed importance of the detailed shape at the tweeter interface. (His horns look great.) I will try to create that detail.
The print is good enough to test now, I expect high freq anomalies due to the imperfections. Key is the effect on freq response near 2 kHz...hoping there is a good enough boost from the horn that I can cross it in below 2kHz with low distortion with a simple single order cap.
Never read any posts from Joseph Crowe but it makes sense that a polished unit will improve response. Augerpro sometimes test his designs in his 3d print , but the final model is professionally printed in nylon sls synth (awesome but very expensive). Augerpro 3d prints look more or less like yours. First order @ 2Khz xover may be on the limit of the waveguide, tweeter, 2nd order may be fine. Just try and measure. I am building a two way with a smaller commercial waveguide (5.5" circular) and I start testing with LR2 active about 2kHz
Never read any posts from Joseph Crowe but it makes sense that a polished unit will improve response. Augerpro sometimes test his designs in his 3d print , but the final model is professionally printed in nylon sls synth (awesome but very expensive). Augerpro 3d prints look more or less like yours. First order @ 2Khz xover may be on the limit of the waveguide, tweeter, 2nd order may be fine. Just try and measure. I am building a two way with a smaller commercial waveguide (5.5" circular) and I start testing with LR2 active about 2kHz
yes, and I am not yet convinced the 8” width I printed is what I need...I will be able to determine that once I test.
certainly I am trying to extract the lowest possible cross using a relatively inexpensive tweeter...I’ll be happy if I get first order 2 kHz or second order 1.75 kHz region. That should assure good dispersion match to the midrange.
H-713
Senior Member
- Joined
- Jan 24, 2021
- Messages
- 379
- Likes
- 666
For those who understand waveguide physics better than me (I lean a little more on the EE side), how terrible of an idea would it be for me to use the 5" Augerpro waveguide (for the SB26) in a system with an 8" woofer? The 4" and 5" ones are a lot less expensive to print. I know that the depth will be wrong with regards to time alignment, but there are other things I can do to fix that.
AnalogSteph
Major Contributor
IIRC it was Presonus who are using the same waveguide on 5" and 6.5" models, but 8" seems a bit of a stretch. This may leave you with issues matching woofer and tweeter - a bump and dip in directivity index.
You've got two issues, first woofer directivity increasing simply as a function of its size, and then the waveguide which may be broader than the woofer at crossover in general, and possibly not yet fully effective at crossover. This makes it hard to go lower with XO without compromising tweeter level handling. Generally speaking, the bigger the waveguide the more tweeter response is boosted at the low end. With the higher level capabilities and lower XO required for an 8", that's obviously quite important.
Mind you, a waveguide too small is still better than none. You may have to take the measurement route to see whether the tradeoff is acceptable to you.
Similar threads
- Replies
- 24
- Views
- 2K