• WANTED: Happy members who like to discuss audio and other topics related to our interest. Desire to learn and share knowledge of science required. There are many reviews of audio hardware and expert members to help answer your questions. Click here to have your audio equipment measured for free!

DIY cable gallery and discussion

Racheski

Major Contributor
Forum Donor
Joined
Apr 20, 2020
Messages
1,116
Likes
1,698
Location
Chicago
Almost all of the gear has arrived to build the HD800S cable:
Short term objective is to watch soldering videos and complete the kit this week. Also had my first beginner's moment...the 550 cord is 4.0mm in diameter, but the Canare 4E6S is 6.0mm and I want to leave the PVC jacket on the cable for a thicker and firmer feel. So I ordered Canare 4E5C which at only 4.8mm should fit with the aid of a paracord fid.

I'll post pics as I make progress.

All done! Took about 6 hours start to finish. Lessons Learned:
  • 0.5mm solder is too thin for the headphone wire joints I was working with. 0.8mm or 1.0mm will allow me to solder faster.
  • Below is a 550 Paracord Cable Sleeve Chart for Canare Quad cables. Y = Yes it will fit into 550 Paracord; N = No it will not fit into 550 Paracord. I ended up using L-4E6S stripped down to the wire insulation for the entire cable.
1594517982692.png

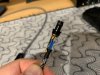
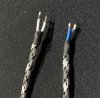
  • Removing the copper shielding from Canare cables is a PITA because it is braided. The best solution I found was to cut the shielding VERY carefully lengthwise and then "peel" it open, which is the same method I used to remove the PVC jacket. In the future I would be willing to buy Mogami just because their shielding is spiraled.
  • A wire stripper that can handle AWG 20-30 is a must-have for a beginner. Yes you can strip wires with a utility knife (or any sharp blade for that matter), but it's not a good time.
  • Sharp scissors designed to cut paracord and trim strands that fray is a must-have. Cutting and trimming paracord with a knife is not a good time.
  • Whoever designed the HD800/HD800S connectors needs to be slapped in the face, and then should write an apology whose word length is determined by the number of HD800 connectors DIYers have had to solder, multiplied by the average cost of a connector.
  • Since the cable without the PVC jacket and shielding is relatively light, the cable doesn't "plop" on my desk as much as I had hoped.
  • All things considered, I'm happy with how it turned out for a first project. I think my next one will be a XLR to 4.4mm pentacon adapter.
HD800Cable_Final.jpg
 

Attachments

  • HD800 Connector.jpg
    HD800 Connector.jpg
    2.3 MB · Views: 362
  • LR_TinnedWires_final.jpg
    LR_TinnedWires_final.jpg
    745.2 KB · Views: 302
  • XLR_Solder_final.jpg
    XLR_Solder_final.jpg
    551.1 KB · Views: 315

Doodski

Grand Contributor
Forum Donor
Joined
Dec 9, 2019
Messages
20,415
Likes
20,408
Location
Canada
Wowowow. Nice cable. :D I noticed you did not have solder wick on your list. If and when you need it there's no substitute. :D
 

Racheski

Major Contributor
Forum Donor
Joined
Apr 20, 2020
Messages
1,116
Likes
1,698
Location
Chicago
Wowowow. Nice cable. :D I noticed you did not have solder wick on your list. If and when you need it there's no substitute. :D
Thanks! Yes I bought some when I ordered the mini cables, but I think the size is too small to be useful
0.098 in Solder Wick
 

Doodski

Grand Contributor
Forum Donor
Joined
Dec 9, 2019
Messages
20,415
Likes
20,408
Location
Canada
Thanks! Yes I bought some when I ordered the mini cables, but I think the size is too small to be useful
0.098 in Solder Wick
A different sized selection of solder wick is for professionals to have in their kit. For a casual home user a thicker braid would be handy but a mid size has advantages too. Use what you have and learn it and then you'll know what you need. :D
 

Bob-23

Senior Member
Joined
Jul 3, 2019
Messages
425
Likes
379
Location
Berlin, Germany
Great! Congratulations!

0.5 mm solder is ideal for boards - you may need it in the future. You can try to twist two solder wires, more or less densely...

There are several kinds of wire strippers. I like the following type very much, it's able to wire strip even shielded cable up to a certain diameter, and more important: it's able to strip very thin cables, which - using simply a knife or scissors, or a 'V-stripper' - are always in danger of getting damaged. But: a certain minimal length of the cables to be stripped is necessary (~ 2 cm). It's a very quick and comfortable way of removing isolations.

https://www.amazon.com/IRWIN-VISE-G...9&sr=1-1-72d6bf18-a4db-4490-a794-9cd9552ac58d

I use such a 'V-stripper', too, when cable length ist too small to use the above one. But they need to be handled carefully, cables can easily be damaged.
https://www.amazon.com/Knipex-11021...keywords=wire+stripper&qid=1594620539&sr=8-74

A good pair of electrician scissor helps a lot. A must have. I like this one very much:
https://www.conrad.de/de/p/toolcraft-to-6326259-kabelschneider-14-mm-2108753.html

Thick shielded microphone cables - too thick for the other types of wire strippers - can be stripped quickly and properly by such a pair of scissors. As you can't get Conrad in the US, look for a similar type, e.g. this one?
https://www.amazon.com/Tools-95-155...trician+scissors+knipex&qid=1594620876&sr=8-1

Good luck!
 
Last edited:

Racheski

Major Contributor
Forum Donor
Joined
Apr 20, 2020
Messages
1,116
Likes
1,698
Location
Chicago
Great! Congratulations!

0.5 mm solder is ideal for boards - you may need it in the future. You can try to twist two solder wires, more or less densely...

There are several kinds of wire strippers. I like the following type very much, it's able to wire strip even shielded cable up to a certain diameter, and more important: it's able to strip very thin cables, which - using simply a knife or scissors, or a 'V-stripper' - are always in danger of getting damaged. But: a certain minimal length of the cables to be stripped is necessary. It's a very quick and comfortable way of removing isolations.

https://www.amazon.com/IRWIN-VISE-G...9&sr=1-1-72d6bf18-a4db-4490-a794-9cd9552ac58d

I use such a 'V-stripper', too, when cable length ist too small to use the above one. But they need to be handled carefully, cables can easily be damaged.
https://www.amazon.com/Knipex-11021...keywords=wire+stripper&qid=1594620539&sr=8-74

A good pair of electrician scissor helps a lot. A must have. I like this one very much:
https://www.conrad.de/de/p/toolcraft-to-6326259-kabelschneider-14-mm-2108753.html

Thick shielded microphone cables - too thick for the other types of wire strippers - can be stripped quickly and properly by such a pair of scissors. As you can't get Conrad in the US, look for a similar type, e.g. this one?
https://www.amazon.com/Tools-95-155...trician+scissors+knipex&qid=1594620876&sr=8-1

Good luck!
Thanks for the gear recommendations! After my wire-stripping struggles I researched them for a couple hours - that Irwin self-adjusting is very popular, but I figured it may be difficult to strip wire in very tight spots because of that minimum length you mentioned. I went with Klein Tools 22-32 AWG Wire Stripper instead which should be good for my one-off projects.

I'll order a pair of those KNIPEX scissors - those look useful.
 

maverickronin

Major Contributor
Forum Donor
Joined
Jul 19, 2018
Messages
2,527
Likes
3,308
Location
Midwest, USA
Sharp scissors designed to cut paracord and trim strands that fray is a must-have. Cutting and trimming paracord with a knife is not a good time.

Depending on the exact polymer you can also avoid fraying by cutting it with a hot knife of just touching up the end for a second or two with a lighter.
 

Racheski

Major Contributor
Forum Donor
Joined
Apr 20, 2020
Messages
1,116
Likes
1,698
Location
Chicago
So the XLR to 4.4mm adapter was a fail. Initially I was having a lot of trouble adding solder to the 4.4mm rings, and the plastic began to melt. After I purchased flux pens I was able to solder everything in place and confirm the connections with a multimeter, however, I'm getting a strange crackling in the right headphone when using the adapter. I'm assuming it has something to do with the melted plastic.

I'm going to give this another go with a new 4.4mm plug, and I'm not a huge fan of the one I purchased ( connector ) - can anyone recommend a website to purchase one that does not take 1-2 months to ship from China to the US?
 

Bob-23

Senior Member
Joined
Jul 3, 2019
Messages
425
Likes
379
Location
Berlin, Germany
I'm getting a strange crackling in the right headphone when using the adapter.
That's indeed a difficult task. I woudn't exclude a cold solder joint on one of the rings - in order to find that out, you may use the continuity tester of your multimeter while wiggling the cable near the plug and, if necessary, reflow the joint, or reflow the resp. joint anyway. But you might be right that some plastic shieding is damaged. Btw., a little vice for clamping the plugs while soldering can be useful. Good luck!
 
Last edited:
OP
doctorjuggles

doctorjuggles

Active Member
Joined
Mar 25, 2019
Messages
152
Likes
182
Location
London, UK
Yep, a vice is great.
I use this one that attaches to whatever is available at the time

Are you able to take a couple of photos of the soldering? We might be able to spot some things we can help with if you do.
Usually you want a nice, shiny finish on the solder joint, it's often obvious with a cold solder - it's dull and grainy.

Having said that, I've had a problem with melting plastic casing too, and that can definitely affect the contact. It's part of the learning curve so don't worry too much. Better to learn on a £10 plastic connector than a £90 Furutech, trust me, I've ruined one of those too
 

Doodski

Grand Contributor
Forum Donor
Joined
Dec 9, 2019
Messages
20,415
Likes
20,408
Location
Canada
This connector requires a advanced soldering job and would be a very difficult beginners project. So carry on and have fun. :D
s-l500.png
 

Racheski

Major Contributor
Forum Donor
Joined
Apr 20, 2020
Messages
1,116
Likes
1,698
Location
Chicago
Yep, a vice is great.
I use this one that attaches to whatever is available at the time

Are you able to take a couple of photos of the soldering? We might be able to spot some things we can help with if you do.
Usually you want a nice, shiny finish on the solder joint, it's often obvious with a cold solder - it's dull and grainy.

Having said that, I've had a problem with melting plastic casing too, and that can definitely affect the contact. It's part of the learning curve so don't worry too much. Better to learn on a £10 plastic connector than a £90 Furutech, trust me, I've ruined one of those too
See below. I melted the plastic after messing around too long without flux.
Pentaconn3.jpg

Pentaconn4.jpg
 

Doodski

Grand Contributor
Forum Donor
Joined
Dec 9, 2019
Messages
20,415
Likes
20,408
Location
Canada
Yes, that's a nasty difficult solder job project. If you have some isopropyl alcohol it will melt/dissolve the flux and clean up the connector. It appears the first white wire from the right side is shorting to the ground.
 

Racheski

Major Contributor
Forum Donor
Joined
Apr 20, 2020
Messages
1,116
Likes
1,698
Location
Chicago
Yes, that's a nasty difficult solder job project. If you have some isopropyl alcohol it will melt/dissolve the flux and clean up the connector. It appears the first white wire from the right side is shorting to the ground.
Yeah I was concerned about that as well...when the plastic melted it created a small crevice between the threads and the first plastic ring. I tried very hard to clean out the solder from there, but couldn't do it; even tried using a wick. I could try again...
 

Doodski

Grand Contributor
Forum Donor
Joined
Dec 9, 2019
Messages
20,415
Likes
20,408
Location
Canada
I could try again...
That's the thing about making up difficult to assemble cables. Everybody has to go through it but keep going at it till you perfect the design and layout of the trimmed wires and it assembles nicely. You may need to order in another connector because from the looks of it this one is going to have taken some damage. There seems to be lots of flux. Is that just from the solder or are you adding flux?
 

Racheski

Major Contributor
Forum Donor
Joined
Apr 20, 2020
Messages
1,116
Likes
1,698
Location
Chicago
That's the thing about making up difficult to assemble cables. Everybody has to go through it but keep going at it till you perfect the design and layout of the trimmed wires and it assembles nicely. You may need to order in another connector because from the looks of it this one is going to have taken some damage. There seems to be lots of flux. Is that just from the solder or are you adding flux?
It's from the flux - Flux Pen
I was able to clean up the flux with some isopropyl alcohol, and then tried a thicker solder tip to remove the flux from the rings...and voila! The solder flowed away from the crevice and made a joint with the ring. I had been using a very fine tip and I guess it was not heating up enough area for the solder to melt on the ring properly. I'll re-attach the wires and see if that solved the issue.
 

Bob-23

Senior Member
Joined
Jul 3, 2019
Messages
425
Likes
379
Location
Berlin, Germany
Usually you want a nice, shiny finish on the solder joint, it's often obvious with a cold solder - it's dull and grainy.
You'd be absolutely right if Racheski used leaded solder - but with lead free it's hard to judge the quality of solder joints by their appearance: they're no more shiny. And our friend has to apply a lot of extra flux, because, generally, more flux is needed for lead free, and, moreover, exra flux is needed in order to compensate for the 'borderline' solder station which should have a bit more wattage for lead free solder. For soldering resistors, capacitors in a board it should be sufficient, but with connectors - there's a lot of metal, you need sufficient wattage. And lead free as such needs higher wattage than leaded solder. But, nonetheless, it could work with the actual tools.

I could try again...
Yes, try it again, the connector might still be alright. It's difficult for beginners, and not only for them. Good luck.
 
Last edited:

Harmonie

Major Contributor
Forum Donor
Joined
May 30, 2020
Messages
1,927
Likes
2,084
Location
France
Maybe using solder with 4% Silver ? That is very fine gauge and has no such flux ?
 

Racheski

Major Contributor
Forum Donor
Joined
Apr 20, 2020
Messages
1,116
Likes
1,698
Location
Chicago
You'd be absolutely right if Racheski used leaded solder - but with lead free it's hard to judge the quality of solder joints by their appearance: they're no more shiny. And our friend has to apply a lot of extra flux, because, generally, more flux is needed for lead free, and, moreover, exra flux is needed in order to compensate for the 'borderline' solder station which should have a bit more wattage for lead free solder. For soldering resistors, capacitors in a board it should be sufficient, but with connectors - there's a lot of metal, you need sufficient wattage. And lead free as such needs higher wattage than leaded solder. But, nonetheless, it could work with the actual tools.


Yes, try it again, the connector might still be alright. It's difficult for beginners, and not only for them. Good luck.
Connector is donzo - the plastic has melted off the rings so I ordered another. The solder iron is 60W; is that on the low side required for lead-free? It indicates a max temp of over 800F.
 
Top Bottom