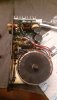
I stumbled on this this thread just now and thought I could add a little here for future DIY'ers. Simply replacing the entire board on this loudspeaker will not provide the best results in my opinion, as there is equalization and crossover that are specific to this loudspeakers operation.
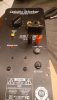
that is correct, by replacing the board, you are foregoing the ability to use the 'speaker level' inputs
i dont have a working board to compare if the board does anything to the LFE signal, or the EQ is just there for the speaker level input. i think we can confidently say it has some filtering/eq for the speaker level input as it needs to hit it with a LP120hz (or whatever they've set it to, likely somewhere in the 60-200hz range) and possibly a subsonic filter as well for sub20hz. but unknown if the same level of filtering would happen on the LFE input as you'd end up doubling up the LP filters causing a phase shift and an even steeper roll off, so my guess is the LFE is likely untouched
so after this mod, since you have to use LFE, i would hypothesize you aren't missing out on any filtering or EQ, and if you have audyssey with sub EQ, irrelevant as you'd gain it back anyway
again, unless someone has a working one and can do a measurement of the individual driver response, and compare it to a bypassed board, would be the only way to prove it.
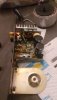
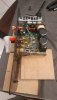
Finally, I would suggest you find a class D board that is advertised to run with not only a +/- 70v max supply but one that puts at least 200w into 8 ohms. So many of the boards I've looked at claim preposterous outputs but upon close inspection you'll see that the claimed wattages are only at .5 ohms at 10% THD for 1ms or some such nonsense. I've settled on a 600w module from Ebay that runs on +/-70v max. I won't link it here because I don't want anyone to buy this thinking I am co-signing for this board. The board I'm going to try uses the IRS2092S class D driver and runs well on high voltage at high speed.
everyone is certainly welcome to get whatever module they want, however the larger boards, require larger power supply stages, which complicates the entire build where you are competing for limited space if you are trying to keep it mounted to the plate, but go for it! the IRS2092S boards are excellent amps (and likely overkill for just sub duty)
yes, these boards often times have inflated spec's (you think the amp board you are pulling out really has 300w
")
) , but depending on which module you have 8/10/12" driver, you'd be surprised how little wattage you'd actually need. with the little class D amp i originally suggested, i have to set to -3Db on the LFE output as i'm able to bottom out the driver.
i cant say we know the spec's for the subs in these, so to give a requirement to say you need 200w into them might end up with some blown drivers, but again, would need to test their power handling before i can confidently say you can't
thanks for chiming in!