
Hi all. I ordered a 4ch NC502 and 4ch NC252 both in 17" cases from Buckeye a few weeks back. I mentioned earlier in the thread that I intended to rack mount them and was ask to document what I did to do that. So....
Let me start by saying I'm not great at documenting a process and even worse at taking pictures. And, I'm more of a shade tree mechanic than I am an engineer or machinist. I wasn't looking for perfection and I'm not looking to enter my solution in a beauty contest. With that being said...
This was done with basic hand tools with maybe the exception of a tool & die set to tap the holes for the machine screws and a drill press. The drill press will make your life easier but isn't required.
First, I have my equipment mounted in a communications equipment rack in a closet. From inside vertical rail to inside vertical rail is about 17 1/4", thus I asked for the 17" case. You need to check the dimensions of your rack and adjust accordingly.
The material I used to make the rack rails is 1/8"x3"x3ft weldable flat steel stock from a big box store. These are about $15ea.
Here is a pic of the ident sticker on the one I used.

I went to a machine/fabrication shop and had them bend both ends of the stock 90 degrees with 7/8" inside measurement. That means from the end of the stock to the 90 degree bend on the inside of the bend is 7/8". This will make the "ears"of the rail. Cost me $15 to have two pieces bent(remember I'm doing two amps).
Here's a pic of the rail with the cut lines marked(black lines) along with some tools I used to get there. I removed one side of the amp case(the black piece lying above the steel rail) to use for measuring. I simply placed it up against the inside of the bend and marked the other end of the case side piece then used the square to make a straight line. I used a reciprocating saw with a metal cutting blade to cut the pieces at my black lines. You could also have the same machine/fabrication shop cut them for you.

A word about these cases. The two side pieces are essentially what holds the entire thing together. Thus, I would not recommend removing both end pieces at the same time. And of course you shouldn't be drilling into any parts of the case with it still together. We don't want metal shavings mixed up with our electrical equipment.
I decided to use 5 screws in the side rail to secure it to the case side. The side pieces are exactly 12" long so I put one screw dead middle and 2 each 2" in from the end of the piece. I used #8-32 x 3/4" machine screws, thus I used a #8-32 tap and appropriate drill bit for this tap to drill and tap the five holes in the both pieces. I used a vice grip clamp to clamp the two pieces together and drilled/tapped them at the same time.
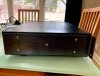
Here's a finished view of one of the sides.

There has been concern about the bottom of the case "sagging" if it were rack mounted. The steel gauge of the top and bottom is pretty lite and would indeed sag just a tad. There is a foot placed in the middle of the bottom case plate so when sitting on a shelf, this isn't an issue.
The way the sides of the case "attach" to the top and bottom plates is a press fit between a lip that is machined into the side. The inside of the lip is roughly 1/2" so I decided to use that to drill and tap two screws on each side to the bottom of the case to positively attach the side plate to the bottom. This won't prevent the sag, but it will prevent the bottom from sagging and slipping out of the press fit sides and falling.
To my eye, the sag is minimal and I'm not worried about it now that I have the sides attached to the bottom plate.
Here's a few pics of it...

.jpg")
.jpg")
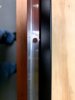
As far has the holes in the "ears", I used an ear from another piece of my equipment to mark the hole location. I only drilled one hole because I wanted to verify proper spacing and location in the rack before drilling the second one on each side. The location where this is going is my second home and most of my shop tools are at my primary home. I'll be test fitting it later this week.
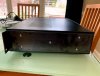
Here's a pic of the other side(from above pic). I still have to disassemble one more time to drill said second holes on the ears and paint the rails.

Listening impressions yet to come...
Let me start by saying I'm not great at documenting a process and even worse at taking pictures. And, I'm more of a shade tree mechanic than I am an engineer or machinist. I wasn't looking for perfection and I'm not looking to enter my solution in a beauty contest. With that being said...
This was done with basic hand tools with maybe the exception of a tool & die set to tap the holes for the machine screws and a drill press. The drill press will make your life easier but isn't required.
First, I have my equipment mounted in a communications equipment rack in a closet. From inside vertical rail to inside vertical rail is about 17 1/4", thus I asked for the 17" case. You need to check the dimensions of your rack and adjust accordingly.
The material I used to make the rack rails is 1/8"x3"x3ft weldable flat steel stock from a big box store. These are about $15ea.
Here is a pic of the ident sticker on the one I used.
I went to a machine/fabrication shop and had them bend both ends of the stock 90 degrees with 7/8" inside measurement. That means from the end of the stock to the 90 degree bend on the inside of the bend is 7/8". This will make the "ears"of the rail. Cost me $15 to have two pieces bent(remember I'm doing two amps).
Here's a pic of the rail with the cut lines marked(black lines) along with some tools I used to get there. I removed one side of the amp case(the black piece lying above the steel rail) to use for measuring. I simply placed it up against the inside of the bend and marked the other end of the case side piece then used the square to make a straight line. I used a reciprocating saw with a metal cutting blade to cut the pieces at my black lines. You could also have the same machine/fabrication shop cut them for you.
A word about these cases. The two side pieces are essentially what holds the entire thing together. Thus, I would not recommend removing both end pieces at the same time. And of course you shouldn't be drilling into any parts of the case with it still together. We don't want metal shavings mixed up with our electrical equipment.
I decided to use 5 screws in the side rail to secure it to the case side. The side pieces are exactly 12" long so I put one screw dead middle and 2 each 2" in from the end of the piece. I used #8-32 x 3/4" machine screws, thus I used a #8-32 tap and appropriate drill bit for this tap to drill and tap the five holes in the both pieces. I used a vice grip clamp to clamp the two pieces together and drilled/tapped them at the same time.
Here's a finished view of one of the sides.
There has been concern about the bottom of the case "sagging" if it were rack mounted. The steel gauge of the top and bottom is pretty lite and would indeed sag just a tad. There is a foot placed in the middle of the bottom case plate so when sitting on a shelf, this isn't an issue.
The way the sides of the case "attach" to the top and bottom plates is a press fit between a lip that is machined into the side. The inside of the lip is roughly 1/2" so I decided to use that to drill and tap two screws on each side to the bottom of the case to positively attach the side plate to the bottom. This won't prevent the sag, but it will prevent the bottom from sagging and slipping out of the press fit sides and falling.
To my eye, the sag is minimal and I'm not worried about it now that I have the sides attached to the bottom plate.
Here's a few pics of it...
As far has the holes in the "ears", I used an ear from another piece of my equipment to mark the hole location. I only drilled one hole because I wanted to verify proper spacing and location in the rack before drilling the second one on each side. The location where this is going is my second home and most of my shop tools are at my primary home. I'll be test fitting it later this week.
Here's a pic of the other side(from above pic). I still have to disassemble one more time to drill said second holes on the ears and paint the rails.
Listening impressions yet to come...
Attachments

Last edited:
")